
Top 5 Outdoor Planter Anchoring Solutions: Proven, Safe & Effective?
Outdoor planter anchoring fails when wind, crowds, and theft meet weak details. U keep planters upright with clear rules, fast hardware, and a one-page sign-off that holds under audit.
U keep planters upright by pairing the right ballast with the right anchor, adding a layered drainage stack, locking anti-theft hardware, and closing with an installer checklist signed on site—this is outdoor planter anchoring done right.

U get these rules from hard sites—hotel terraces, wedding plazas, mall atriums. Below shows what works, where it fails, and how your team can run outdoor planter anchoring with speed and proof. For outdoor materials and UV choices, see full-sun faux plants.
1) Ballast Choices for Outdoor Planter Anchoring: plates, sand, concrete cores?
Wind pushes tall planters hard. Crowds add knocks. U size ballast before U choose anchors. Match dead loads to the slab and the roof.
Use steel or stone plates for frequent moves, kiln-dried sand for hidden mass and low cost, and concrete cores for permanent weight. Confirm structural limits before U add mass to any outdoor planter anchoring plan.
Risk first. Walk the site. Check wind, edge zones, roof height, narrow paths. Ask for structural limits in kg/m² or psf. Choose ballast that gives stable mass without breaking rules.
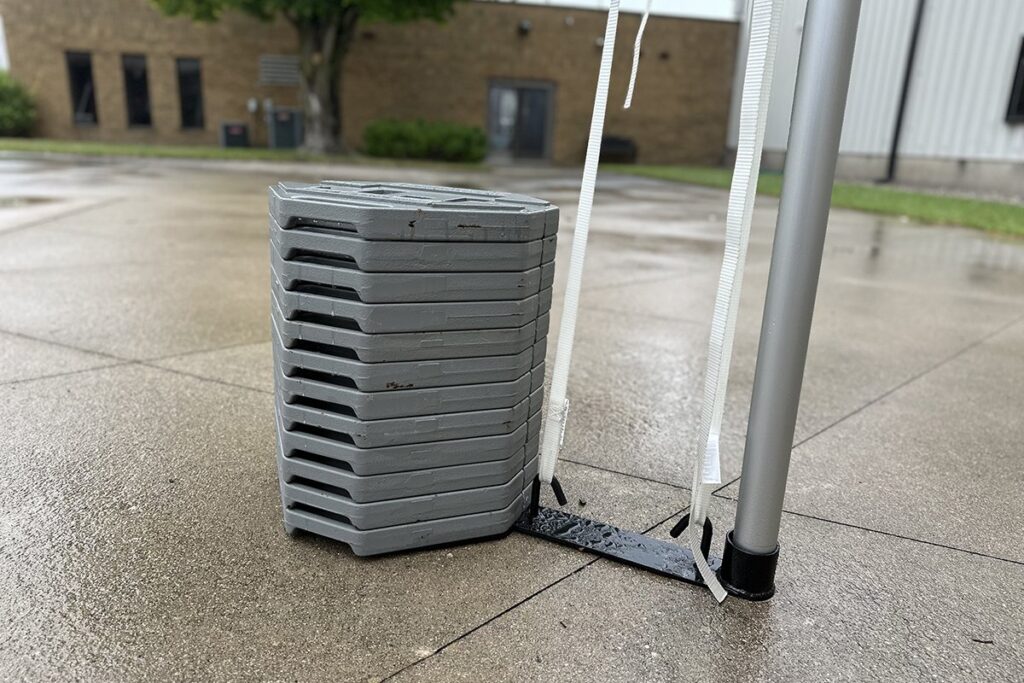
- Steel/stone plates. Slide 8–20 mm plates into a base tray. Stack to tune weight. Add neoprene to stop rattle. Easy re-sets for mall atriums and event floors.
- Kiln-dried sand. Pour into a sealed liner for invisible mass and low cost. Tape seams to stop leaks. Great where U want no metal near AV or sensitive finishes.
- Concrete cores. Use removable buckets or pre-cast blocks with grips for long-term installs. Keep mass low and wide. Treat cores as semi-permanent.
Handling. Print mass per unit on the work order. Plan lift points and center of gravity. If the planter is tall/narrow, add an inner sleeve to lower weight and widen the base inside the shell. Label final mass under the lip and in the asset list to speed safety audits.
2) Anchors & Bracing for Plazas, Rooftops, Malls
Some sites need more than mass. Add mechanical anchors or braces when staff, wind, or theft push limits. Protect membranes and pavers at all times.
Use non-penetrating mass on sensitive roofs, expansion or adhesive anchors in concrete slabs, and brace points to parapets/railings where allowed. Protect membranes with pads and pedestals.

Pick from three families
- Non-penetrating. Combine ballast with high-friction pads. Add concealed cross-bars to lock planters together. Run a hidden spine across rows so a crowd can’t rotate a single unit.
- Penetrating (owner-approved). Drill only into solid concrete with sign-off. Use stainless wedge anchors or structural adhesives with sleeves. Torque to spec, cap tops with gasketed washers. Never anchor through pavers without a structural plate below.
- Hybrid bracing. Discreet braces to parapets/rails with rubber isolators and quick-release pins for service. Confirm guardrail loads before attachment.
Egress & verification. Keep planters out of door swings and exits. Maintain ADA widths and maintenance paths. Pull-test one anchor per zone, record torque, and photo each fastening point for closeout.
3) Drainage Stack: geotextile, risers, overflow ports
Water adds weight and damage (smells, stains). Control water with a simple stack that works for live or faux displays.
Build a clean stack: geotextile over a drain bed, risers under the liner, and side overflow ports at a fixed height. Test with a hose before hand-off and log the video.
- Base & protection. Protection mat under each planter on membranes/pavers. Use pads that resist compression. Keep edges clean so water flows.
- Drain bed. Perforated spacer or plastic drain grid (avoid loose gravel). Wrap with geotextile so fines stay out of holes.
- Risers. Lift the inner pot/liner to create a gap for water to move to the outlet. Use three or four risers so staff can lift later.
- Overflow. Side ports a few centimeters below media, face them to service aisles. For high-rain roofs, add a slotted standpipe to control the water line.
- Filter & media. Geotextile on risers to stop fines. For faux greenery, use inert media or capped inserts; avoid open cavities that hold dirty water.
4) Anti-Theft & Public Safety
Open sites invite tampering; busy malls need safe edges. Design anti-theft early, not on the last day.
Use tamper-resistant bolts, hidden cross-bars, security cables, and shear nuts. Add setback, edge radii, and lighting checks. Log serials. Audit quarterly.
- Lock shell and liner together with an inner bar; drive security screws from inside the liner and cap recesses.
- Link neighbors with concealed plates so one person cannot spin a unit; add discreet cables to structural points.
- Reduce grab points; choose profiles with soft corners, matte textures, and top edges below handrail level near drops.
5) Installer Briefing & Sign-Off (one-page checklist)
Good installs start with a short brief. Great installs end with proof. Run one page that saves calls and protects everyone.
Use a single page: site limits, method, torque, water test, photos, labels, and signatures. Keep copies with facilities. Store digital files with asset IDs.

Brief before day one
- Scope. Count, sizes, zones with a simple map.
- Substrate. Slab, pavers, or membrane; add load limits and no-drill zones.
- Method. Ballast type and anchor type with part numbers.
- Protection. Pads, pedestals, isolation layers.
- Drainage. Geotextile type, riser height, overflow plan.
- Safety. Working hours, barriers, egress rules.
Close with checks
- Torque. Record values for each anchor set with tool serial.
- Pull/push test. Record the test unit ID and pass/fail.
- Water test. Run a 2-minute hose test on one planter per zone and save video.
- Photos. Shoot the base, the anchor, the overflow, and the label.
- Labels. Print asset IDs with mass and method and place them under the lip.
- Signatures. Installer, facility lead, and your PM sign and date.
Conclusion
Outdoor planter anchoring works when ballast, anchors, drainage, and anti-theft meet a signed checklist. U design once, install fast, and sleep well during storms.
FAQs (B2B)
1) How do U size ballast for outdoor planter anchoring?
Walk the site, capture wind exposure and structural limits (kg/m² or psf), then pick the ballast type—steel/stone plates, kiln-dried sand, or removable concrete cores. Keep the center of gravity low, spread weight across the footprint, and document final mass per unit and per zone.
2) Can U anchor planters on a membrane roof?
Avoid drilling. Use non-penetrating mass, protection pads, and interlinked planters. If a fix is unavoidable, involve the roof consultant, submit details, and use compatible pedestals/isolators with validated load paths.
3) What torque should U record for anchors?
Follow the fastener manufacturer’s spec for the substrate. Record torque values, tool model/serial, location, and date. Photograph each fastening point and store with the asset file for closeout and audits.
4) Where should U set overflow ports?
Place side overflows a few centimeters below media level and face them toward service paths. Run a hose test before hand-off to verify flow direction and prevent staining. For high-rain roofs, consider an internal slotted standpipe to control the waterline.
5) How do U lower theft and tampering risk?
Use tamper-resistant bolts, inner cross-bars tying shell to liner, concealed plates linking adjacent planters, and shear nuts where appropriate. Add discreet security cables to structural points. Keep edges/radii public-safe. Log serials and inspect quarterly.
6) What if the slab cannot take heavy ballast?
Reduce per-unit mass, widen the internal base, interlink rows to share load, or add discreet bracing to approved structure. Engage the engineer to validate alternate load paths before install.
7) Do faux-plant installs still require drainage?
Yes. Rain adds weight and can cause odor/staining. Build a stack: protection mat, drain grid, geotextile filter, risers under the liner, and side overflow ports. Test with a hose and keep the clip in the closeout file.
8) Can ballast be reused after relocation?
Plates are the fastest to reuse and tune. Sand moves with sealed liners—recheck seals after re-install. Concrete cores require lifts and planned grip points; treat them as semi-permanent components.
9) How often should outdoor planter anchoring be inspected?
Quarterly for most public sites. Scan asset labels, re-torque anchors, verify cable crimps and link plates, and refresh photos. After major storms or crowd events, do an extra spot check.
10) What documents close the job?
A one-page installer checklist (scope, method, torque, water test, photos, labels), torque records, pull/push-test results, hose-test video, and a searchable asset list with IDs, locations, and final mass. Store copies with facilities and your vendor.
Helpful links
- ICC (wind basics)
- NRCA (roofing field guides)
- ASLA (site planning resources)
- Contact for drawings & SKUs
References (selected)