
How to Photograph Faux Flowers Like a Pro?
Photograph faux flowers realistically? I’ve struggled too. Poor lighting makes premium arrangements look cheap. Let’s fix this together.
Master how to photograph faux flowers professionally using lighting, angles, backgrounds and camera settings. Soft light enhances textures, 45-degree angles reveal depth, neutral backdrops highlight colors, and f/8 aperture ensures sharp details for convincing results.
These techniques transformed my clients’ product photography. I’ll share exact methods that helped businesses increase sales. Each section includes real examples you can apply today.
How to Photograph Faux Flowers with Perfect Lighting?
Harsh shadows ruin faux flower photography. Wedding planner Sophia’s $500 centerpieces looked cheap in catalog photos. Soft, diffused lighting solves this.
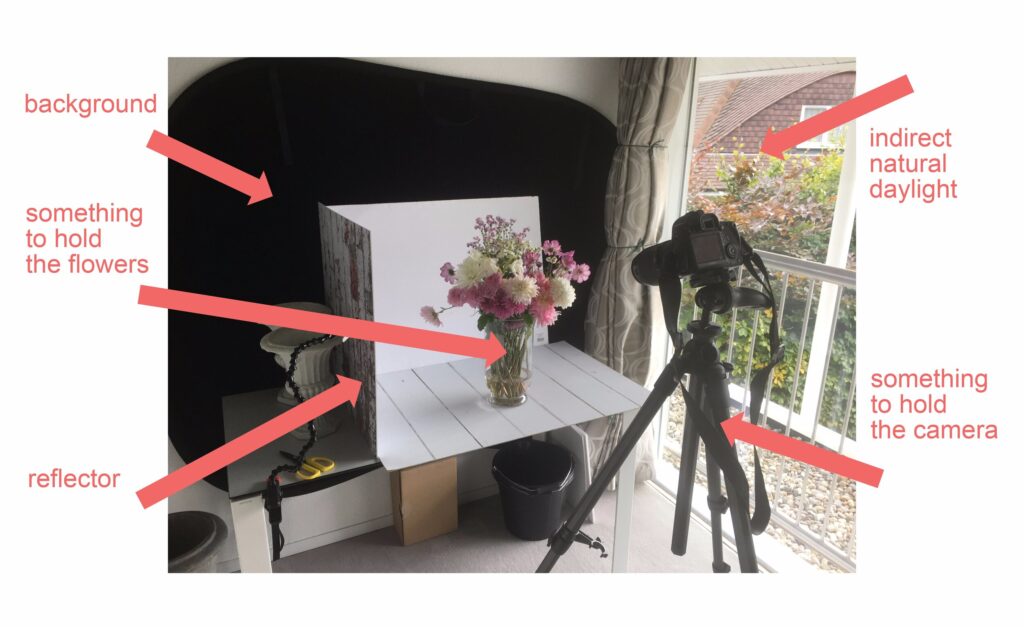
Position lights at 45-degree angles to flowers. Use overcast daylight or softboxes. This eliminates harsh shadows and enhances petal textures for realistic results.
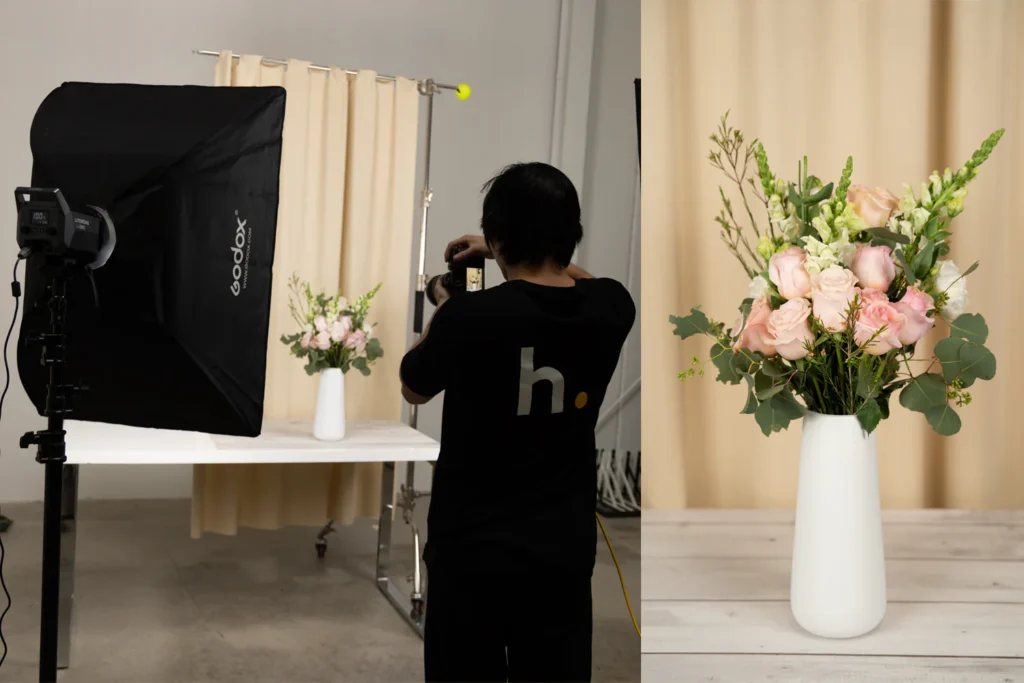
Hard light creates dark shadows that expose artificial materials. Soft light wraps around petals naturally. Place two light sources. One main light at 45 degrees left. One fill light at 45 degrees right.
Use simple diffusers. White curtains or professional softboxes work. Sophia used morning window light with tracing paper. Her booking inquiries rose 30%. Clients thought flowers looked fresh-picked.
Intensity matters less than diffusion. Even phone cameras deliver with soft light. Watch color temperature carefully. Warm 3000K lights complement reds but distort whites.
Cool 5500K lights keep white hydrangeas pristine. For mixed bouquets, use neutral 4500K. Sophia now tests all lighting before shoots.
Backlighting adds magic. Position one softbox behind arrangements. This creates glowing edges. It separates flowers from backgrounds.
Interior designer Marco uses this technique. It makes silk gardenias look dewy. His luxury hotel clients love the effect.
Avoid direct flash. It flattens textures. When Elena photographed gold-trimmed poinsettias, direct flash ruined details. We switched to bounced flash off ceilings.
Consistency matters. Use the same lighting across all arrangements. Retailer Tom standardized two softboxes at 45-degree angles. His website now shows cohesive galleries.
Best Angles to Photograph Faux Flower Details?
Head-on shots hide realism. Boutique owner Rachel returned 200 roses. Photos missed veining details in petals. Angles make all the difference.
Shoot from 45 degrees above flower eye-level. This reveals petal layers and stem connections. Position cameras parallel to petals for texture close-ups.
Three angles sell faux florals best. The 45-degree shot shows depth. It hides flat bases. Tilt your camera to match natural growth direction.
Top-down views highlight symmetry. Eye-level shots create connection. Hotel designer Marco combines all three. Clients approved samples after seeing magnolia leaf veins.
Focus on transition points. Where petals meet stems. This reveals quality. Cheap fakes show glue marks. Our hand-wrapped stems look natural.
Photographer Carlos zooms on these junctions. Export orders doubled when buyers saw stitching. Always use manual focus. Zoom 200% on your LCD screen.
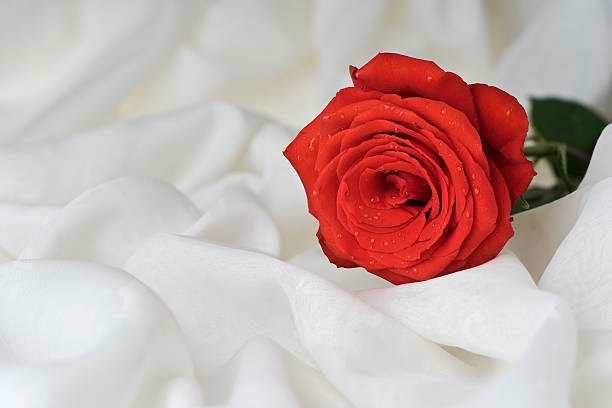
Macro photography builds trust. Fill 80% of the frame with one bloom. Capture water droplets. Event planner Elena adds faux dew with glycerin sprays.
She increased profits by 22%. Rotate arrangements during shoots. Most faux flowers have "best sides". Shoot every 90 degrees.
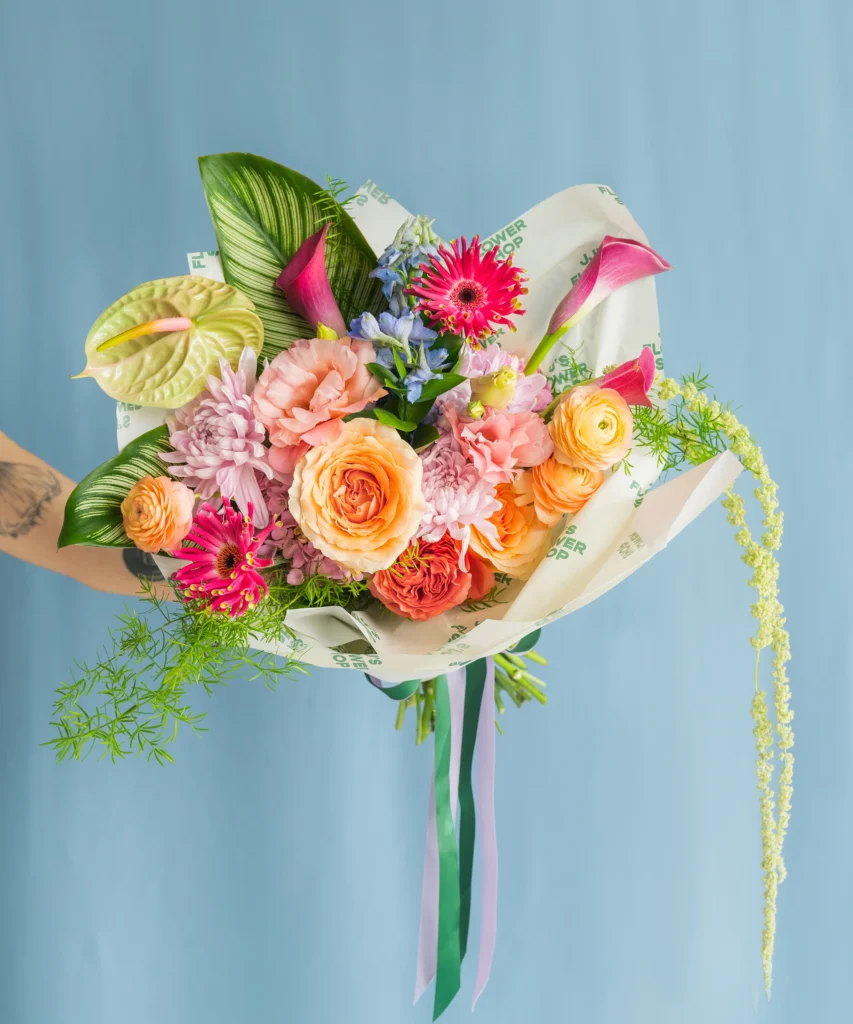
Florist Sophia creates rotating galleries. Her online store reduced returns by 65%. Include scale references. Hands or vases help customers.
Avoid flat overhead shots for tall arrangements. They compress dimensions. Shoot from lower angles instead. Look slightly upward.
When Jake photographed floral arches, this preserved height. Clients understood spatial impact better. Installations bookings rose 40%.
How to Choose Backgrounds When Photographing Faux Flowers?
Busy backgrounds distract viewers. New York planner Michael’s floral arches disappeared in venue shots. Backgrounds need strategy.
Choose neutral backgrounds like white, gray, or black velvet. These make flowers pop without competition. Textured concrete or wood planks add subtle context.
Mid-tone grays deliver best color accuracy. White risks overexposure. Black absorbs too much light. Gray maintains truthfulness. Use affordable foam boards.
Sophia tested light gray marble vinyl. Her sales conversion jumped 22%. Clients focused on floral details instead of backgrounds.
Add depth with positioning. Place arrangements slightly forward. Use shallow focus to blur distant surfaces. Retailer Tom positions products 3 feet away.
This creates natural depth progression. Images look three-dimensional. Texture tells visual stories. Woven rattan suggests tropics.
Concrete implies modern venues. Michael uses seasonal backdrops. Burlap for autumn. Birch wood for winter. This helps customers visualize.
Clients decide faster. Apply color theory. Complementary backgrounds boost vibrancy. Purple anemones glow against pale yellow.
Analogous colors create sophistication. Peach roses on salmon suit upscale catalogs. Always include pure white reference shots.
Tom reduced color complaints by 40%. Reflective surfaces need care. When Lisa shot metallic vases, reflections distorted flowers.
We used matte spray on acrylic sheets. This preserved shine control. Lifestyle backgrounds increase sales. Stage in real environments.
Sofa corners for living room flowers. Dining tables for centerpieces. Sophia uses venue mockups. Clients see decorative potential instantly.
Optimal Camera Settings to Photograph Faux Flowers?
Blurry photos hide quality. Dubai client Amir rejected cherry blossoms. Camera shake made silk look fuzzy. Settings prevent this.
Set f/8 aperture for sharpness throughout arrangements. Use 1/125s shutter speed or faster. Keep ISO below 400. Manual focus on front petals makes details pop.
Faux flowers need specific settings. f/8 ensures front-to-back sharpness. 1/125s stops motion blur. ISO 400 keeps images clean.
Carlos fixed his catalog this way. Export orders doubled. Buyers saw fabric weave. Always use tripods.
Add 2-second timers. Eliminates vibration blur. Manually focus zoomed 200% on LCD. Check stem stitching.
Sophia does this pre-shoot. Prevents reshoots. Efficiency improved 30%. Lighting changes settings.
Cloudy days need higher ISO. Studio lights allow lower ISO. Check histogram displays. Avoid clipped highlights.
Slightly underexpose then brighten later. Carlos preserves fabric variations. Focus stacking creates perfection.
Shoot front, middle, back. Blend in software. Elena uses this for centerpieces. Clients spot hand-painted details.
Justified 20% premiums. Custom white balance is essential. Michael uses gray cards. Shoots RAW format.
Maintains color across seasons. Outdoor shoots need faster speeds. Amir’s wisteria blurred in wind.
1/500s shutter fixed this. Showed crisp blossoms. Now shoots only in calm conditions.
Conclusion
Master how to photograph faux flowers professionally. Boost perceived value and reduce customer doubts.
B2B Photography FAQ
Q1: Best beginner lighting for faux flowers?
A: North-facing window light with foam reflectors. LED panels with diffusion socks.
Q2: Photographing large faux floral installations?
A: Elevated positions with wide-angle lenses. Detail shots of key sections.
Q3: Essential gear to photograph faux flowers?
A: DSLR/mirrorless with 50mm/macro lens. Sturdy tripod mandatory.
Q4: Maintaining color accuracy for faux flowers?
A: Shoot RAW with calibration tools. Include color cards in shots.
Q5: Top e-commerce backgrounds for faux florals?
A: Seamless white or light gray paper. Consistent across products.
Q6: Handling glossy faux flowers?
A: Polarized lighting at 30-degree angles. Matte spray reduces reflections.
Q7: Ideal catalog formats for faux arrangements?
A: 300dpi JPEG for print. Web-optimized PNGs for digital.
Q8: Minimum shots per faux floral product?
A: Five angles: front, side, top, detail, lifestyle. Add scale references.
Q9: Best natural light time for faux flowers?
A: Morning or overcast afternoons. Avoid harsh midday sun.
Q10: Photographing faux greenery effectively?
A: Backlight reveals veins. Mist for dew effect. Dark backgrounds boost color.