
11 Smart Fillers for Fake Plant Pots That Look Real (And Cut Labor)?
Empty pot tops look fine in a showroom, then a
hotel lobby
spotlight hits them and the foam shows. Your team spends hours fixing it on site, and your client thinks the display is “cheap.”
You solve what to fill fake plant pots with by using 11 realistic fillers that hide foam fast, add weight, lock stems, and reduce cleaning time—so your installs stay premium with less labor.

If you manage installs like Sophia does, you already know the pain. A planter can look perfect at delivery. Then guests walk by, air vents blow, and stems shift. I learned to treat pot filling like a small engineering job. When I control the top layer, I control realism, safety, and maintenance.
When your team asks what to fill fake plant pots with, you do not want ten opinions. You want one repeatable stack that works across locations. I use the same decision flow on hotel projects, retail chains, and corporate offices.
I also track labor in minutes, not feelings. A good top finish should take 10–18 minutes per pot for a trained team. If it takes longer, the method is too complex for real commercial work. This is the fastest way to decide what to fill fake plant pots with without burning margin.
On every kickoff call, I set expectations. I tell buyers that what to fill fake plant pots with is not “decoration.” It is a control point for guest photos, safety, and housekeeping cost. That one sentence helps teams stop treating the pot top like an afterthought.
I also ask one simple question before I quote labor. I ask, “Do you want a photo-perfect top for day one, or do you want a stable top for day ninety?” The answer changes what to fill fake plant pots with and it changes the filler stack.
If you want faster alignment inside your team, I recommend you write one short line into your install SOP: “We decide what to fill fake plant pots with before delivery day.” This saves real labor on commercial projects.
Why “Empty Top Soil” Looks Cheap in Hotel Lobbies?
A fake plant can look premium, then one empty top surface ruins the whole illusion. Hotel guests notice the base first because it sits at eye level when they check in.
Empty top soil looks cheap because it exposes foam, glue, and gaps, and it reflects light in a flat way. A layered top surface hides the “factory” signs and makes the plant look planted.

What people actually see first
I worked with Sophia on a boutique hotel refresh. She chose tall faux olive trees. The leaves were realistic. The problem was the pot top. The supplier shipped trees with exposed foam and a thin layer of loose coco fiber. Under warm lobby lights, the foam looked gray. Guests took photos in that spot. The foam showed up in every photo.
The “cheap signals” empty tops create
- The foam edge becomes a bright ring.
- The glue lines look shiny.
- The stem entry holes look like a drill mark.
- The top is too flat, so it looks like a stage prop.
The hidden cost: cleaning and service calls
Empty tops do not stay empty. They collect dust, hair, and debris. Housekeeping will try to clean it. Then fibers lift and the foam shows again. The buyer pays twice. First in install labor. Then in maintenance labor. This is why my first question is not “what looks good.” My first question is what to fill fake plant pots with so it still looks good after 30 days.
The fix I use on commercial installs
I always build a top surface in three layers. I keep it simple and repeatable, because the labor cost matters. This layered approach also gives the most stable answer to what to fill fake plant pots with when the install is in a high-traffic space.
- Layer 1: lock layer (foam, mortar, or a plaster cap depending on weight needs)
- Layer 2: hide layer (moss, bark, or pebble to cover seams)
- Layer 3: realism layer (mixed texture and color, so it looks natural)
When I explain this to a hotel buyer, I say one sentence: the top surface sells the “real” story. If you control what to fill fake plant pots with, you control the first impression.
Which Fillers Hide Foam Fast (Moss/Bark/Stone)?
Foam is the enemy of realism. You can hide it in minutes if you choose the right surface materials and the right grain size.
The fastest fillers to hide foam are sheet moss, reindeer moss, fine bark, small pebbles, and mixed stone chips, because they cover gaps and kill shine without complex prep.
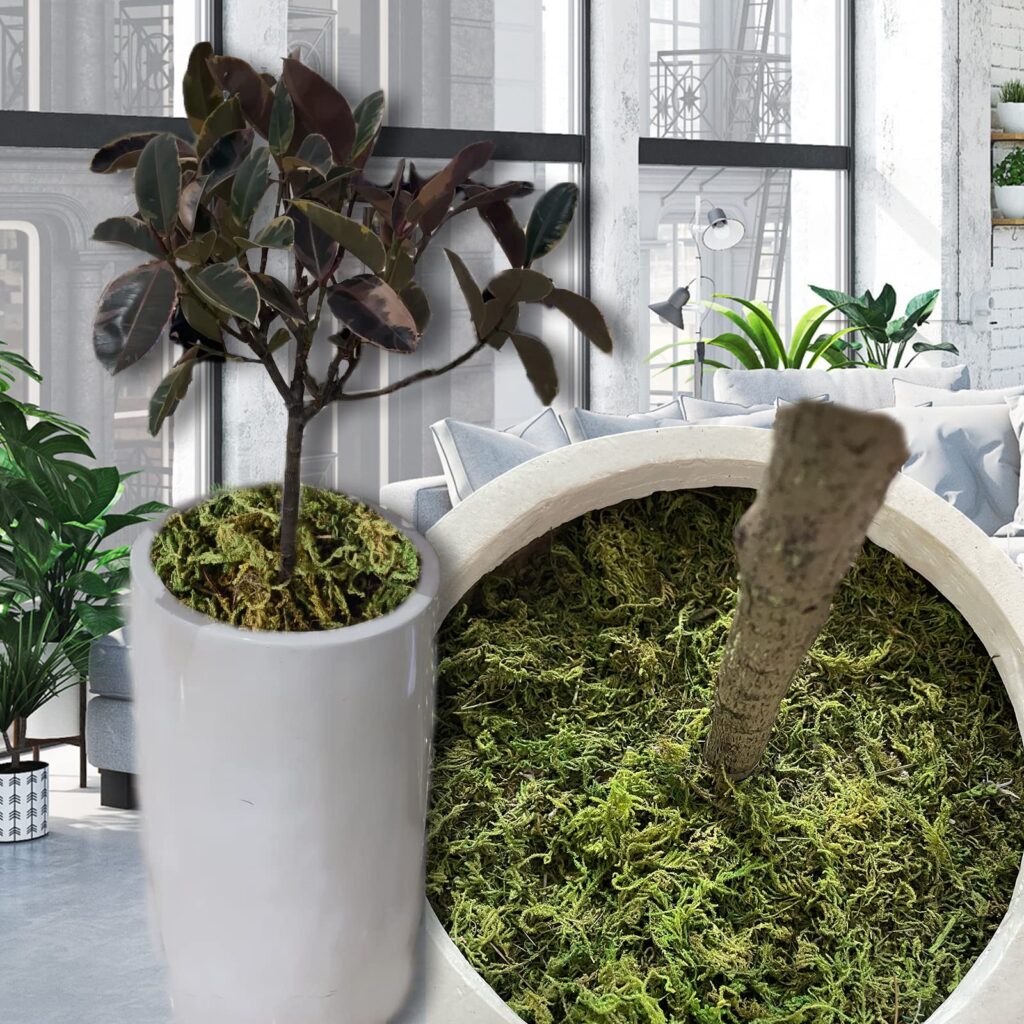
The 11 smart fillers I use most often
I group them by speed and realism. This helps buyers pick fast, not guess. It also keeps the answer to what to fill fake plant pots with consistent across many SKUs and many sites.
Fast “cover in 10 minutes” fillers
- Sheet moss (preserved)
I use this when the top is uneven. It hides foam seams fast. - Reindeer moss (preserved)
I use this when I need volume. It fills holes and hides glue marks. - Fine orchid bark
I use this when I want a dry, natural look. It hides foam without looking “green.” - Coco chips (small)
I use this for tropical looks. It covers large areas fast.
Clean “hotel-friendly” fillers
- Polished river pebbles (small/medium mix)
I use this for minimal, modern lobbies. It looks tidy and premium. - Crushed stone chips
I use this for outdoor covered areas and high-traffic zones. Chips lock together better than round stones. - Decor sand + stone mix
I use this when a pot is shallow. Sand alone looks flat, but sand + chips looks real.
Texture “real soil” illusion fillers
- Dark cork granules
I use this when I want a soil look without mess. - Coffee-ground colored granules (synthetic décor)
I use this for photo sets. It reads like soil but stays clean. - Dried bark flakes + moss mix
I use this when I want “forest floor” realism. - Leaf litter (dried décor leaves) as a top sprinkle
I use this as a final realism touch. I never use it as the full layer.
How I choose the grain size (this is where “real” happens)
Most failures happen because the filler size does not match the pot scale. Large stones in a small pot look fake. Powdery sand in a tall lobby pot looks like a display tray. I use one rule. The largest visible piece should be smaller than the width of the main trunk by a clear margin. This keeps the surface believable in photos.
The fastest 2-step method for rushed installs
When a buyer calls me and says, “We have two hours,” I do not debate. I use a two-step method. First, I cover seams with sheet moss. Then I top it with small pebbles or fine bark. This quick method answers what to fill fake plant pots with when speed matters more than perfect layering.
A real client story about speed
Sophia once had a last-minute event setup. Her team had 24 planters to refresh. The plants were fine, but foam showed in half of them. I told her team to use sheet moss to cover seams, then add a thin bark layer, then finish with small pebble accents. They finished in one afternoon. They saved a full day of labor. That is why I like fast fillers when buyers ask what to fill fake plant pots with.
External reference for filler ideas
If your team wants a visual list of pot fillers for large planters, this reference helps you compare textures and sizes:
https://thepotterypatch.com/pot-fillers-for-large-pots/
Which Fillers Add Weight So Pots Don’t Tip?
A pot that tips is not just ugly. It is a safety problem. It can also become a claim problem if a guest trips or a display falls during an event.
The best fillers to add weight are pea gravel, crushed stone, sand in sealed bags, and a concrete or plaster cap under the top layer, because they lower the center of gravity and stop wobble.

How I decide how much weight is enough
- I push the pot rim with one hand.
- I push from two directions.
- I watch if the base slides or rocks.
- I check if the stem “lags” and then swings.
If it rocks, it needs a heavier base. If it slides, it needs friction under the pot. This is also how I decide what to fill fake plant pots with when liability matters in public spaces.
The clean commercial method: sealed weight packs
I prefer sealed packs because housekeeping will not spill them. A sealed pack can be sand, gravel, or mixed stone. I place the pack at the bottom, then I add a cap layer. This makes the weight stable and service-friendly.
How I prevent “weight noise” and sliding
Loose stones can rattle inside thin pots. This sounds minor, but hotel staff notice it. I add a soft liner under the weight pack, and I add a non-slip pad under the pot. This small step protects the floor and protects the display. It also supports what to fill fake plant pots with as a full system, not a single material choice.
Cap options and when I use each one
- Foam cap: fast and light, best for retail displays that move often.
- Plaster cap: strong, clean, and stable, best for hotel lobbies and offices.
- Mortar cap: strongest lock, best for tall trees and high-traffic corridors.
A real client story about tipping
Sophia installed tall faux trees in a lobby near a revolving door. Air flow was strong. Two trees tipped in the first week. The hotel manager was not happy. I changed the base. I added sealed gravel packs at the bottom, then a plaster cap, then a stone top dressing. The problem stopped. The hotel stopped calling. That is why weight is part of what to fill fake plant pots with. It is not only about looks. It is about safety and service calls.
Internal link for outdoor stability thinking
If your projects include outdoor planters, this approach connects well with long-life base layouts:
How to Plant Artificial Flowers in Pots: 7 Outdoor-Pro Layouts That Don’t Tip, Fade, or Look Fake
How U Lock Stems So Arrangements Don’t Shift?
A premium topper can still fail if stems shift. When stems shift, the arrangement looks messy. It also creates “bald” spots where foam shows again.
You lock stems by using a hard cap layer, a grid or anchor system, and a repeatable insert depth, so each stem has friction and cannot rotate or lift under handling.
The stem shift causes I see most
- The foam is too soft, so holes expand.
- The stem wire is smooth, so it slides.
- The plant crown is heavy, so it pulls when bumped.
- The top dressing is loose, so it moves with vibration.
The locking method I use (repeatable for teams)
Step 1: set an anchor layer
I use a foam block for fast work, a plaster cap for clean stability, or a mortar cap for heavy trees.
Step 2: create a simple grid
I use plastic grid sheet, metal mesh, or a cut plate with holes. The goal is repeat spacing.
Step 3: control insertion depth
I set a target depth and keep it the same across pots. The canopy stays even.
Step 4: lock rotation
I lock entry points with hidden glue or an internal clamp, then I cover it with moss or bark.
The “no-movement” test I use before delivery
I hold the pot at the base and I shake it lightly for five seconds. I watch the stem base, not the leaves. If the stem base moves, the pot top will fail in real life. This test helps me confirm what to fill fake plant pots with is not only decorative, but also functional.
How I standardize stem lock across many pots
On large projects, the biggest risk is inconsistency. One team member makes a strong base, another makes a weak base. I solve this with three simple standards: same cap thickness, same grid type, and same insertion depth. When these three are fixed, the answer to what to fill fake plant pots with becomes repeatable across many locations.
A real client story about shifting
Sophia once shipped a set of faux arrangements to a venue. The courier handled boxes roughly. The stems shifted inside the pots. When her team unpacked, the tops looked uneven. Foam showed in the center. She lost time on site.
I changed her method. I made her team build a thin plaster cap and use a grid sheet. The next shipment arrived stable. Her team saved labor on setup day. That is why I treat stem lock as part of what to fill fake plant pots with. If you only dress the top, you will be fixing it again.
Internal link for procurement controls
If you want a stricter control approach on bulk projects, this sourcing framework helps:
Artificial Flowers In Bulk: 9 Spec Rules That Prevent Color Drift, Crush Damage, and Returns
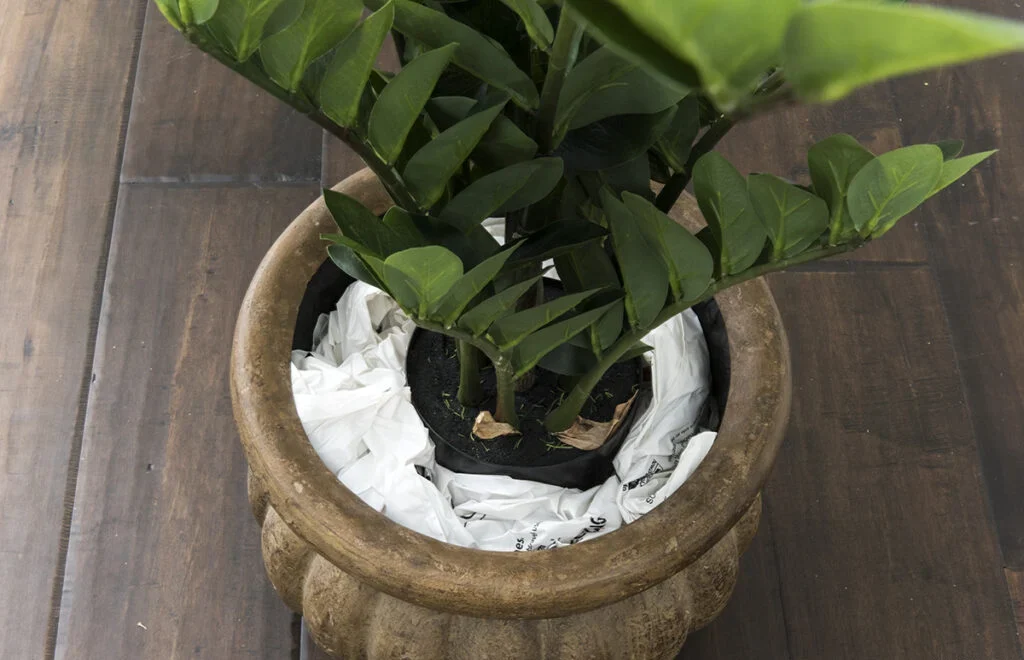
The 3 Mistakes That Create Dust Traps on Displays?
Dust turns a premium install into a maintenance headache. Many fillers look great on day one, then trap dust and become gray. That creates service calls and extra labor.
The biggest dust-trap mistakes are using fluffy moss as the only top layer, using sticky glue lines exposed to air, and using very light loose fibers that lift with HVAC airflow.

Mistake 1: moss as the full surface layer
I like moss, but I do not like it alone in high-traffic indoor spaces. Moss alone holds dust. Moss alone looks gray over time. Moss alone is hard to clean without damage.
I use moss only to hide seams. I finish with bark or stone on top. This is a key part of deciding what to fill fake plant pots with for long-term maintenance and fewer complaints.
Mistake 2: glue exposed
Glue lines catch dust and look shiny. That creates a “fake” signal fast. I keep glue under the top layer, and I cover entry points with small chips or bark.
Mistake 3: very light loose fibers
Coco fiber and light filler can lift and move. HVAC airflow can make the top look messy. I mix fibers with heavier chips, and I use a cap layer so the top does not shift.
A simple cleaning SOP that reduces labor
I set a basic SOP for clients. I keep it easy for housekeeping. Stone tops can be wiped. Bark tops can be vacuumed with a brush head. Moss tops should not be scrubbed. If a buyer wants fewer service calls, I guide them on what to fill fake plant pots with that matches their cleaning reality.
A real client story about dust maintenance
Sophia once installed planters in a hotel lounge near a bar. Dust and fine grease in the air settled on the moss tops. In one month, the tops looked dirty. The hotel asked for replacement. I rebuilt the tops with a bark and stone finish layer. The hotel cleaning team could wipe the stone. Calls stopped. That is why “easy to clean” is part of what to fill fake plant pots with. It is not only a design choice. It is a service cost choice.
External reference for display care standards
If your team needs a baseline for in-store plant care and handling habits that also apply to faux displays, this reference is useful:
https://aggie-horticulture.tamu.edu/ornamental/a-reference-guide-to-plant-care-handling-and-merchandising/in-store-plant-care-merchandising/
Send your pot size, plant height, and install location. I will reply with the exact filler stack and weight method your team can copy. If you want a fast decision on what to fill fake plant pots with, send one photo of the pot top and one photo of the whole display.
Conclusion
When you control what to fill fake plant pots with, you control realism, safety, and maintenance. A simple filler stack saves labor and protects your client experience.
FAQ (B2B)
- What to fill fake plant pots with for the fastest foam cover?
I use sheet moss to hide seams, then I finish with bark or stone chips so it stays clean. - What to fill fake plant pots with to add weight for tall trees?
I use sealed gravel packs or pea gravel at the bottom, then I cap with plaster before top dressing. - Which top layer looks most premium in hotel lobbies?
I use a mixed small pebble layer with a few darker chips, because it looks clean and high-end. - How do you stop stems from spinning over time?
I use a hard cap layer plus a grid, and I lock the entry point before covering it. - Which filler is easiest to clean for long-term displays?
I prefer small pebbles or stone chips, because staff can wipe or vacuum around them. - Does moss always create dust problems?
Moss traps dust when it is the full surface. I use it only to hide seams. - How do you avoid filler shifting during shipping?
I use a cap layer, keep the finish layer thin, and protect the top with a simple collar. - What filler works best for outdoor covered areas?
I use crushed stone chips, because they lock together and resist movement. - How thick should the top dressing be?
I keep it thin, usually 1–2 cm, because the cap layer should do the real work. - Can you standardize fillers across many projects?
Yes. I use a repeat stack: weight pack + cap + seam cover + finish layer, then I only change the finish look.