
DIY corsages become expensive and stressful when every set uses different flowers, improvised fasteners, unclear instructions, and components that cannot survive transport or repeated handling.
To build bulk-friendly DIY corsage sets with artificial flowers, standardize the design, limit flower choices, use modular mechanics, offer safe fastening options, pre-measure every component, create an assembly-line workflow, and package each set with numbered instructions. Test one complete sample before cutting or gluing the full order.
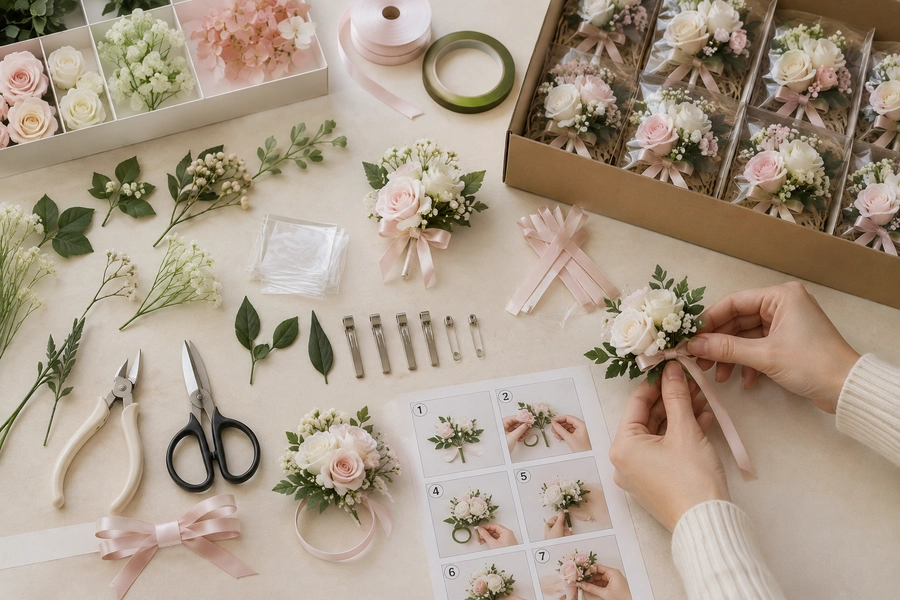
Artificial flowers make advance preparation possible because they do not require hydration or refrigeration. However, they still need realistic shaping, secure mechanics, comfortable sizing, compatible adhesives, and controlled packaging.
Are Artificial Flowers Good for DIY Wedding Corsages?
Artificial flowers are especially practical when many relatives, bridesmaids, volunteers, retailers, or event staff must assemble matching corsages before the wedding day.
Artificial flowers work well for bulk corsage sets because they can be prepared early, color-matched across a complete order, reshaped after packing, and stored without floral coolers. They also allow damaged components to be replaced before the event instead of waiting for fresh inventory.
Afloral advises unpacking faux stems, opening compressed blossoms, and bending wired stems into more natural shapes. Those steps matter in corsage work because a flower that remains attractive in a vase may still look flattened when viewed closely on a wrist or jacket.
Artificial corsages are not automatically easier, however. Common problems include:
- Corsages that are too wide for the wrist
- Heavy flowers that rotate underneath the arm
- Exposed wire
- Glue visible between petals
- Identical flower heads facing forward
- Scratchy stem ends
- Loose magnets
- Ribbon that frays during assembly
- Mixed components packed without labels
- Instructions that assume previous floral experience
A successful kit prevents these problems before the customer opens it.
What Should a DIY Artificial-Flower Corsage Kit Include?
The kit should contain enough components to finish one approved design without asking the user to measure, improvise, or purchase specialist mechanics.
Each corsage set should include a prepared base, focal flower, supporting flowers, foliage, binding material, approved adhesive or fastening wire, decorative ribbon, finishing cover, identification label, and illustrated instructions. Add one or two spare small components to bulk packs rather than overfilling every individual kit.
Core Kit Checklist
| Component | Recommended Purpose |
|---|---|
| One focal flower | Creates the visual center |
| Two or three small supporting blooms | Adds color and depth |
| One or two foliage pieces | Frames the flowers |
| One texture accent | Adds detail without crowding |
| Wristlet, pin base, cuff, or clip | Attaches corsage to wearer |
| Floral tape or binding material | Secures and conceals mechanics |
| Wire where required | Reinforces stems or forms a base |
| Approved floral adhesive | Attaches lightweight components |
| Ribbon or decorative cover | Finishes the rear and edges |
| Alcohol-free cleaning wipe for tools, where suitable | Prepares reusable work surfaces |
| Numbered component card | Prevents assembly errors |
| Step-by-step guide | Standardizes the result |
| Small packaging tray | Protects the finished corsage |
FloraCraft states that floral tape can wrap, join, and conceal artificial, dried, or fresh flower stems. OASIS describes its stem wrap as self-sealing and suitable for finishing corsages.
The exact kit contents depend on whether the corsage is:
- A wrist corsage
- A pin-on corsage
- A magnetic corsage
- A bracelet-style cuff
- A ribbon-tie corsage
- A shoulder or handbag accent
Do not use one attachment system for every wearer without checking comfort, clothing, age, and medical considerations.
What Are the 7 Proven Ways to Build Bulk-Friendly DIY Corsage Sets?
The best bulk system removes unnecessary choices after production starts.
The seven proven methods are to create one master design, restrict the flower recipe, build a modular flat-backed structure, offer controlled attachment options, pre-cut and label every component, organize assembly as repeatable stations, and package each corsage for transport, identification, and fast wedding-day distribution.
Way 1: Approve One Master Corsage Before Buying in Bulk
A mood board is not a production specification.
Build one complete corsage using the actual flowers, wristlet, tape, wire, ribbon, and adhesive planned for the order. Wear it for a movement test, photograph it from every angle, weigh it, measure it, and then freeze the approved recipe before preparing the remaining kits.
Record the Master Sample
Document:
- Finished width
- Finished length
- Maximum height above the wrist
- Total weight
- Focal-flower position
- Number of blooms
- Number of foliage pieces
- Ribbon length
- Wire length
- Tape length
- Adhesive amount
- Drying or setting time
- Front and rear appearance
- Approved flower angles
- Packaging orientation
The master sample should be tested while the wearer:
- Walks
- Sits
- Raises the arm
- Holds a glass
- Hugs another guest
- Puts on a jacket
- Uses a handbag
- Dances gently
The test does not need to reproduce every wedding movement. It should reveal whether the design rotates, catches on clothing, exposes wire, or feels too heavy.
Create Three Acceptance Views
Photograph the approved corsage:
- From above
- From the side
- From underneath
The underside matters because bulk-made corsages frequently look finished from the front while leaving tape, glue, wire, or sharp stem ends visible at the back.
Freeze the Recipe
After approval, do not continue adding:
- Extra flowers
- New ribbons
- Different leaf types
- Unplanned beads
- Longer wire
- Heavier centers
Every additional component increases purchasing, sorting, instruction, assembly, and quality-control complexity.
Way 2: Limit Every Kit to One Focal Flower and Two Supporting Families
Too many flower varieties make bulk sets harder to match and easier to assemble incorrectly.
Use one focal flower, one smaller supporting bloom, and one foliage or texture family. Choose artificial flowers with short manageable heads, secure centers, flexible stems, and colors that remain consistent under the venue’s lighting.
Reliable Artificial Corsage Flowers
| Flower | Strength | Main Risk |
|---|---|---|
| Small rose | Familiar and versatile | Large roses become bulky |
| Ranunculus | Compact layered shape | Soft coatings may mark |
| Mini peony | Romantic volume | Can become too wide |
| Orchid | Elegant and lightweight | Center detail must look realistic |
| Hellebore | Natural muted color | Thin petals need protection |
| Small hydrangea cluster | Adds volume quickly | Dense cluster may dominate |
| Anemone | Strong center contrast | Center is vulnerable |
| Small dahlia | Structured focal bloom | Can sit too high |
| Baby’s-breath-style filler | Light texture | Cheap versions look plastic |
| Eucalyptus | Modern framing foliage | Pale leaves show glue |
| Ruscus | Clean directional foliage | Long tips may scratch |
| Fern accent | Soft outer edge | Fine leaves can tangle |
For most wrist corsages, I would avoid combining three large focal flowers. The result may photograph well on a table but become heavy and unstable once worn.
Use Several Bloom Stages
A believable artificial corsage may combine:
- One open focal bloom
- One partly open supporting flower
- One small bud
- One foliage line
The variation creates depth without increasing the number of product families.
Shape the Flowers Before Kitting
Artificial flowers can arrive compressed and may need individual petal and stem adjustment. Wired stems can generally be bent into the intended design line, but they should be reshaped gradually rather than folded sharply.
Prepare every flower before placing it into the kit:
- Remove loose threads.
- Separate compressed petals.
- Rotate repeated leaves.
- Check the flower center.
- Trim or reinforce the stem.
- Compare it with the master sample.
- Reject flowers with exposed glue or unstable heads.
The customer should be assembling the design—not repairing factory packing damage.
Way 3: Build a Flat-Backed Modular Structure
A corsage should sit against the wrist or garment rather than balance on a round cluster of stems.
Arrange components on a small flat structural base. Position the focal flower slightly off-center, keep the rear surface smooth, and direct foliage outward rather than underneath the wearer’s arm. Build the floral module separately before attaching it to the wristlet or garment fastening.
OASIS notes that floral adhesive can replace some traditional wiring and taping in corsages and small floral accents. Its professional guidance also describes combining a wired-and-taped basic structure with glued accent flowers where appropriate.
Why Modularity Helps Bulk Production
A separate flower module can be:
- Inspected before attachment
- Rotated to the best angle
- Used with several wristlet colors
- Replaced if damaged
- Packed flat
- Assigned to a specific wearer later
Three Useful Module Types
Wired-and-Taped Module
Best for:
- Heavier focal flowers
- Designs needing adjustable angles
- Corsages that may be transported repeatedly
- Users comfortable handling wire
Method:
- Reinforce short stems as required.
- Arrange the foliage base.
- Add supporting flowers.
- Position the focal bloom.
- Bind the stems.
- Cover wire with stretched floral tape.
- Flatten and finish the back.
Adhesive Module
Best for:
- Lightweight artificial flowers
- Flat wristlet disks
- Fast repetitive production
- Designs with very short stems
Method:
- Prepare a clean stable base.
- Dry-fit all components.
- Mark the focal position.
- Apply the minimum approved adhesive.
- Hold each component until secure.
- Allow full curing before handling.
- Conduct a pull test.
OASIS markets floral adhesive for corsages and small wearable accents, while its wristlet guidance describes attaching flowers and decorative elements to corsage bases.
Hybrid Module
Best for:
- Bulk weddings
- Large flowers plus light accent pieces
- Designs that need both structure and speed
Use wire and tape for the main skeleton, then use compatible floral adhesive for small foliage, filler flowers, or ribbon details.
Do Not Use Adhesive as the Only Plan Without Testing
Artificial flowers contain different plastics, fabrics, coatings, and paints. An adhesive that bonds one stem may peel from another.
Test the actual production components for:
- Bond strength
- Drying time
- Visible residue
- Discoloration
- Stiffness
- Odor
- Heat sensitivity
- Surface damage
Do not distribute adhesive into kits without including the product’s handling instructions and necessary safety information.
Way 4: Offer Controlled Wrist, Pin, and Magnet Options
A bulk-friendly guide should allow attachment choices without creating dozens of different designs.
Keep the floral module consistent and change only the fastening base. Use adjustable wristlets for most wrist corsages, guarded pins or purpose-made pin bases for garments, and magnets only after providing clear medical-device and small-component warnings.
OASIS offers adjustable wrap and hook-and-loop wristlets designed as bases for corsages and wearable floral accents. It also supplies corsage magnets intended for attaching floral designs.
Option A: Adjustable Wristlet
Best for:
- Mothers of the couple
- Grandmothers
- Bridesmaids
- Ushers
- Prom-style wedding accessories
- Guests wearing delicate clothing
Check:
- Minimum and maximum fit
- Edge comfort
- Closure security
- Skin contact
- Whether the flowers stay on top of the wrist
- Whether the base can be hidden
OASIS describes its hook-and-loop wristlet as adjustable and designed to provide a secure base for corsages.
Option B: Ribbon-Tie Wrist Corsage
Best for:
- Flexible sizing
- Romantic or soft styling
- Kits that do not use a manufactured bracelet
- Wearers who prefer an adjustable bow
The ribbon should be:
- Wide enough for comfort
- Long enough for secure tying
- Heat-sealed or otherwise finished at the ends
- Attached to a smooth flat module
- Tested so it does not rotate excessively
Include an illustration showing how tightly to tie it. A ribbon should be secure without restricting circulation.
Option C: Pin-On Corsage
Best for:
- Jackets
- Structured dresses
- Lapels
- Handbags
- Wearers who do not want flowers on the wrist
Use a purpose-made corsage pin or guarded pinning system. The guide should show the pin path and warn users not to pin blindly while the garment is being worn.
Pin-on corsages are less suitable for:
- Fine silk
- Very lightweight fabric
- Sheer material
- Loose knitwear
- Garments where pinholes are unacceptable
Option D: Magnetic Fastening
Magnets can reduce fabric punctures, but they require stricter safety controls.
Do not provide a magnetic corsage without warning that magnets may interfere with certain implanted medical devices. Offer a nonmagnetic alternative and keep loose magnets away from children.
FDA guidance warns that strong magnets can affect some pacemakers, defibrillators, and other implanted medical devices; its consumer guidance commonly recommends maintaining at least six inches of separation from affected implants. A wearable magnetic corsage may sit directly on the upper torso, so a pin, clip, or wristlet should be offered instead when there is any concern.
The kit should state:
Magnetic fastening: Do not use near a pacemaker, implanted defibrillator, neurostimulator, insulin pump, cochlear implant, or other device affected by magnets. Ask the wearer and follow their medical-device guidance. Use the supplied nonmagnetic alternative when uncertain.
This is a safety issue, not merely a design preference.
Way 5: Pre-Cut, Count, and Label Every Component
Bulk DIY becomes inefficient when forty people must measure the same ribbon or determine which leaf belongs to which design.
Convert the approved sample into a fixed bill of materials. Pre-cut ribbon, tape, wire, backing pieces, and stem lengths using templates or jigs. Place components in numbered groups that match the instruction guide.
Example Bill of Materials per Corsage
| Code | Component | Quantity |
|---|---|---|
| A1 | Focal artificial rose | 1 |
| A2 | Small ranunculus | 2 |
| A3 | Artificial bud | 1 |
| B1 | Eucalyptus leaf spray | 1 |
| B2 | Fine texture accent | 1 |
| C1 | Wristlet base | 1 |
| C2 | Flat module backing | 1 |
| D1 | Floral wire | 2 lengths |
| D2 | Floral tape | 1 measured strip or mini roll |
| E1 | Decorative ribbon | 1 cut length |
| E2 | Finishing ribbon patch | 1 |
| F1 | Instruction card | 1 |
| F2 | Name and role label | 1 |
Use Templates
Create simple templates for:
- Finished corsage width
- Stem-cutting length
- Wire length
- Ribbon length
- Foliage angle
- Focal-flower position
- Packaging cavity
A cardboard silhouette can reveal immediately when one corsage is too large.
Add Quantity Allowances at the Bulk Level
For a 24-corsage wedding, the purchase plan could include:
- 24 approved focal flowers
- 2 to 4 replacement focal flowers
- 48 supporting blooms
- 6 to 10 replacement supporting blooms
- Extra foliage from the same batch
- Additional wristlets in the most common size
- One extra roll of tape
- Spare wire
- Backup nonmagnetic fasteners
The allowance should reflect actual defect history, supplier pack sizes, and replacement lead time. Do not hide excessive waste inside every individual kit.
Keep Similar Colors Separated
Ivory, warm white, pure white, blush, nude, champagne, and pale peach can appear similar in a warehouse but visibly different in wedding photography.
Label by:
- SKU
- Color name
- Batch
- Wedding group
- Wearer
- Corsage number
Do not rely solely on the supplier’s color name.
Way 6: Turn Assembly Into Seven Repeatable Stations
A bulk guide should separate preparation from design decisions.
Organize production into stations for inspection, stem preparation, module building, fastening, finishing, quality control, and packaging. Complete one operation across the batch before changing tools. This reduces repeated setup and makes errors easier to identify.
Seven-Station Workflow
| Station | Task | Quality Check |
|---|---|---|
| 1 | Inspect and shape flowers | No damage or loose parts |
| 2 | Cut and reinforce stems | Correct lengths and covered wire |
| 3 | Build foliage base | Flat, smooth rear surface |
| 4 | Add blooms | Correct flower count and angles |
| 5 | Attach fastening base | Secure and correctly oriented |
| 6 | Finish with ribbon or backing | No exposed wire, glue, or sharp edges |
| 7 | Test, label, and package | Fits template and survives handling |
Station 1: Shape
Open petals and leaves before assembly. The full batch should be compared with the approved sample under consistent lighting.
Station 2: Prepare Mechanics
Pre-cut wire and tape. Where floral tape is used, follow its product instructions; self-sealing stem wraps generally depend on correct stretching and overlapping to bind effectively.
Station 3: Build the Flat Base
Set the main foliage direction and keep the underside smooth.
Station 4: Add Flowers
Use the same sequence every time:
- Focal flower
- First supporting bloom
- Second supporting bloom
- Bud
- Texture accent
Station 5: Attach the Wristlet or Fastener
Confirm that the floral design faces correctly when worn—not merely when lying on the worktable.
Station 6: Finish
Hide:
- Wire
- Stem ends
- Glue
- Backing
- Plastic disks
- Rough tape edges
Station 7: Test
Each corsage should pass:
- A gentle pull test
- A rotation test
- A visual comparison
- An underside touch check
- A size-template check
- A packaging fit test
Use Batch Records
For commercial or wholesale kits, record:
- Builder
- Date
- Kit number
- Material batch
- Adhesive batch
- Fastening type
- Quality-control result
- Repair or replacement
- Packaging carton
A record is particularly useful when one adhesive, wristlet, or flower batch performs differently from the rest.
Way 7: Package Each Corsage for Identification and Shape Protection
A well-made corsage can still fail if it is thrown into a bag with programs, shoes, favors, and emergency supplies.
Place each finished corsage or DIY set in a rigid labeled tray or box. Restrain the fastening base, leave clearance around the flowers, and prevent the lid from touching petals. Include the wearer’s name, role, attachment type, and opening instructions on the outside.
Finished Corsage Package
Use:
- A rigid shallow box
- A fitted base or wristlet holder
- Loose tissue support beside vulnerable blooms
- Sufficient head clearance
- A transparent viewing panel where practical
- An orientation mark
- A wearer label
- A nonmagnetic warning where relevant
Do not press tissue directly onto the focal flower.
Unassembled DIY Kit Package
Divide components into:
- Flower packet
- Foliage packet
- Mechanics packet
- Ribbon packet
- Fastening packet
- Instruction card
Sharp wire should not share an unprotected bag with fabric petals.
Label for Wedding-Day Distribution
Example:
Corsage 04
Wearer: Grandmother of the Bride
Fastening: Adjustable wristlet
Color: Champagne and ivory
Open from marked side
Final fitting: 3:30 p.m.
For a magnetic fastening, add the medical-device warning prominently rather than burying it inside the instructions.
Do Not Refrigerate Faux Corsages Automatically
Artificial corsages do not need fresh-flower refrigeration. Cold or humid storage may affect some adhesives, coatings, paper wraps, ribbons, or packaging.
Store them according to the flower, adhesive, wristlet, and packaging manufacturers’ instructions in a clean, dry, protected location.
How Do You Make an Artificial-Flower Wrist Corsage?
A beginner-friendly design should stay small and use a flat profile.
Start with one small focal flower, two supporting blooms, one bud, and two short foliage pieces. Create a flat-backed floral module, secure all mechanics, attach it to an adjustable wristlet, and finish the underside so no wire, stem, or hardened adhesive touches the skin.
Step-by-Step Artificial Wrist Corsage
-
Prepare the flowers.
Open compressed petals and check every attachment. -
Trim the stems.
Leave enough structure for binding, but avoid a thick stem bundle. -
Arrange the foliage.
Form a shallow horizontal or diagonal base. -
Place the focal flower.
Set it slightly off-center rather than exactly in the middle. -
Add supporting flowers.
Turn them in different directions. -
Add the bud or texture accent.
Use it to extend the design line. -
Bind the module.
Use the approved wire, tape, adhesive, or combination. -
Flatten the back.
Trim protruding stems and cover rough mechanics. -
Attach the wristlet.
Follow the wristlet manufacturer’s attachment method. -
Test the orientation.
Put it on a test wrist and move the arm. -
Finish the edges.
Add ribbon or a smooth backing where required. -
Allow adhesive to cure.
Do not package the corsage while the bond is still soft. -
Complete quality control.
Compare it with the master sample.
How Large Should a Wedding Corsage Be?
The corsage should be visible without covering most of the wrist or dominating the wearer’s clothing.
Size the corsage to the wearer, flower type, sleeve, and wedding style. A compact design is generally easier to wear, package, photograph, and reproduce than a tall arrangement containing several large blooms.
Rather than using one universal measurement, approve:
- A petite version
- A standard version
- A larger statement version only when requested
Size-Control Questions
Ask:
- Will it be worn over a sleeve?
- Is the wearer’s wrist particularly small or large?
- Will jewelry be worn beside it?
- Does the dress contain delicate beading?
- Will the wearer use mobility aids?
- Is the arrangement likely to catch on lace?
- Does the wearer prefer a pin-on corsage?
A bulk program can still use one flower recipe while changing the base size or ribbon length.
Which Artificial Flowers Should Be Avoided in DIY Corsage Kits?
Some products are beautiful but difficult for beginners or inefficient in bulk.
Avoid oversized blooms, unstable flower heads, sharp plastic foliage, sticky coatings, loose glitter, shedding artificial pollen, brittle foam petals, and stems that require heavy cutting tools. Reject products whose glue, paint, or wire is visible from normal corsage viewing distance.
High-Risk Components
| Component | Why It Creates Problems |
|---|---|
| Oversized peony | Too heavy and wide |
| Full hydrangea head | Difficult to scale consistently |
| Loose glitter spray | Transfers to clothes and packaging |
| Sharp ruscus tip | May scratch skin |
| Thick branch stem | Requires difficult cutting |
| Sticky real-touch flower | Collects lint and packaging marks |
| Weak glued flower head | Detaches during wear |
| Long artificial pollen | Catches on fabric |
| Heavy jeweled center | Causes rotation |
| Flocked foliage | Rubs or sheds onto clothing |
The ideal DIY flower is not merely realistic. It is predictable under cutting, wiring, gluing, handling, and transport.
Should Corsage Kits Use Hot Glue?
Hot glue can bond some artificial materials quickly, but it creates burn, bulk, stringing, and compatibility risks.
Use hot glue only when the flower, base, and glue system have been tested together and the kit user can handle the equipment safely. For consumer DIY sets, a purpose-made floral adhesive, mechanical wire-and-tape method, or preassembled adhesive step may provide better control.
FloraCraft describes low-temperature glue and florist wire as methods for attaching artificial flowers to selected craft structures. OASIS specifically markets floral adhesive for corsages and lightweight floral accents. These sources support several possible mechanics—not one universal adhesive for every artificial flower.
Hot-Glue Risks
- Skin burns
- Visible glue strings
- Thick hardened lumps
- Melted foam
- Warped plastic
- Poor bonding to flexible coatings
- Glue failure under heat
- Damage to ribbon
- Difficult repositioning
For a wedding kit intended for untrained users, reduce tool complexity wherever possible.
How Far in Advance Can Artificial Corsages Be Made?
Artificial corsages can be prepared considerably earlier than fresh corsages, but their exact storage period depends on the materials and adhesive.
Finish the master sample early enough to test storage, packaging, and bond stability. Complete bulk production only after the sample remains acceptable through the planned storage period. Keep the corsages dry, protected from sunlight, correctly supported, and free from crushing.
A practical workflow may be:
- Approve the design several weeks ahead
- Order and inspect all materials
- Produce one storage-test sample
- Assemble bulk modules in advance
- Complete final fastening and inspection before the wedding
- Keep replacement parts with the event emergency kit
Do not quote a universal storage duration without checking:
- Adhesive instructions
- Flower coating
- Ribbon behavior
- Magnet or pin packaging
- Storage temperature
- Sun exposure
- Humidity
- Carton pressure
Bulk Corsage Planning Example
Assume a wedding needs:
- 6 corsages for parents and grandparents
- 8 corsages for bridesmaids or attendants
- 4 corsages for ushers or readers
- 6 reserve or optional guest pieces
Total planned quantity: 24 corsages
Production Plan
| Stage | Quantity |
|---|---|
| Approved master sample | 1 |
| Wearable fit-test sample | 1 |
| Final required corsages | 24 |
| Spare flower modules | 2 |
| Spare wristlets | 3 |
| Spare pin bases | 2 |
| Emergency nonmagnetic alternatives | At least 2 |
| Extra focal flowers | Based on pack size and defect history |
| Extra small flowers | Higher allowance than focal flowers |
Labor Formula
Use:
Total production time = preparation time + assembly time + curing time + quality control + packaging
Do not calculate labor from assembly alone.
For example, a corsage that requires 8 minutes to assemble may also require:
- 3 minutes for flower preparation
- 2 minutes for fastening
- 2 minutes for inspection
- 2 minutes for packaging
Its active labor is therefore closer to 17 minutes, excluding adhesive curing and workstation setup.
Measure the master batch rather than relying on an optimistic estimate.
Bulk-Friendly Corsage Quality Checklist
| Check | Pass Standard |
|---|---|
| Flower recipe | Matches approved count |
| Color | Matches retained sample |
| Width | Fits size template |
| Height | Does not sit excessively above wrist |
| Weight | Within approved range |
| Flower angle | Focal bloom visible when worn |
| Fastening | Secure and correctly oriented |
| Underside | Smooth with no exposed wire |
| Adhesive | Fully cured and discreet |
| Ribbon | Clean, finished, and secure |
| Pull test | No component movement |
| Wear test | Corsage stays in position |
| Package | No lid or tissue pressure on flowers |
| Label | Correct wearer and fastening type |
| Safety note | Included where magnets or sharp parts exist |
My Insights: DIY Corsage Sets With Artificial Flowers—What 7 Proven Ways Build a Bulk-Friendly Wedding Guide
A bulk-friendly corsage is not simply a small floral arrangement repeated many times. It is a standardized wearable product that must fit, remain comfortable, survive handling, match the wedding palette, and be assembled correctly by people with different skill levels.
The seven strongest methods are to approve one master sample, limit the flower recipe, build a flat modular structure, control the fastening options, pre-cut and label every component, divide production into repeatable stations, and package each corsage for safe identification and distribution.
My central insight is that the best DIY kit removes decisions without removing personalization.
The Seven-Way Summary
| Way | Main Bulk Benefit |
|---|---|
| 1. Approve one master design | Prevents design drift |
| 2. Limit flower families | Simplifies purchasing and assembly |
| 3. Build flat modular mechanics | Improves comfort and consistency |
| 4. Control fastening options | Supports different wearers safely |
| 5. Pre-cut and label components | Reduces measuring and errors |
| 6. Use assembly stations | Improves speed and quality control |
| 7. Package and identify each set | Protects flowers and distribution |
The Best Beginner Recipe
For a simple artificial-flower wrist corsage, I recommend:
- One small rose or ranunculus
- Two smaller supporting blooms
- One bud
- One short eucalyptus or ruscus accent
- One adjustable wristlet
- One smooth flat backing
- Minimal approved adhesive
- One narrow ribbon finish
This provides enough variation to look designed without becoming complicated.
The Best Bulk Recipe
For a large wedding program:
- Keep one floral module
- Offer two wristlet colors
- Offer one pin-on alternative
- Keep a nonmagnetic fastening available
- Use one ribbon width
- Use one foliage family
- Label each wearer after assembly
Personalization can come from:
- Wristlet color
- Ribbon color
- One accent bud
- Name label
- Wearer role
The core mechanics should remain unchanged.
The Most Important Safety Rule
Do not treat magnetic fasteners as a harmless universal upgrade.
Magnets may interfere with certain implanted medical devices, and a chest-worn corsage may be positioned close to those devices. Include a prominent warning and an immediate nonmagnetic alternative.
The Most Important Adhesive Rule
Test the bond using the production flower and production base.
A supplier description that says an adhesive is suitable for corsages does not prove it will bond every polyester petal, polyurethane coating, plastic disk, painted wire, ribbon, and artificial leaf equally well.
The complete sample should be:
- Cured
- Pulled
- Worn
- Stored
- Rechecked
- Packed
- Unpacked
Only then should the kit move into bulk production.
The Most Important Comfort Rule
Finish the underside as carefully as the front.
Wearers experience:
- Wire ends
- Hard glue
- Rough tape
- Sharp leaves
- Heavy flower heads
- Tight closures
- Rotating modules
A beautiful front cannot compensate for an uncomfortable base.
The Most Important Instruction Rule
One action should equal one numbered step.
Weak instruction:
Arrange and attach the flowers attractively.
Better instruction:
- Place foliage piece B1 across the backing.
- Position focal flower A1 on the marked circle.
- Turn supporting flower A2 toward the upper edge.
- Attach A3 below the focal flower.
- Cover the rear mechanics with ribbon piece E2.
- Leave the corsage untouched until the adhesive reaches its specified handling strength.
Photographs should show both the correct result and common mistakes.
My Final Bulk-Friendly Corsage Formula
Use this order:
- Choose the wearer groups.
- Decide wrist, pin, clip, or nonmagnetic alternatives.
- Build one complete sample.
- Test comfort and movement.
- Freeze the flower recipe.
- Approve the materials and adhesive.
- Create cutting templates.
- Number every component.
- Produce the kits or corsages in stations.
- Inspect the underside and fastening.
- Package without petal pressure.
- Label every wearer.
- Keep repair parts and alternative fasteners at the venue.
The strongest DIY artificial corsage set makes the approved result easier to achieve than the incorrect one.
Conclusion
Standardize one lightweight design, pre-measure every component, use secure modular mechanics, offer safe fasteners, and package each artificial-flower corsage with numbered instructions and clear wearer labels.