
Artificial flowers often leave a shipping carton looking flat, tangled, and permanently ruined, even though much of the damage may be temporary compression rather than structural failure.
To fix squashed artificial flowers, unpack them completely, identify the materials, separate every petal and leaf by hand, and reshape wired stems with broad gradual curves. Support crushed blooms with tissue, use controlled cool air, and apply low heat, steam, or warm water only when the manufacturer permits it and a hidden-area test succeeds.
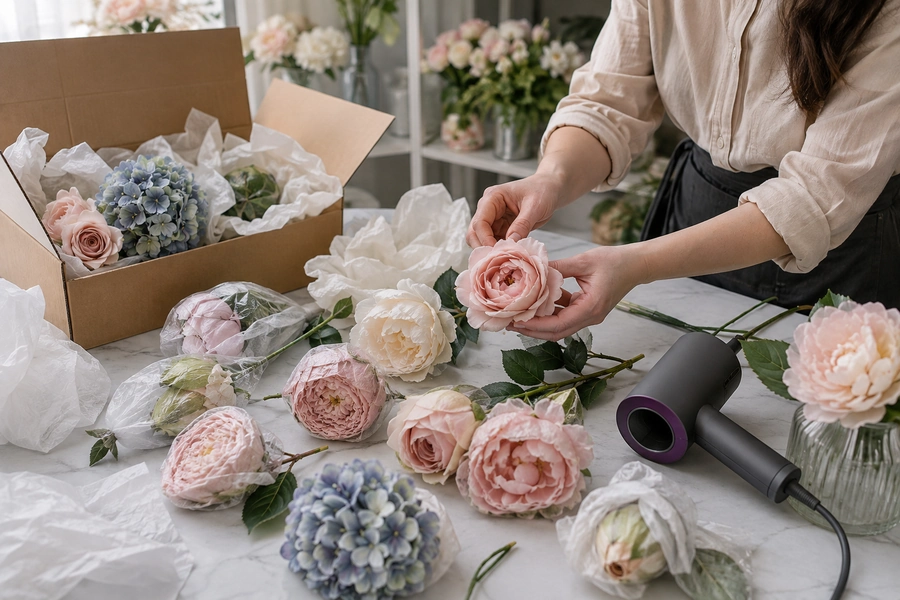
The safest repair method depends on how the flower was made. Polyester petals, molded plastic leaves, real-touch coatings, wire cores, adhesives, foam centers, and paper-wrapped stems can react differently to pressure, heat, steam, and water.
Can Squashed Artificial Flowers Be Restored?
Many artificial flowers are compressed intentionally to reduce shipping volume. Their petals, leaves, and wired stems may recover once they are separated and reshaped.
Artificial flowers can usually be restored when the problem is temporary flattening, folded leaves, tangled branches, or bent wire. Recovery is less likely when petals are torn, coatings are heat-damaged, wires have snapped, glue joints have failed, or deep creases remain after careful reshaping.
Afloral instructs customers to unpack artificial flowers, separate the leaves and petals, and introduce gentle organic curves into the stems. Balsam Hill similarly recommends periodic reshaping of wired stems to maintain the intended appearance of its artificial floral products.
Compression or Permanent Damage?
| Condition | Likely Repairable? | Starting Action |
|---|---|---|
| Petals pressed together | Usually | Separate by hand |
| Bloom flattened on one side | Usually | Support and reshape |
| Leaf folded around a stem | Usually | Reverse the fold gradually |
| Wired stem bent in transit | Usually | Form a broad corrective curve |
| Dense flower cluster compressed | Often | Open each branch separately |
| Deep plastic crease | Product-specific | Test controlled warmth |
| Sticky real-touch coating | Uncertain | Stop heat and moisture |
| Flower head detached | Requires repair | Reattach or replace |
| Internal wire snapped | Limited | Splint or replace |
| Fabric torn or frayed | Rarely invisible | Trim, reposition, or replace |
| Melted or glossy surface | Usually permanent | Replace visible component |
| Permanent discoloration | No shape repair | Replace or reposition |
Do not immediately steam, wash, or heat the complete order. Begin with the least aggressive method and stop when the flower reaches an acceptable shape.
Why Do Artificial Flowers Arrive Crushed?
Artificial flowers occupy substantial carton volume. Suppliers may fold stems, nest flower heads, compress foliage, or use tight inner packaging to reduce shipping space.
Crushing becomes visible when broad flower heads remain under pressure, stems are sharply folded, layered petals become interlocked, or heavy products rest on delicate blooms. Wired components may retain a shipping angle until they are deliberately opened and reshaped.
Afloral’s unpacking guidance explains that faux flowers may arrive compressed and need their petals, leaves, and stems opened individually. The company recommends using the natural living flower as a visual reference when rebuilding the artificial stem’s form.
Four Types of Squashing
- Surface compression: Petals and leaves are pressed together but remain structurally sound.
- Wire deformation: A stem or wired leaf retains a sharp shipping bend.
- Material creasing: Fabric, foam, or molded plastic develops a visible fold.
- Structural damage: Glue, wire, petals, or branch connections have failed.
The first two types are usually the easiest to correct. Material creasing requires greater caution, while structural damage may need repair parts rather than reshaping alone.
What Are the 9 Best Rescue Tricks?
The strongest repair sequence begins with manual shaping and adds more intervention only when necessary.
The nine rescue tricks are to inspect and grade the damage, isolate every stem, hand-fluff petals, reverse-bend wired parts, support blooms with tissue, use controlled cool airflow, apply product-approved warmth cautiously, use warm water only on washable components, and rest and inspect each flower before arranging or repacking it.
Rescue Trick 1: Photograph and Grade the Damage First
Reshaping every flower immediately can hide evidence of poor packaging or actual product defects.
Photograph the sealed carton, internal packaging, complete order, and damaged areas before beginning repairs. Separate temporary compression from broken wires, detached leaves, torn petals, failed glue, discoloration, or surface damage that may justify a replacement claim.
Afloral asks customers reporting transit damage to retain clear photographs of the product and shipping carton. Recording the condition before repair also helps businesses compare incoming batches and improve future packaging.
Create Three Repair Groups
| Group | Condition | Action |
|---|---|---|
| A: Reshape | Flat but intact | Manual recovery |
| B: Repair | Loose or bent components | Controlled repair |
| C: Replace | Torn, snapped, melted, or badly stained | Supplier claim or replacement |
Inspect These Areas
- Flower center
- Petal edges
- Calyx
- Head-to-stem connection
- Leaf attachments
- Main stem
- Side branches
- Exposed wire
- Surface coating
- Artificial pollen
- Glue joints
- Decorative wrapping
Do not use heat on a flower that is already sticky, brittle, discolored, or partially detached.
Rescue Trick 2: Unpack and Separate Every Stem
Flowers cannot recover while they remain tied, folded, or pressed against neighboring stems.
Remove all shipping bands, plastic sleeves, stem ties, tissue, and carton pressure. Lay the flowers in one loose layer and separate them by type, size, and material. Give compressed petals and leaves time to relax before using stronger methods.
Afloral recommends removing faux flowers from their packaging and opening the petals, leaves, and stems individually rather than arranging them in the compressed shipping shape.
Safe Unpacking Sequence
- Open the carton from the marked side.
- Avoid cutting deeply with a knife.
- Lift bundles by the lower stems.
- Remove ties without pulling flower heads.
- Separate pale flowers from dark products.
- Place heavy blooms apart from delicate petals.
- Allow the stems to rest without weight above them.
- Inspect again after the packaging pressure is removed.
Some petals begin recovering naturally within a short resting period. That passive recovery should occur before steam, warm water, or heated air is considered.
Rescue Trick 3: Hand-Fluff Petals From the Outside In
Manual shaping is the lowest-risk and most important repair method.
Support the flower head at its base, then separate the outer petals one at a time. Move gradually toward the center, lifting, rotating, and spacing the layers according to the form of the real flower. Do not pull petals by their edges or force the center open.
Afloral advises bending and separating blooms and leaves to create an organic appearance, using photographs of the natural flower as a styling reference.
General Petal-Fluffing Method
- Hold the calyx or lower flower head.
- Release petals trapped beneath neighboring layers.
- Open the largest outer petals first.
- Rotate repeated layers slightly.
- Lift compressed middle petals.
- Leave the center appropriately tight.
- Turn the bloom and inspect its side profile.
- Stop before the flower becomes unnaturally symmetrical.
Flower-Specific Shaping
| Flower | Natural Rescue Shape |
|---|---|
| Garden rose | Open outer petals with a tighter center |
| Peony | Broad, soft outer bowl with irregular inner layers |
| Ranunculus | Compact rounded layers |
| Hydrangea | Open each small branch separately |
| Poppy | Light irregular petals with visible center |
| Orchid | Distinct petals surrounding an exposed center |
| Tulip | Closed or partially open cup |
| Dahlia | Layered radial form with varied depth |
| Magnolia | Wide substantial petals with clear spacing |
A rose should not be opened like a magnolia, and a tulip should not be fluffed into a flat disk.
Rescue Trick 4: Reverse-Bend Wired Stems Gradually
Wired stems and leaves often retain sharp bends created during packing.
Locate the full bend before correcting it. Hold the stem on both sides of the damaged area and form a broad curve in the opposite direction. Distribute the correction across several centimeters rather than folding the wire back at one sharp point.
Balsam Hill identifies periodic reshaping of wired stems as part of maintaining artificial flowers. Afloral also recommends adding slight organic curves to stems instead of leaving them rigidly straight.
Broad Curve vs Sharp Fold
A broad corrective curve:
- Spreads stress across the wire
- Looks more botanical
- Reduces visible kinks
- Is easier to adjust later
Repeatedly folding the same narrow point can weaken an internal wire or damage its exterior coating.
Two-Hand Stem Method
- Identify the center of the unwanted bend.
- Place one hand below and one above it.
- Apply gentle pressure over a wide area.
- Release and inspect.
- Repeat in smaller increments.
- Add a natural final curve.
For branching stems, reshape the main stem first. Open side branches only after the central structure has been corrected.
Rescue Trick 5: Use Tissue Cradles to Hold the Recovered Shape
Large blooms may reopen by hand but slowly collapse again because the petals have been stored flat for too long.
Form loose supports from clean unbuffered acid-free tissue and place them beneath or beside the petals. Let the flower rest in its natural shape without pressure from above. The tissue should support empty space rather than tightly filling the flower center.
Tissue-Cradle Method
- Hand-fluff the flower.
- Create a loose tissue ring.
- Position it below the outer petals.
- Add small side supports where the bloom falls inward.
- Keep the center unobstructed.
- Place the flower in a shallow rigid tray.
- Allow it to rest before reinspection.
This method is useful for:
- Peonies
- Hydrangeas
- Large garden roses
- Magnolias
- Dahlias
- Finished bouquets
Avoid Tight Stuffing
Do not force tissue deep inside a glued flower center.
Tight stuffing may:
- Stretch petal attachments
- Change the intended bloom stage
- Leave new pressure marks
- Catch on artificial stamens
- Expose glue joints
The objective is temporary support, not expansion beyond the flower’s design.
Rescue Trick 6: Use Cool Air to Separate Dense Layers
Controlled cool airflow can help lift lightweight petals and reach deep flower clusters after manual opening.
Use a rubber air blower, small fan, or hair dryer set strictly to cool and low airflow. Hold it at a safe distance and direct short bursts across—not directly into—the flower center. Support the bloom and stop if petals whip, fold, or loosen.
Cool-air care guidance recommends maintaining distance and avoiding continuous aggressive airflow that could damage delicate artificial flowers or increase unnecessary static.
Best Uses for Cool Air
- Hydrangeas
- Fine filler flowers
- Dense peonies
- Fern-like foliage
- Wisteria
- Small blossoms
- Artificial grasses
Cool-Air Procedure
- Remove loose dust first.
- Support the flower from below.
- Begin at the lowest airflow.
- Direct air across the outer layers.
- Rotate the stem.
- Separate petals with your fingers as they lift.
- Stop when the bloom is open enough for manual finishing.
Cool airflow cannot remove a deep material crease, but it can loosen petal layers without introducing moisture or heat.
Rescue Trick 7: Use Low Heat or Steam Only When the Product Allows It
Heat advice varies because artificial flowers are made from different materials.
Use warmth only after checking the manufacturer’s instructions and testing a spare or concealed component. Keep the heat source moving and distant, expose the material for only a few seconds, and reshape it immediately with your hands. Stop at the first sign of gloss change, odor, stickiness, soft glue, or distortion.
Afloral recommends the lowest hair-dryer heat setting for stubborn flattened areas while lightly reshaping the petals. Nearly Natural suggests cautious low heat or brief handheld steam for creased artificial leaves. However, other care guidance warns that steam and heated hair dryers can warp materials or weaken glue. The disagreement reflects different product constructions, so no heat method is universally safe.
Heat-Risk Hierarchy
Use methods in this order:
- Hand shaping
- Tissue support
- Cool airflow
- Manufacturer-approved low warmth
- Manufacturer-approved brief steam
- Replacement
Low-Heat Hair-Dryer Method
When explicitly permitted:
- Test a hidden petal or spare stem.
- Set the dryer to the lowest heat and airflow.
- Keep it well away from the flower.
- Warm one small area briefly.
- Remove the heat.
- Reshape by hand.
- Let the material cool in position.
- Inspect for surface changes.
Do not aim heated air at:
- Glue joints
- Foam centers
- Real-touch coatings
- Thin flower edges
- Painted stamens
- Paper-wrapped stems
- Electrical decorations
Controlled Steam Method
When the manufacturer permits steam:
- Use a handheld steamer rather than uncontrolled boiling water
- Keep the flower away from the steam outlet
- Treat one small area
- Avoid saturating the flower
- Reshape immediately
- Allow complete cooling and drying
- Stop if the product changes texture
Never place the complete bloom directly over a kettle spout or pan of boiling water. Steam can burn the user and may rapidly soften adhesive or coatings.
Rescue Trick 8: Use Warm Water Only for Confirmed Washable Components
Warm water may relax selected plastic or fabric components, but immersion introduces additional risks.
Use a warm-water method only when the exact product is identified as washable and a hidden-area test shows no color transfer, stickiness, glue failure, rust risk, or surface change. Treat detachable stems individually and keep moisture contact brief.
Nearly Natural includes a brief warm-water method among its options for creased artificial leaves. Other artificial-flower manufacturers advise against washing particular products, demonstrating why this method must remain product-specific.
Controlled Warm-Water Method
- Remove loose dust.
- Test a concealed area.
- Prepare clean mildly warm—not hot—water.
- Immerse only the approved component briefly.
- Remove it without twisting.
- Blot with a clean white towel.
- Reshape while damp.
- Support the shape during air-drying.
- Confirm that the stem is completely dry before storage.
Do Not Immerse Flowers Containing:
- Paper wrapping
- Exposed wire
- Battery lights
- Natural moss
- Unsealed wood
- Loose glitter
- Artificial pollen
- Flocking
- Velvet
- Weak glue
- Unknown dyes
- Sticky real-touch coating
A washable plastic leaf does not prove that the flower center, stem, wire, and adhesive are also washable.
Rescue Trick 9: Rest, Reinspect, and Replace Irreparable Parts
A flower may look corrected immediately but return to its compressed shape after several hours.
Let reshaped stems rest individually or inside a loose arrangement before final approval. Reinspect them from the front, side, and back after the material has cooled or dried. Repeat only gentle corrections, then replace components that remain visibly crushed or structurally unstable.
Post-Rescue Acceptance Test
A repaired flower passes when:
- Petals remain open
- The bloom no longer leans unnaturally
- The stem holds a broad curve
- No glue has softened
- No color has transferred
- The surface has not become shiny
- Leaves remain attached
- No internal wire is exposed
- The flower works at its intended viewing distance
Repair or Replace?
| Condition | Better Decision |
|---|---|
| Minor hidden crease | Reposition toward the back |
| One loose petal | Reattach only with compatible repair method |
| Flower head loose on stem | Secure or replace |
| Internal wire broken | Splint for background use or replace |
| Melted petal edge | Replace |
| Sticky coating | Isolate and investigate |
| Permanent discoloration | Replace or use at long distance |
| Repeatedly collapsing bloom | Replace |
| Large commercial quantity affected | Review supplier packaging |
Do not continue heating a flower merely because the first attempt did not work. Escalating temperature can turn reversible compression into permanent damage.
How Do You Fix Specific Crushed Artificial Flowers?
Different flower structures need different recovery methods.
Roses
Open the outer petals first and retain a tighter center.
Do not pull the center apart completely. Garden roses may be wider and looser than standard roses, but both should retain layered depth.
Use a tissue collar beneath large outer petals if the bloom remains flat on one side.
Peonies
Support the heavy flower head and lift the outer bowl before opening the internal layers.
Peonies tolerate visible irregularity. A perfectly spherical bloom often looks less realistic than one with several relaxed outer petals.
Hydrangeas
Open each small flower branch rather than pulling the complete head outward.
Begin at the lower cluster and work upward. Rotate small blossoms in several directions to rebuild volume without creating one hard ball.
Orchids
Correct the stem line before adjusting the flowers.
Protect the center. The individual petals should surround it rather than being forced forward into a flat fan.
Tulips
Restore the curved stem and cup shape without fully opening the petals.
Tulips look convincing when some blooms lean and remain partially closed.
Poppies and Cosmos
Use minimal handling and prioritize shape over perfect smoothness.
Their natural petals are light and irregular. Small ripples may improve realism, while hard folds and flattened centers require cautious attention.
Blossom Branches
Straighten the main branch gradually, then separate each secondary branch.
Do not pull blossoms directly. Hold the structural branch beneath each flower cluster.
Garlands and Wisteria
Lay them in broad curves and separate tangles from the structural vine outward.
Avoid hanging a severely compressed garland immediately. Its full weight may reinforce folds before they are corrected.
How Do You Straighten a Bent Artificial Flower Stem?
Most wired stems should not be made perfectly straight.
Remove sharp shipping kinks, then create a natural gradual line. Hold both sides of the bend, distribute pressure across a wide area, and correct it in several small movements. Use a hidden support stake when the internal wire cannot carry a heavy bloom safely.
Hidden Stem Splint
For a weak but valuable stem:
- Choose a coated support rod.
- Position it along the lower stem.
- Attach it with soft floral tape or discreet ties.
- Keep fasteners below visible foliage.
- Re-form the complete line.
- Use the repaired stem in a lower-risk position.
A splint can restore display function, but it does not return the original internal wire strength.
Can You Iron Artificial Flower Petals?
Direct ironing is unsafe for most assembled artificial flowers.
Do not place an iron directly against petals, leaves, foam, glue, or plastic. Heat and pressure can flatten texture, transfer color, melt synthetic materials, create permanent shine, and weaken attachments. Use manufacturer-approved low warmth at a distance instead.
Artificial flowers are three-dimensional mixed-material objects. An iron simultaneously applies concentrated heat and pressure—the two forces that already caused much of the crushing.
Can You Use a Clothes Steamer?
A clothes steamer is appropriate only for products whose manufacturer permits steam.
Test first, maintain distance, treat a small area briefly, and keep steam away from glue, coatings, exposed wire, electrical parts, and painted centers. Reshape the material immediately, then allow it to dry and cool completely before evaluation.
Nearly Natural recommends cautious handheld steam for selected artificial leaves, while other flower-care guidance warns against steam on products vulnerable to warping or glue failure.
The conflicting advice means the material and supplier instructions must decide the method.
What Should You Never Do to Crushed Faux Flowers?
Several popular shortcuts can make the problem permanent.
Never apply high heat, boil the flowers, microwave them, iron the petals, twist wet fabric, pull flower heads, or hold glue joints directly in steam. Avoid soaking unknown materials, forcing sharp reverse folds, and repacking flowers before they have cooled, dried, and recovered fully.
High-Risk Rescue Mistakes
| Mistake | Possible Result |
|---|---|
| Maximum hair-dryer heat | Melting, shine, glue failure |
| Kettle steam at close range | Burns, saturation, warping |
| Direct ironing | Flattened texture and melted material |
| Sharp reverse bending | Broken internal wire |
| Pulling petals by the edge | Tears and fraying |
| Soaking unknown flowers | Dye transfer and corrosion |
| Heavy books on petals | New compression marks |
| Strong adhesive everywhere | Stiffness and visible repair |
| Immediate dense arranging | Re-compression |
| Repacking while damp | Odor and material damage |
| Repeating heat aggressively | Permanent deformation |
How Can You Prevent Artificial Flowers From Being Crushed Again?
A successful repair should be followed by better storage or packaging.
Store artificial flowers in rigid containers with enough head clearance, support large blooms with loose tissue, and keep heavy accessories in separate compartments. Bundle stems at the lower section, use rigid trays between layers, and never allow the lid or another carton to rest on petals.
Afloral recommends proper unpacking, reshaping, and storage practices to maintain the form of faux flowers after delivery. Balsam Hill recommends cool, dry, protected storage and periodic stem reshaping for artificial florals.
No-Crush Storage Rules
- Store bouquets upright
- Keep wreaths in rigid flat cases
- Coil garlands in broad curves
- Use shallow flower boxes
- Add load-bearing trays between layers
- Protect pale flowers from dark colors
- Keep real-touch petals away from rough plastic
- Label containers “top load only”
- Do not vacuum-seal flowers
- Inspect stored inventory periodically
Commercial Rescue Workflow
| Step | Action | Stop Condition |
|---|---|---|
| 1 | Photograph the shipment | Evidence recorded |
| 2 | Grade damage | Broken products isolated |
| 3 | Remove all compression | Flowers separated |
| 4 | Hand-fluff petals | No tearing or detachment |
| 5 | Correct wired stems | No sharp reverse folds |
| 6 | Add tissue supports | Shape held without pressure |
| 7 | Use cool air if needed | Petals remain controlled |
| 8 | Test approved warmth | No gloss, odor, or glue change |
| 9 | Air-rest the flowers | Shape remains stable |
| 10 | Inspect under display lighting | Acceptance decision made |
| 11 | Document rejected units | Supplier or packaging review |
| 12 | Repack correctly | No petal load |
My Insights: How to Fix Squashed Artificial Flowers—Which 9 Rescue Tricks Work Best for Crushed Stems
The most effective rescue method is not the hottest or fastest technique. It is the least aggressive process capable of restoring the flower without changing its material.
The nine strongest rescue tricks combine damage inspection, complete unpacking, manual petal separation, gradual wire correction, tissue shape support, cool airflow, product-approved warmth, selective warm-water treatment, and post-repair resting. Manual reshaping remains the safest first solution, while heat and moisture should be treated as controlled exceptions.
The Nine-Trick Summary
| Trick | Main Result |
|---|---|
| 1. Photograph and grade damage | Separates compression from defects |
| 2. Unpack every stem | Removes continuing pressure |
| 3. Hand-fluff petals | Restores natural flower volume |
| 4. Reverse-bend wired parts | Corrects sharp shipping angles |
| 5. Add tissue cradles | Holds recovered bloom shape |
| 6. Use controlled cool air | Opens dense flower layers |
| 7. Apply approved warmth cautiously | Relaxes selected stubborn materials |
| 8. Use warm water selectively | Treats confirmed washable components |
| 9. Rest and reinspect | Confirms whether recovery is permanent |
The Best Overall Rescue Sequence
For most crushed artificial flowers, I use:
- Photographs
- Complete unpacking
- Twenty to thirty minutes without pressure
- Manual petal separation
- Broad stem reshaping
- Tissue support
- Cool airflow where useful
- A longer rest period
- Final inspection
I consider warmth only after this sequence fails.
The Most Important Material Rule
“Silk flower” does not identify the complete construction.
Two similar roses may contain different:
- Polyester fabric
- Plastic
- Foam
- Coatings
- Dyes
- Adhesives
- Wire
- Paper wrapping
One may tolerate low warmth while another becomes shiny or sticky.
The Most Important Heat Rule
Manufacturer guidance controls the method.
Afloral endorses low heat for selected stubborn areas, while Nearly Natural suggests careful steam or low heat for some artificial leaves. Other care advice explicitly warns against steam and heated dryers because of possible warping and glue failure.
This variation is precisely why a hidden test is necessary.
The Most Important Shape Rule
Restore the natural flower—not a perfect geometric form.
Real flowers include:
- Uneven outer petals
- Several bloom stages
- Side-facing flowers
- Curved stems
- Small asymmetries
- Open space
A repaired rose should not look like a rigid plastic ball.
The Most Important Replacement Rule
Stop when the repair risk exceeds the flower’s value.
Replace the component when it has:
- Melted surfaces
- Failed adhesive
- Snapped wire
- Permanent discoloration
- Severe tears
- Sticky coating
- Repeated collapse
A visible damaged focal flower can reduce the quality of the complete arrangement.
My Final Rescue Rule
Use this sequence:
- Document the condition.
- Identify the materials.
- Separate every stem.
- Let the flowers relax.
- Hand-fluff the petals.
- Correct wired curves gradually.
- Support large blooms with tissue.
- Use cool air before heat.
- Apply warmth or water only when approved.
- Rest and reinspect the flower.
- Replace permanently damaged components.
- Improve the future storage or shipping package.
Most compressed artificial flowers need patience and controlled reshaping—not aggressive heat.
Conclusion
Unpack completely, hand-fluff each bloom, reshape wired stems gradually, support petals with tissue, and use heat, steam, or water only after product-specific testing.