
A fake plant may look stable at first, yet one accidental bump can rotate the trunk, spill the top dressing, or tip the entire planter.
The best fills for a fake plant pot are dry floral foam, chicken wire with gravel, river rock with stem sleeves, sealed sandbags, compacted potting mix, plaster, cured expanding foam, concrete anchor inserts, and rigid reusable grids. The strongest planters combine low ballast with a separate stem-holding layer and secured top dressing.
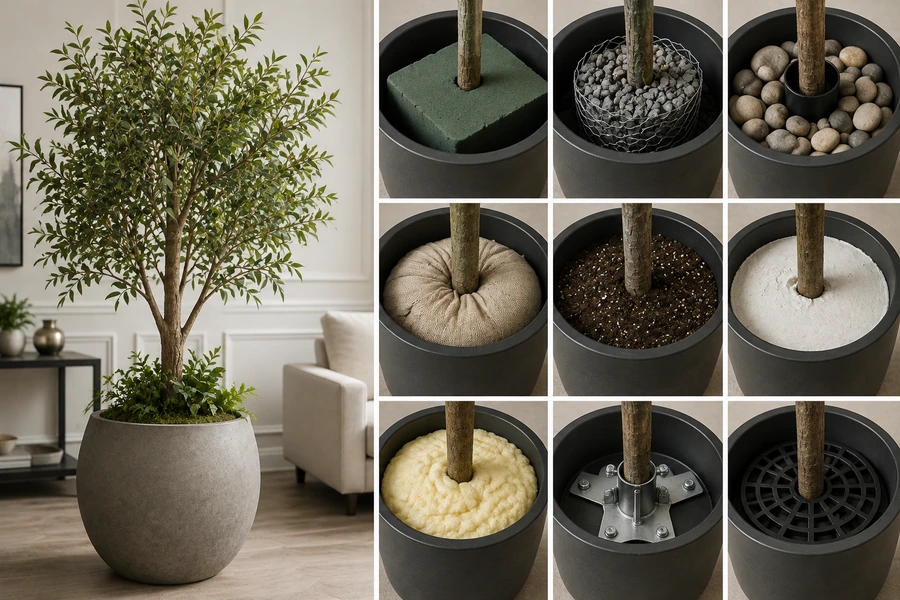
The right fill depends on the plant’s height, canopy width, planter material, installation location, and whether the display must remain removable. Loose filler may hide the nursery pot, but it will not reliably stop a tall artificial tree from shifting.
What Should You Put in the Bottom of a Fake Plant Pot?
The lower part of the pot should control weight and movement. It should not be expected to position every leaf or decorative stem.
Put dense ballast such as gravel, river rocks, bricks, pavers, or sealed sandbags at the bottom of a fake plant pot. Place the plant’s nursery pot or stem holder above that weight, secure it mechanically, and finish with a separate decorative top layer. Keep exterior drainage openings clear.
A stable artificial planter normally contains three functional zones.
| Planter Zone | Main Purpose | Suitable Materials |
|---|---|---|
| Bottom zone | Adds low weight | Gravel, rocks, bricks, sandbags, concrete insert |
| Middle zone | Stops stems or nursery pots from moving | Dry foam, chicken wire, rigid grids, plaster, expanding foam |
| Top zone | Hides the mechanics | River rock, artificial soil, fixed moss, bark, gravel |
Using separate layers is more reliable than filling the whole container with one material. Gravel provides weight but may not grip one narrow trunk. Dry floral foam grips stems but adds little stability to a tall planter.
For outdoor displays, drainage still matters. Water can collect around wire, foam, ballast, and adhesive even though the plant has no living roots. The CDC specifically identifies planters and flowerpot saucers as containers that should not be allowed to retain standing water.
Which Fill Is Best for a Fake Plant Pot?
There is no single best fill for every planter. The correct choice depends on whether the priority is weight, precise stem positioning, removability, speed, or permanent installation.
Use dry floral foam for small stems, chicken wire and gravel for reusable outdoor displays, sandbags for removable weight, plaster for indoor arrangements, expanding foam for irregular inserts, and concrete for large permanent plants. River rock works best as ballast or top dressing when a separate holder controls the trunk.
Nine-Fill Comparison
| Fill System | Holding Strength | Adds Weight | Removable | Best Location |
|---|---|---|---|---|
| Dry floral foam | Medium | Low | High | Indoor or covered displays |
| Chicken wire and gravel | High | High | High | Reusable outdoor planters |
| River rock with sleeves | High | High | Medium | Modern commercial planters |
| Sealed sandbags and grid | High | High | High | Tall movable displays |
| Compacted potting mix and anchor | Medium | Medium | High | Natural-looking pots |
| Plaster insert | High | Medium | Medium | Indoor floor plants |
| Exterior-compatible expanding foam | Medium | Low | Medium | Irregular inner pots |
| Concrete anchor insert | Very high | Very high | Low | Permanent large plants |
| Rigid grid or floral frog | High | Low | Very high | Frequently changed arrangements |
The strongest system often combines two fills. For example, sealed sandbags can provide weight while a rigid grid holds the trunk.
Fill 1: Dry Floral Foam for Small and Medium Fake Plants
Dry floral foam is easy to cut, shape, and pierce. It works well for flowers, grasses, branches, and smaller artificial plants with several stems.
Smithers-Oasis identifies SAHARA as a dry foam intended for permanent botanicals and dried arrangements. This distinguishes it from wet foam designed to supply water to fresh flowers.
Best Uses
- Artificial flower arrangements
- Small desk plants
- Window-box inserts
- Short grasses
- Seasonal displays
- Covered porch planters
- Rental arrangements that change frequently
How to Keep the Foam From Shifting
The foam must fit tightly inside an inner pot or tray. A loose block can rotate with the plant.
I use the following structure:
- Put gravel, a brick, or a sandbag at the bottom.
- Fit the dry foam inside a removable liner.
- Secure the foam with waterproof tape, wire, or a rigid upper grid.
- Insert stems deeply and at different angles.
- Cover the foam with fixed moss or decorative stones.
For large arrangements, OASIS recommends reinforcing foam-based permanent botanical work with netting or tape where more strength is needed.
Main Limitation
Dry foam does not add meaningful weight. It can also crumble after repeated insertion.
I do not rely on a shallow foam disk to hold a tall tree. A long trunk creates leverage that can tear through the block or lift the entire insert.
Fill 2: Chicken Wire With Gravel for Reusable Planters
Chicken wire creates a strong, reusable network through which stems can be crossed and tied. Gravel adds the low ballast the wire lacks.
This is one of the most flexible systems for artificial plants that must be changed seasonally.
Afloral recommends fastening artificial plant anchor stems to chicken wire when wind is a concern. Its outdoor-planter guidance also shows that stronger displays need a mechanical connection rather than loose fill alone.
Best Uses
- Porch arrangements
- Restaurant planters
- Artificial grasses
- Flowering branches
- Outdoor seasonal displays
- Large mixed arrangements
- Rental inventory
How the System Works
I form the wire into a cylinder, ball, or folded grid that fits the inner pot.
The wire should be attached to:
- The nursery pot
- A lower crossbar
- A heavy insert
- The drainage opening with a suitable tie
- Another fixed point inside the planter
The stems pass through at least two openings. Tall focal stems can be tied to the grid.
Gravel is then placed around the lower wire structure to add weight without covering the drainage path.
Main Advantages
- Reusable
- Easy to modify
- Strong in several directions
- Suitable for different stem sizes
- Compatible with gravel and sandbags
- Does not require curing
Every cut wire edge should be folded inward or covered. Exposed wire can scratch the planter, damage stems, or injure the person maintaining the display.
Fill 3: River Rock With Rigid Stem Sleeves
River rocks create a clean commercial finish and add substantial weight. Loose stones, however, do not reliably keep a narrow trunk centered.
The solution is to install rigid sleeves before adding the rocks.
Best Uses
- Hotel planters
- Office lobbies
- Retail entrances
- Poolside displays
- Artificial agave
- Snake plants
- Architectural grasses
- Modern indoor trees
How to Build It
I attach one or more tubes to a lower rigid base. The tubes can be made from a compatible plastic pipe, a planter insert, or another purpose-built sleeve.
The artificial stem slides inside the sleeve. River rock is placed around the system.
This creates two independent controls:
- The sleeve prevents sideways trunk movement.
- The stones add weight and hide the support.
Decorative pebbles are also used in floral work to hold stems and add weight to a vessel. Better Homes & Gardens lists stones among reusable floral-foam alternatives, although larger artificial plants need stronger internal sleeves or grids than a small vase arrangement.
Main Limitation
Rock-filled planters become heavy quickly.
Before filling a balcony pot, raised platform, shelf, mobile cart, or suspended structure, confirm that the location can support the final weight.
Small stones should be contained with a mesh layer so they do not escape through drainage openings.
Fill 4: Sealed Sandbags With a Rigid Upper Grid
Sealed sandbags are ideal when the planter needs strong ballast but must remain movable or reusable.
They are cleaner than loose sand and easier to remove from a decorative pot.
Best Uses
- Tall lightweight planters
- Event installations
- Balcony floor pots
- Seasonal hotel displays
- Artificial trees
- Planters that must be transported
- Rental inventory
Recommended Layering
I place several smaller sandbags at the lowest point instead of one oversized bag.
Above the bags, I install:
- A plywood or plastic platform
- A rigid grid
- Chicken wire
- A fitted nursery-pot support
- Dry foam inside a separate tray
The plant should not rest directly on a soft bag. The upper grid distributes the load and stops the trunk from leaning when the sand shifts.
Main Advantages
- High removable weight
- No curing time
- Suitable for expensive decorative planters
- Easy to rebalance
- Reusable across several designs
Main Limitation
Sharp wire, stems, or hardware can puncture the bags. The ballast must be isolated from sharp components.
The planter may also become too heavy for one person to move. Label the finished weight or use smaller removable modules.
Fill 5: Compacted Potting Mix Over a Buried Anchor
Real soil or potting mix gives fake plants a convincing planted appearance. It is inexpensive and easy to adjust.
However, soil alone can shift, settle, or become heavy when wet. It works best as a visible filler around a hidden support.
Afloral’s basic outdoor method places an artificial plant’s anchor stem directly into soil. For locations with more wind, it recommends adding chicken wire and ties.
Best Uses
- Sheltered porches
- Hanging baskets
- Window boxes
- Artificial flowers mixed with living plants
- Temporary seasonal pots
- Displays viewed closely
How to Make Soil Stay Put
I install a buried grid, stake, sleeve, or wire cage before adding the mix.
The artificial stems pass through the anchor and then into the compacted fill.
For a single tall plant, I attach the main stem to a longer coated stake. The stake reaches the lower part of the pot rather than ending near the surface.
Main Limitations
Potting mix can:
- Retain rainwater
- Spill through drainage holes
- Support weeds
- Settle over time
- Create dust indoors
- Conceal loose connections
I do not use wet garden soil inside a valuable interior planter. For indoor displays, clean artificial soil, bark, or stones may create the same appearance with less mess.
Fill 6: Plaster for Stable Indoor Artificial Plants
Plaster creates a firm custom base around an artificial stem or nursery pot. It is common in smaller manufactured faux plants because it sets into a rigid insert.
Best Uses
- Indoor floor plants
- Desk plants
- Artificial orchids
- Small trees
- Retail displays
- Planters that will remain dry
Why It Works
A cured plaster insert limits rotation and creates more weight than foam.
The artificial plant can be set into a disposable inner pot. After curing, the complete insert can be placed inside a decorative planter.
This protects the decorative pot and makes future removal possible.
Main Limitations
Ordinary plaster is not my preferred fill for exposed outdoor planters.
Repeated moisture can damage some plaster products, while trapped water may remain around the insert. Plaster is also brittle. A narrow or thin base may crack when a tall trunk is moved repeatedly.
I keep drainage separate and use plaster mainly for dry interior applications unless a product is specifically rated for the planned exposure.
Fill 7: Cured Expanding Foam Inside a Removable Liner
Expanding foam fills irregular gaps and can create a fitted support around a nursery pot, stem sleeve, or custom arrangement.
The foam itself is lightweight, so it must be combined with lower ballast.
Some exterior foam products form a water-resistant outer coating after curing. DuPont’s Pond & Stone foam, for example, is intended for exterior decorative water-feature applications. This does not mean that every expanding foam is safe for every planter or plant material.
Best Uses
- Irregular decorative pots
- Lightweight topiaries
- Artificial orchids
- Custom inner containers
- Planters with large empty cavities
- Displays needing a fitted removable insert
Safer Setup
I apply the foam only inside a removable nursery pot, bucket, or liner.
Before application, I position:
- The artificial trunk
- A rigid stem sleeve
- Temporary spacing tubes
- The nursery pot
- A lower platform
I follow the product label for ventilation, personal protection, application depth, and curing.
After the foam has cured, I trim only where the instructions allow and cover the surface with a decorative top layer.
Main Limitations
Expanding foam:
- Adds little ballast
- Can distort a weak container
- May expand farther than expected
- Is difficult to remove from finished surfaces
- May not bond reliably to every plastic
- Can hide blocked drainage
- Requires correct curing
It should hold the plant’s position, while a separate sandbag, gravel layer, or weight plate controls tipping.
Fill 8: A Concrete Anchor Insert for Large Permanent Plants
Concrete creates the strongest and heaviest option in this list. It suits artificial trees and permanent commercial planters that must resist frequent contact.
Fast-setting concrete products are designed to harden around posts and anchors. QUIKRETE states that its Fast-Setting Concrete Mix contains cement, sand, and gravel and is intended for applications such as setting posts.
Best Uses
- Large artificial trees
- Hotel entrances
- Shopping malls
- Restaurant terraces
- Public buildings
- High-traffic spaces
- Permanent exterior planters
Use a Removable Concrete Insert
I do not normally pour concrete directly into an expensive decorative planter.
Instead, I cast a separate insert inside:
- A plastic bucket
- A rigid nursery pot
- A purpose-built liner
- A removable form
A central sleeve or anchor can be positioned before the material cures. The artificial trunk then attaches to that point.
This allows the decorative pot to be replaced while preserving the support module.
Important Limitations
Concrete creates substantial weight.
The final load may be unsuitable for:
- Balconies
- Roof terraces
- Raised floors
- Temporary stages
- Lightweight planters
- Mobile display carts
Large public installations may require professional structural review. The concrete insert also needs a planned drainage path so it does not create a sealed water basin.
Cement-based products require appropriate eye, skin, and respiratory protection during handling. Follow the manufacturer’s safety instructions.
Fill 9: Rigid Reusable Grids, Floral Frogs, and Modular Holders
A rigid grid can hold artificial stems without disposable foam, loose fill, or permanent adhesive.
Options include:
- Metal floral frogs
- Plastic grids
- Perforated planter inserts
- Crossbars
- Reusable pin holders
- Custom stem plates
- Wire mesh frames
Better Homes & Gardens lists floral frogs and chicken wire as reusable alternatives that keep stems upright. Decorative pebbles can then add weight and hide the mechanics.
Best Uses
- Frequently changed retail arrangements
- Seasonal hotel flowers
- Reception displays
- Short artificial plants
- Low bowls
- Wedding and event rentals
- Planters requiring easy repair
Why It Will Not Shift
The holder must connect to the container rather than float inside it.
I secure it with:
- Mechanical clips
- Waterproof tape
- Crossbars
- Bolts
- Ties
- A fitted lip
- A weighted base
Stems can be inserted into separate openings and adjusted without destroying the holder.
Main Limitation
A grid adds control but little weight. Tall plants still require ballast below it.
Metal holders may scratch valuable containers or corrode in wet environments. A protective pad, compatible coating, or removable liner can prevent direct contact.
What Top Dressing Keeps a Fake Plant Pot From Shifting?
The top layer should conceal the internal holder without becoming a loose hazard. It should not be the only component holding a tall plant.
Use washed river rocks, medium gravel, fixed artificial moss, bark pieces, or a fitted artificial-soil mat as top dressing. Choose pieces too large to spill easily, keep the layer below the planter rim, and secure lightweight materials in exposed or high-traffic locations.
Best Top-Dressing Options
| Top Dressing | Appearance | Stability | Best Use |
|---|---|---|---|
| River rock | Clean and modern | High | Hotels, offices, retail |
| Medium gravel | Neutral and practical | High | Outdoor planters |
| Fixed artificial moss | Soft and natural | Medium | Indoor arrangements |
| Bark pieces | Rustic | Medium | Trees and natural interiors |
| Artificial soil mat | Realistic and contained | High | Frequently moved plants |
| Large glass stones | Decorative | Medium | Small interior plants |
Loose Spanish moss, shredded paper, packing filler, and very light bark can move when people walk past, doors open, or exterior wind reaches the pot.
If I use moss, I attach it to a removable mat or mesh rather than gluing it permanently to the decorative planter.
How Do You Stop a Fake Plant From Leaning in the Pot?
A plant leans when its trunk has too much space, the fill is too shallow, the canopy is unbalanced, or the nursery pot moves inside the decorative container.
Stop a fake plant from leaning by centering the nursery pot, adding rigid side spacers, anchoring the trunk at two levels, and placing ballast below the plant. Adjust the canopy before final fixing because uneven branches can pull the trunk toward one side.
Use Two-Point Trunk Control
One shallow support controls only the bottom of the stem. A tall trunk can still pivot above it.
I prefer two holding points:
- A lower anchor or sleeve near the bottom.
- An upper grid or brace near the planter opening.
This creates much stronger resistance to leaning and rotation.
Reshape the Plant Before Adding Fill
Artificial branches may arrive compressed to one side. If the planter is fixed before the canopy is opened, the plant may appear off-center afterward.
I first:
- Open all branches
- Turn leaves in different directions
- Measure the final canopy
- Find the visual center
- Adjust the trunk
- Add the permanent support
Add Side Spacers Around the Nursery Pot
When a small nursery pot sits inside a large decorative container, I use rigid blocks or a fitted collar to prevent sideways movement.
Loose newspaper, plastic bags, or packing material may compress over time. They can fill empty space in a light indoor display, but they should not be considered dependable structural support for a tall plant.
What Should You Avoid Putting in a Fake Plant Pot?
Some inexpensive fillers appear useful but compress, absorb water, create mess, or allow the plant to move.
Avoid relying on loose packing peanuts, shredded paper, untreated cardboard, lightweight moss, unsecured plastic bags, or one shallow foam disk. Do not fill exterior pots in a way that blocks drainage, and do not add excessive permanent weight without checking the planter and installation surface.
Common Fill Mistakes
| Mistake | Why It Fails |
|---|---|
| Loose packing peanuts | Shift and compress |
| Shredded paper | Absorbs moisture and settles |
| One thin foam layer | Cannot control a tall trunk |
| Loose moss only | Adds no meaningful weight |
| Rocks without a stem holder | Trunk can still rotate |
| Foam without ballast | Planter may tip |
| Concrete in decorative pot | Difficult to remove or repair |
| Sealed outdoor base | Traps rainwater |
| Heavy fill on a balcony | May create an unsafe load |
| Glue as the only connection | Difficult to inspect and repair |
For outdoor pots, I also keep a severe-weather plan. The National Weather Service recommends securing loose outdoor objects when strong winds are expected. A heavy planter may remain upright while its plant, decorative stones, or removable insert becomes loose.
How Do You Fill a Fake Plant Pot Step by Step?
A successful planter is built from the bottom upward. Beginning with decorative moss and then trying to stabilize the trunk usually produces a weak result.
Start with the final location and plant shape. Preserve drainage, add low ballast, install a rigid holder, center the plant, fill side gaps without compression, and apply a secured top dressing. Finish with pull, tilt, rotation, and drainage tests.
Step 1: Shape the Plant
Open all branches and leaves before fixing the trunk.
Confirm the final:
- Height
- Width
- Front-facing side
- Canopy balance
- Viewing direction
Step 2: Inspect the Decorative Planter
Check:
- Cracks
- Drainage holes
- Base width
- Interior depth
- Surface level
- Maximum practical weight
Step 3: Add Low Ballast
Place gravel, sandbags, bricks, or the concrete insert at the bottom.
Keep the heaviest material as low as possible.
Step 4: Install the Main Holder
Use foam, wire, a grid, sleeves, plaster, expanding foam, or another compatible system.
Connect the holder to the ballast, nursery pot, or planter insert.
Step 5: Center and Brace the Plant
Check the plant from the front and sides.
Use two support levels for tall trunks.
Step 6: Fill Empty Side Space
Use rigid spacers, gravel, or fitted materials.
Do not crush the nursery pot or block drainage.
Step 7: Add the Top Dressing
Keep the finish below the rim so it does not spill during moving or cleaning.
Step 8: Test the Planter
Perform four checks:
- Pull test: The trunk should not lift from gentle upward pressure.
- Rotation test: The plant should not turn freely.
- Tilt test: The planter should recover from a small controlled movement.
- Drainage test: Water should leave through the intended outlet.
The test should remain gentle. Do not intentionally tip a heavy or fragile planter.
My Insights: What to Put in a Fake Plant Pot—Which 9 Best Fills Won’t Shift
The best answer is not one loose filler. It is a layered system in which every material has one clear job.
The nine best fills are dry floral foam, chicken wire with gravel, river rocks with sleeves, sealed sandbags, anchored potting mix, plaster, expanding foam, concrete inserts, and reusable rigid grids. Chicken wire with low ballast offers the best reusable balance, while concrete provides maximum permanence for suitable large installations.
My main insight is that most fake-plant pots fail because weight and stem retention are treated as the same problem.
Weight Stops Tipping
Useful ballast includes:
- Gravel
- Sandbags
- Bricks
- Pavers
- Concrete
These materials lower the planter’s center of gravity.
Holders Stop Leaning and Rotation
Useful holders include:
- Dry floral foam
- Chicken wire
- Rigid grids
- Stem sleeves
- Plaster
- Expanding foam
- Concrete anchors
These materials control the plant’s position.
Top Dressing Finishes the Display
Useful finishing materials include:
- River rocks
- Gravel
- Fixed moss
- Bark
- Artificial soil
These materials conceal the engineering.
A strong planter combines all three functions rather than asking decorative rocks to perform every job.
Best Fill for Indoor Floor Plants
For an indoor olive tree, ficus, palm, or fiddle-leaf tree, I use:
- A heavy nursery pot or lower sandbag
- Rigid spacers around the nursery pot
- An upper support collar
- River rock or artificial soil as the finish
This structure is clean, reversible, and easy to inspect.
Best Fill for Artificial Flowers
For individual flower stems, I use dry floral foam or a reusable rigid grid.
I add a small amount of gravel below the holder when the flower heads are heavy.
Best Fill for Outdoor Planters
For most reusable outdoor displays, I choose:
- Open drainage
- Sealed sandbags or gravel
- Secured chicken wire
- Deep stems
- A washed-stone top layer
Afloral’s guidance supports the use of chicken wire and ties when artificial plants need stronger wind retention.
Best Fill for Large Permanent Trees
For a suitable ground-level commercial planter, a removable concrete insert with a central sleeve provides the strongest base.
The installation surface and planter must be able to carry the finished weight.
Best Fill for Frequently Changed Displays
Reusable grids and chicken wire are the most practical.
They allow stems to be removed and replaced without crumbling foam or breaking a permanent base.
The Final Nine-Fill Decision Guide
| Main Need | Best Fill |
|---|---|
| Quick flower arrangement | Dry floral foam |
| Reusable outdoor support | Chicken wire and gravel |
| Heavy modern finish | River rocks with sleeves |
| Removable ballast | Sealed sandbags |
| Natural planted appearance | Potting mix over an anchor |
| Stable indoor base | Plaster insert |
| Irregular internal space | Expanding-foam liner |
| Maximum permanent strength | Concrete anchor insert |
| Frequent redesign | Rigid reusable grid |
My Final Rule
Never choose the fill only by what looks attractive at the top of the pot.
Start with the plant’s height, weight, canopy, location, and maintenance plan. Add ballast to control tipping, a rigid holder to control movement, and a separate top dressing to complete the appearance.
That system will remain more stable than a pot filled with one loose material, no matter how heavy or decorative that material appears.
Conclusion
Use low ballast, a rigid stem holder, secure side support, and contained top dressing. Chicken wire with gravel is the best reusable system; concrete suits permanent installations.