
Artificial flowers may look secure when first placed in a planter, yet rain and wind can expose loose stems, blocked drainage, weak foam, and an unstable base.
To pot artificial flowers outdoors, combine a weather-resistant planter, low ballast, a firm stem-holding layer, open drainage, and a secured top finish. Seven practical fills include dry floral foam, chicken wire with gravel, compacted potting mix, sealed sandbags, river rocks, exterior expanding foam, and a concrete anchor insert.
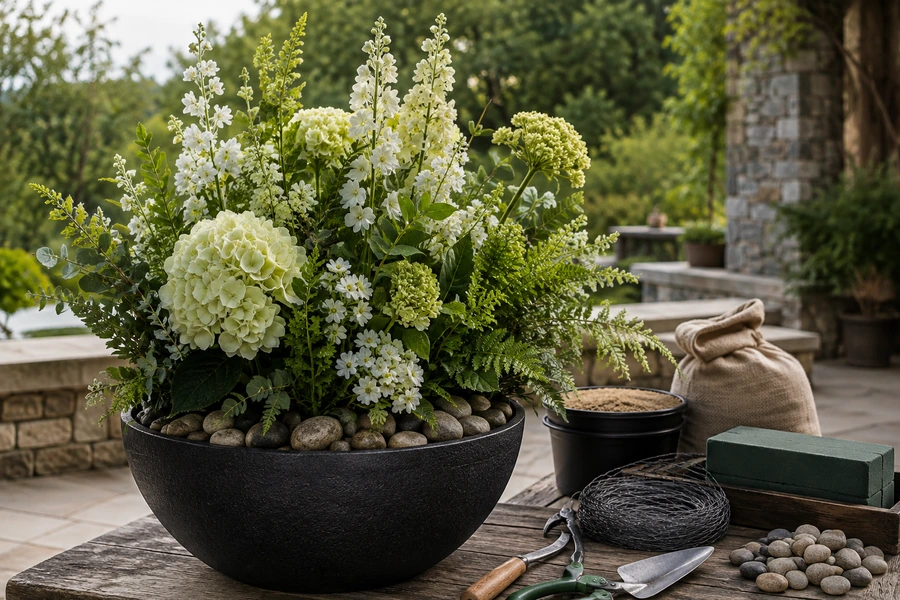
No fill can make weak indoor flowers permanently weatherproof. The complete display must also use suitable artificial flowers, secure stems, stable construction, and placement that matches the expected sun, rain, and wind.
What Should You Put in a Planter for Artificial Flowers?
Many people fill an entire planter with decorative stones or loose soil and then push the stems into the top. The arrangement may look finished, but it has no dependable internal structure.
An outdoor artificial-flower planter usually needs three functional layers: ballast at the bottom, a stem-holding system in the middle, and a decorative finish at the top. The best materials depend on whether the arrangement must be lightweight, removable, highly wind-resistant, or permanently installed.
Afloral recommends inserting outdoor artificial plants directly into soil for simple planters. For windier sites, it suggests tying the stems to a ball of chicken wire or securing the arrangement through a drainage opening. This difference is important because loose fill can support appearance, while a mechanical connection provides stronger retention.
The Three-Layer Potting System
I separate the planter into three jobs.
| Planter Layer | Main Function | Possible Materials |
|---|---|---|
| Lower layer | Adds weight and lowers the center of gravity | Gravel, bricks, sandbags, concrete insert |
| Middle layer | Holds and positions the stems | Dry floral foam, chicken wire, rigid grid, foam insert |
| Upper layer | Hides the mechanics and finishes the design | River rocks, gravel, fixed moss, bark, artificial soil |
One material does not need to perform every job. Dry floral foam can hold stems well but adds little weight. Gravel adds weight but may not hold a tall stem securely. Expanding foam can create a custom-fitting holder, but it should not be expected to stabilize a very light planter on its own.
Drainage Still Matters for Artificial Flowers
Artificial flowers do not develop root rot, but an outdoor planter can still collect rainwater around wire, foam, glue, dirt, and packaging materials.
Containers should have a clear route for excess water to leave. Penn State Extension recommends drainage openings in outdoor containers so water can flow out rather than remain trapped. For an artificial display, this same principle helps prevent standing water around the internal support.
Standing water can also create a mosquito-breeding area. The CDC specifically includes planters and flowerpot saucers among outdoor containers that should be emptied, covered, or maintained so water does not remain inside them.
I therefore keep drainage holes open even when I use stones, foam, or concrete. I may place rigid mesh over the opening to prevent small fill from escaping, but I do not seal the entire base unless the display is permanently covered and has another planned drainage route.
Do Not Confuse Ballast With Drainage
Gravel is useful in an artificial-flower planter because it adds weight. It should not be described as a magical drainage layer.
For living container plants, Penn State Extension warns that adding a coarse gravel layer beneath potting mix can actually interfere with water movement rather than improve drainage.
Artificial planters have no roots, so the design question is different. Gravel can still serve as ballast, but the actual drainage comes from open holes or an outlet—not simply from putting stones at the bottom.
What Are the 7 Best Fills for Outdoor Artificial-Flower Pots?
The seven best options solve different problems. A small covered-porch arrangement does not need the same fill as a large commercial planter beside an exposed entrance.
The most useful outdoor fills are dry floral foam, chicken wire with gravel, compacted potting mix with an anchor, sealed sandbags, river rock with stem sleeves, cured exterior expanding foam, and a removable concrete base. The strongest installations usually combine two or more of these materials.
Fill 1: Dry Floral Foam With a Weighted Base
Dry floral foam is one of the easiest materials for arranging artificial flower stems. It can be cut to fit the planter and allows each flower to be positioned at a controlled angle.
Smithers-Oasis identifies SAHARA as a dry floral foam intended for permanent botanicals and dried arrangements. Its guidance also recommends adding florist netting and waterproof tape when a large design needs greater strength.
Best For
- Covered porches
- Small patio pots
- Window boxes in protected locations
- Seasonal arrangements
- Planters that need frequent redesign
- Lightweight flower stems
How I Use It
I first add a heavy lower layer, such as a brick, sealed sandbag, or gravel. I then place the dry foam inside a waterproof or weather-resistant insert.
The foam should fit firmly. It should not slide or lift when I pull gently on a stem.
For a wider planter, I place chicken wire or florist netting over the foam and connect the netting to the insert. The wire distributes force across the entire block instead of allowing one tall flower to tear out a narrow section.
I insert the stems deeply and at varied angles. The tallest stems receive the deepest insertion.
I finish the top with larger decorative stones or a secured artificial-moss mat.
Main Advantages
- Easy to cut
- Fast to arrange
- Supports precise spacing
- Allows individual stems to be replaced
- Useful for rental and seasonal inventory
Main Limitations
Dry foam is not heavy. It can also crumble after repeated stem insertion or prolonged exposure. Water entering around the foam may carry small particles out of the drainage holes.
I use it as a stem holder, not as the planter’s only ballast or structural system.
Fill 2: Chicken Wire and Pea Gravel
Chicken wire creates a reusable stem grid, while pea gravel adds weight and locks the lower part of the structure in place.
This is one of my preferred systems for medium and large planters because it can be adjusted without destroying a foam block.
Best For
- Windy patios
- Restaurant entrances
- Large porch containers
- Mixed artificial grasses and flowers
- Displays changed several times each year
- Buyers who want to avoid single-use foam
How I Use It
I shape galvanized or exterior-suitable wire mesh into a firm ball or cylinder that fits inside the planter. I fold and cover every sharp edge.
I connect the wire structure to the planter insert, a lower anchor, or another fixed point. Afloral specifically recommends tying artificial plant stems to chicken wire in higher-wind planters and using zip ties for additional security.
I add pea gravel around the bottom of the wire structure. The gravel should stabilize the grid without blocking drainage.
Each stem passes through more than one wire opening. I cross some stems through the structure rather than placing every stem vertically.
Main Advantages
- Reusable
- Stronger than loose soil
- Allows good drainage
- Suitable for many stem diameters
- Easy to repair
- Works with gravel ballast
Main Limitations
Chicken wire does not grip very thin stems automatically. Fine fillers may need to be grouped around a stronger anchor stem.
Wire ends can also damage hands, planters, and artificial stems. Every cut edge must be folded inward or covered.
Fill 3: Compacted Potting Mix With a Buried Anchor
Potting mix or clean soil gives an artificial arrangement a natural planted appearance. It is useful for covered hanging baskets, window boxes, and pots that will be viewed closely.
Afloral’s outdoor artificial-plant guide recommends filling an empty hanging basket partly with soil and placing artificial stems directly into it.
However, soil alone is not a dependable fixing for tall flowers in an exposed location.
Best For
- Covered hanging baskets
- Window boxes
- Sheltered porches
- Temporary seasonal arrangements
- Mixed real and artificial displays
- Planters where natural-looking top fill matters
How I Strengthen It
I place a wire cage, grid, or buried rigid anchor beneath the soil. The stems pass through this support before entering the surrounding mix.
For short flowers, the buried section may be sufficient. For tall hydrangeas, grasses, or flowering branches, I tie several stems to a longer coated stake.
I compact the fill enough to support the stems, but I do not create a solid wet mass.
I also keep the planter free of weeds and fallen organic material. Artificial displays still collect seeds, leaves, dust, and insects when they remain outdoors.
Main Advantages
- Natural appearance
- Low material cost
- Easy stem adjustment
- Useful in existing planters
- Can blend artificial and live plants
Main Limitations
Soil can become heavy when wet. It may also support weeds, collect debris, or wash out through drainage openings.
Loose soil should not be treated as an engineered wind anchor. A hidden wire or stake system makes the display much safer and more dependable.
Fill 4: Sealed Sandbags With a Top Grid
Sand creates strong ballast, but loose sand can escape through drainage holes and move into the stem-holding layer.
A sealed sandbag or fabric weight pouch keeps the ballast contained and removable.
Best For
- Tall lightweight planters
- Rental inventory
- Balcony floor planters
- Event entrances
- Displays that must be moved between seasons
- Containers that cannot be permanently filled
How I Use It
I place one or more sealed sandbags at the lowest point. I distribute them evenly so the planter does not lean.
Above the sandbags, I install a rigid plastic grid, chicken-wire insert, or dry floral-foam tray. The stem system should not sit directly on a soft bag because it can shift when the planter is moved.
I leave an open channel between the upper support and the planter’s drainage holes.
Main Advantages
- Strong removable weight
- Easy seasonal disassembly
- No loose grains in the planter
- Useful in decorative pots
- Can be reused across several displays
Main Limitations
A punctured bag releases sand and may block drainage. The bags should therefore remain below sharp wire ends and rigid stems.
The added weight also affects handling. Staff should know the finished planter weight before attempting to lift or transport it.
For a large commercial pot, several smaller sandbags are often easier to position and remove than one very heavy bag.
Fill 5: River Rock or Gravel With Stem Sleeves
River rocks and gravel are durable outdoor materials. They add ballast and create a clean visible finish, but loose stones alone do not position delicate flower stems very well.
I solve that problem by combining the stones with rigid stem sleeves.
Best For
- Modern exterior planters
- Artificial agave and structured plants
- Poolside décor
- Commercial entrances
- Low arrangements
- Planters that need a finished stone surface
How I Use It
I install several short PVC tubes, hollow garden stakes, or rigid stem sleeves inside the planter. The tubes are fixed to a lower grid or weighted base.
The artificial flower stems slide into these sleeves. This prevents the stems from drifting through the stones.
I then place washed gravel or river rocks around the sleeves. Larger stones form the visible top layer.
The design can remain removable. I can pull out one stem or insert a replacement without disturbing the entire planter.
Main Advantages
- Adds substantial weight
- Handles rain well
- Provides a finished surface
- Easy to clean
- Reusable
- Suitable for structured artificial plants
Main Limitations
A stone-filled planter can become extremely heavy. The floor, balcony, shelf, and moving equipment must be suitable for the final load.
Small gravel may escape through drainage holes, so I use mesh or a rigid screen while preserving water flow.
I also wash the stones before using them around white or pale artificial flowers. Stone dust can transfer to petals during installation.
Fill 6: Exterior Expanding Foam in a Removable Insert
Expanding polyurethane foam can fill irregular spaces and create a custom-fitted stem holder. It is useful when a planter opening is unusual or when a premade foam block does not fit.
DuPont describes several cured exterior foam products as weather-resistant or water-resistant. Its Pond & Stone foam is designed for damp outdoor conditions and forms a water-resistant outer coating after curing.
That does not mean every expanding foam is suitable for every planter. The product label must specifically permit the material, environment, and intended use.
Best For
- Irregular planter interiors
- Custom artificial topiaries
- Small permanent inserts
- Complex stem arrangements
- Displays that require a fitted internal block
How I Use It
I do not normally spray expanding foam directly into an expensive decorative planter.
Instead, I use a removable plastic bucket, rigid nursery pot, or custom inner container. I place temporary tubes where the stems will enter, then apply the foam according to the manufacturer’s instructions.
I allow the foam to expand and cure fully. After curing, I remove or open the temporary stem channels and insert the artificial flowers.
The completed insert is then placed above a separate ballast layer.
Main Advantages
- Fits irregular spaces
- Holds custom stem channels
- Lightweight
- Can bond to several surfaces when compatible
- Creates a removable internal module
Main Limitations
Expanding foam is not useful ballast. It can also expand beyond the expected shape, distort a weak container, or become difficult to remove.
The uncured material requires careful handling. I follow the product label, work in a well-ventilated area, protect nearby surfaces, and use the required gloves and eye protection.
I do not place uncured foam around finished petals, fabric, or visible planter surfaces.
Fill 7: A Concrete Anchor Insert With Removable Stem Tubes
Concrete provides the strongest ballast among the seven options. It is suitable for large permanent planters, commercial entrances, tall artificial trees, and exposed projects.
It is also the least flexible option.
Quick-setting concrete products can harden rapidly, and concrete or grout products are commonly used to secure anchors and other fixed components.
Best For
- Large commercial planters
- Tall artificial trees
- Hotel and restaurant entrances
- Permanent exterior displays
- High-traffic public areas
- Locations where theft or movement is a concern
How I Use It
I create a removable concrete puck inside a separate bucket or liner rather than pouring concrete directly into the decorative planter.
Before the concrete sets, I place rigid sleeves, anchor bolts, or a central support tube in the correct positions. The sleeves remain open after curing.
The artificial stems, tree trunk, or upper floral structure connects to these sleeves.
I also create a clear drainage path around or through the insert. The concrete should not create a sealed basin that holds rainwater.
After the insert has cured according to the product instructions, I place it in the decorative planter and cover it with gravel, stones, or a removable upper layer.
Main Advantages
- High stability
- Long service life
- Strong anchor points
- Suitable for large structures
- Difficult to remove or steal
- Useful for repeat commercial displays
Main Limitations
Concrete creates substantial weight. It may exceed the safe capacity of balconies, raised platforms, lightweight planters, or temporary stages.
It is also difficult to modify. A cracked stem sleeve or wrong anchor position may require a new insert.
For structural, elevated, or public installations, a qualified contractor should confirm the support, attachment, and finished load.
Seven-Fill Comparison
| Fill System | Stability | Easy to Change? | Outdoor Durability | Best Application |
|---|---|---|---|---|
| Dry floral foam + ballast | Medium | High | Medium | Covered seasonal pots |
| Chicken wire + gravel | High | High | High | Windy reusable planters |
| Potting mix + buried anchor | Medium | High | Medium | Natural-looking sheltered displays |
| Sealed sandbags + grid | High | High | High | Movable weighted planters |
| River rock + stem sleeves | High | Medium | High | Modern commercial pots |
| Expanding-foam insert | Medium | Medium | High when compatible | Custom planter interiors |
| Concrete anchor insert | Very high | Low | Very high | Permanent large installations |
How Do You Pot Artificial Flowers Step by Step?
An attractive outdoor arrangement should be planned from the planter upward. Starting with flowers and then searching for a way to hold them often creates an unstable result.
To pot artificial flowers, inspect the planter, preserve drainage, choose a low ballast, install a stem holder, prepare the flower heights, connect the tallest stems mechanically, and add a secured decorative top layer. Test the completed arrangement before placing it in service.
Step 1: Choose a Suitable Planter
I look for:
- Outdoor-rated material
- Wide or stable base
- Adequate depth
- Drainage openings
- No existing cracks
- Enough width for the planned arrangement
- A safe finished weight
A tall narrow planter may look elegant, but it needs more ballast than a wide low pot.
I also check the installation surface. A planter placed on a sloped paver, soft soil, or narrow ledge will remain unsafe even with a strong internal fill.
Step 2: Protect the Drainage Path
I cover large drainage holes with rigid mesh or screen so loose gravel does not escape.
I do not seal the holes with glue, foam, or concrete.
After installing the main fill, I pour a small amount of water into the empty areas of the planter and confirm that it can leave freely.
This drainage check is especially important when foam, sandbags, liners, or concrete inserts create hidden pockets.
Step 3: Add the Lowest Ballast
The heaviest materials belong at the bottom.
Possible lower ballast includes:
- Bricks
- Sealed sandbags
- Gravel
- Concrete insert
- Metal weight plates
Placing weight near the top does less to control tipping and makes the planter harder to handle safely.
Step 4: Install the Stem-Holding Layer
I select dry floral foam, wire, rigid sleeves, or a custom insert according to the display.
The holder must connect to the planter or ballast. It should not lift out as one loose block.
Afloral’s stronger-wind method uses chicken wire, ties, and a connection through the planter rather than relying on loose fill alone.
Step 5: Prepare the Artificial Flowers
Before inserting them, I:
- Clean the stems
- Check for exposed wire
- Open compressed petals
- Bend wired leaves
- Group fine stems
- Extend stems that are too short
- Sort flowers by height
- Confirm outdoor suitability
I do not force a short stem to work in a deep planter. I attach it to a longer coated stake or anchor stem.
Step 6: Arrange From Strongest to Lightest
I begin with the main anchor stems. I then add focal flowers, supporting flowers, fillers, and trailing pieces.
Heavy flower heads remain lower and closer to the center. Tall narrow stems can rise higher.
Afloral’s vessel guidance recommends crossing stems to create an internal armature and keeping heavier blooms low and central when extra support is needed.
Step 7: Add a Secured Decorative Finish
I hide the holder with:
- River rocks
- Large gravel
- Fixed artificial moss
- Bark pieces
- Artificial soil
- A fitted decorative mat
Loose lightweight moss may blow away. I use a fitted sheet, hidden ties, or heavier top material in exposed locations.
Step 8: Perform Three Tests
Pull test: Important stems should not slide out under gentle upward pressure.
Movement test: The insert should not shift when the planter is moved slightly.
Drainage test: Water should leave through the intended outlet.
I also step back and examine the arrangement from several directions. A mechanically secure arrangement can still look unnatural when every flower faces forward.
How Do You Keep Potted Artificial Flowers From Blowing Away?
A heavy fill can stop the planter from tipping while the flowers still pull out individually. Wind protection requires separate controls for the container and the stems.
Keep potted artificial flowers secure by lowering the center of gravity, connecting the internal holder to the planter, inserting stems deeply, grouping lightweight flowers around strong anchors, and keeping the overall arrangement compact. Move removable displays indoors when severe winds are forecast.
The National Weather Service advises securing or bringing in loose outdoor objects before high winds begin because ordinary outdoor items can become dangerous debris.
Reduce Wind-Catching Surface
Large hydrangeas, wide leaves, and long trailing stems catch more wind than compact flowers.
For an exposed planter, I use:
- Lower flower height
- Denser central placement
- Fewer wide flat leaves
- Shorter trailing pieces
- More attachment points
- Flexible stems rather than brittle stems
I reserve tall open garden-style arrangements for covered or sheltered areas.
Connect Stems at More Than One Point
A stem can rotate or pull loose when it is held at only one shallow point.
I pass it through a wire grid and then into foam, soil, or a lower sleeve. Tall focal stems may also be tied to a hidden stake.
This two-level connection gives the arrangement more resistance than a single insertion point.
Secure the Planter Itself
A heavy planter should stand on a level surface. For permanent commercial installations, it may need a hidden structural connection in addition to internal ballast.
Elevated planters require special caution. Added weight increases the consequences if the planter falls.
I do not place a heavy but unsecured planter on a balcony ledge, narrow wall, or unstable shelf.
Use a Storm Plan
No decorative fill makes an arrangement safe in every storm.
Before severe weather, I remove hanging baskets, small pots, lightweight inserts, and detachable flower modules. Large permanent planters remain outside only when their complete structure and site attachment are designed for those conditions.
How Do You Keep Outdoor Artificial Flowers Looking Good?
A strong potting system prevents movement, but it cannot prevent color fading or material aging.
Use artificial flowers labeled for the intended outdoor exposure, place delicate fabric blooms under cover, keep drainage clear, clean the petals regularly, and inspect the fill after storms. Replace faded stems individually when possible instead of rebuilding the entire planter.
Match the Flower Material to the Location
For full exposure, I favor:
- Molded PE greenery
- Structured grasses
- Artificial boxwood
- Agave-style plants
- Dense shrubs
- Outdoor-rated flowers
- Secure wired stems
For covered porches, I can use more silk-touch polyester flowers, hydrangeas, ferns, and delicate trailing pieces.
Inspect the Hidden Fill
Every few weeks and after strong weather, I check:
- Drainage openings
- Loose gravel
- Torn sandbags
- Crumbling foam
- Rusting wire
- Shifted concrete inserts
- Loose zip ties
- Standing water
- Detached stems
- Surface moss or bark
The hidden support may weaken before the flowers show obvious movement.
Clean Without Soaking the Fill
I use a soft brush, microfiber cloth, or cool airflow for routine dust.
I avoid spraying large amounts of water into a planter simply to wash the flowers. Water can carry dirt deeper into the fill and remain around internal connections.
When washing is necessary and the flower material allows it, I remove the stem from its sleeve or holder and clean it separately.
My Insights: How Should You Pot Artificial Flowers With 7 Fills That Stay Perfect Outdoors
The best fill is not a single material. It is a layered system that separates weight, stem control, drainage, and appearance.
Artificial flowers stay secure outdoors when the planter combines low ballast, mechanical stem retention, open drainage, a durable top finish, and flowers suited to the exposure. Of the seven fills, chicken wire with gravel offers the best reusable balance, while concrete inserts provide the strongest permanent support.
My main insight is that buyers should choose a fill according to the intended service life.
Best Fill for Seasonal Planters
I choose dry floral foam above removable ballast.
The arrangement is fast to build, easy to change, and suitable for a covered porch or short outdoor season.
I reinforce the foam with wire or netting when the flowers are large.
Best Fill for Reusable Event Inventory
I choose sealed sandbags beneath a removable chicken-wire or rigid-grid insert.
The weight, holder, and flowers can be separated. Event teams can reuse the planter for several designs without breaking concrete or disposing of a fitted foam block.
Best Fill for Retail Displays
I use a rigid insert with dry foam or stem sleeves.
The display needs to stay organized, but staff may need to replace individual flowers or update seasonal colors quickly.
Best Fill for Windy Residential Patios
I choose chicken wire, gravel ballast, deep stems, and a secured decorative stone layer.
This system remains adjustable while providing stronger retention than loose soil.
Best Fill for Permanent Commercial Projects
I choose a removable concrete anchor insert with stem sleeves or a fixed central tube.
The insert provides weight and repeatable connection points. The decorative planter remains replaceable because concrete is not poured directly into it.
Best Fill for a Natural Planted Look
I use compacted potting mix over a buried wire grid.
The visible soil makes the arrangement look planted, while the hidden grid provides the strength that loose mix cannot.
Best Fill for an Irregular Planter
I use a cured exterior-compatible expanding-foam insert above separate ballast.
The foam creates a custom internal shape, but the heavy lower layer controls stability.
My Final Selection Guide
| Main Priority | Recommended Fill |
|---|---|
| Fast and inexpensive | Dry foam over ballast |
| Reusable and adjustable | Chicken wire with gravel |
| Natural appearance | Potting mix with buried anchor |
| Strong removable weight | Sealed sandbags with grid |
| Clean modern finish | River rocks with sleeves |
| Custom irregular shape | Expanding-foam insert |
| Maximum permanent stability | Concrete anchor insert |
The Most Reliable Outdoor Build
For most medium porch or patio planters, I use this sequence:
- Confirm that the planter has open drainage.
- Add a sealed sandbag or gravel at the bottom.
- Fit a removable chicken-wire cylinder.
- Connect the cylinder to the lower anchor or planter insert.
- Extend short flower stems with coated stakes.
- Pass stems through several wire openings.
- Keep heavy blooms low and central.
- Add washed river rocks over the support.
- Check drainage and stem retention.
- Remove the floral insert before severe weather.
This approach is stable, repairable, and reusable. It does not depend on one adhesive or one fragile foam block.
A planter should also remain honest about its limits. Heavy ballast cannot make indoor fabric flowers UV-proof. A concrete base cannot stop thin petals from tearing. Expanding foam cannot turn a narrow unstable pot into a storm-rated structure.
The fill keeps the design in place. The flower material, planter shape, site conditions, and maintenance determine how long the complete display continues to look good.
Conclusion
Use low ballast, a secured stem holder, open drainage, and a durable top finish. Choose dry foam for flexibility, wire and gravel for reuse, or concrete for permanent outdoor stability.