
A tall artificial plant can look stable until wind rotates the trunk, spills the top dressing, or lifts the entire insert from its decorative planter.
The best outdoor pot fills combine dense ballast with a separate mechanical holder. Strong options include sealed sandbags, angular gravel with chicken wire, river rocks with stem sleeves, bricks with crossbars, reinforced dry floral foam, anchored potting mix, exterior foam inserts, concrete anchor pucks, and reusable perforated grids.
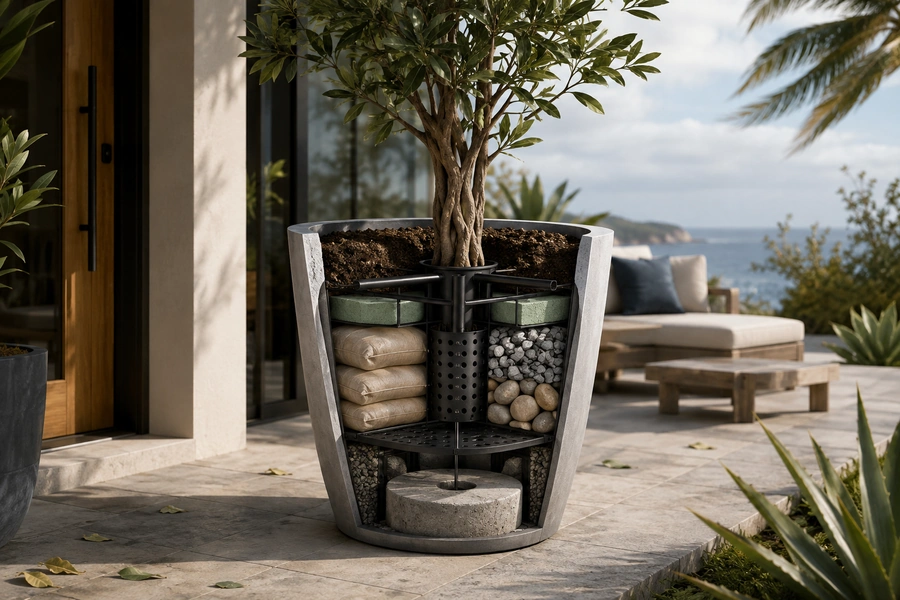
No loose filler makes a planter unshakeable by itself. The plant, internal holder, ballast, decorative pot, drainage system, installation surface, and severe-weather plan must operate as one connected structure.
What Should You Put in an Artificial Plant Pot Outdoors?
Outdoor planters need more than an attractive surface. The material hidden beneath the top dressing determines whether the artificial plant remains centered and upright.
An outdoor artificial-plant pot should contain three functional layers: low ballast to resist tipping, a rigid holder to stop the trunk from leaning or rotating, and a contained top dressing to conceal the mechanics. The planter must also preserve drainage so rainwater cannot remain trapped around wire, foam, or anchors.
Afloral recommends inserting simple artificial plants into soil but adding chicken wire and ties when greater wind resistance is required. That distinction is important: loose soil can create a planted appearance, while wire provides the stronger mechanical connection.
The Three-Layer Outdoor System
| Pot Layer | Main Job | Suitable Materials |
|---|---|---|
| Bottom layer | Lowers the center of gravity | Sandbags, gravel, bricks, pavers, concrete |
| Middle layer | Locks the trunk or stems | Chicken wire, sleeves, foam cage, crossbars, rigid grid |
| Top layer | Hides the structure | River rock, gravel, fixed moss, artificial soil |
One material rarely performs all three jobs well.
Dry floral foam positions stems but adds little weight. Stones add weight but may allow a narrow trunk to rotate. Expanding foam fills gaps but does not create enough ballast for a tall tree.
Keep Rainwater Moving
Artificial plants do not have roots, but standing water can still damage internal materials and create an avoidable sanitation problem.
The CDC recommends regularly emptying or maintaining planters and other outdoor containers that hold water because mosquitoes lay eggs near standing water.
I therefore preserve:
- Open drainage holes
- An overflow route
- Space beneath removable inserts
- Mesh that contains gravel without sealing the outlet
- Access for inspection after storms
A layer of stones should not be confused with drainage. Water leaves through an open outlet, not simply because rocks are present.
Which Outdoor Fill Is Best?
The best fill depends on the plant’s height, canopy, pot shape, expected wind, maintenance plan, and whether the installation must remain removable.
Use sealed sandbags for removable ballast, gravel and chicken wire for adjustable outdoor planters, stem sleeves for narrow trunks, bricks and crossbars for large decorative pots, reinforced dry foam for protected floral displays, and concrete inserts for permanent ground-level installations.
Nine-Fill Comparison
| Fill System | Tipping Resistance | Trunk Control | Removable? | Best Use |
|---|---|---|---|---|
| Sealed sandbags and rigid deck | High | Medium | High | Movable tall planters |
| Angular gravel and chicken wire | High | High | High | Reusable patio displays |
| River rock and stem sleeves | High | High | Medium | Modern commercial pots |
| Bricks, pavers, and crossbars | Very high | High | High | Large hollow planters |
| Reinforced dry floral foam | Low alone | Medium | High | Covered floral arrangements |
| Potting mix and buried anchor | Medium | Medium | High | Natural-looking sheltered pots |
| Exterior foam insert and ballast | Medium | High | Medium | Irregular containers |
| Concrete anchor puck | Very high | Very high | Low to medium | Permanent artificial trees |
| Reusable perforated grid module | Medium | High | Very high | Frequently redesigned pots |
Fill 1: Sealed Sandbags With a Rigid Support Deck
Loose sand adds weight, but it can escape through drainage holes, enter stem mechanisms, and make seasonal removal unnecessarily messy.
Sealed sandbags provide dense, removable ballast. Place several small bags at the lowest point of the planter, cover them with a rigid support deck, and install the artificial plant above that deck. The plant should never rest directly on a flexible bag that can change shape.
Best Applications
- Tall fiberglass planters
- Hotel entrance pots
- Event installations
- Balcony floor planters
- Seasonal artificial trees
- Pots that must be moved or reused
How I Build the System
I begin with two or more compact sandbags rather than one oversized bag. Smaller modules are easier to distribute, remove, and carry.
Above the bags, I install a rigid platform made from a material suitable for the environment. The platform supports:
- The nursery pot
- A central stem sleeve
- A chicken-wire cage
- An upper crossbar
- A removable floral insert
The deck must leave drainage channels around its edge or through planned openings.
Why It Resists Movement
The bags place dense weight close to the ground. The rigid deck spreads the plant’s force across the complete lower structure.
The artificial plant cannot remain stable when its trunk holder floats independently above the ballast. I therefore connect the upper holder to the deck with ties, bolts, brackets, or another suitable mechanical method.
Main Limitation
Sandbags can be punctured by wire, screws, rough planter interiors, or sharp branch ends.
I isolate them from sharp hardware and inspect them whenever the planter is dismantled.
The finished planter may also become too heavy for safe manual handling. Multiple removable bags let the team reduce the weight before moving the pot.
Fill 2: Angular Gravel With a Chicken-Wire Core
Angular gravel and chicken wire create one of the most versatile outdoor systems. Gravel supplies weight, while the wire controls stems in several directions.
Form chicken wire into a tight cylinder or ball, connect it to the planter or lower ballast, and place angular gravel around its base. Pass stems through more than one opening and tie tall anchor stems to the wire so the arrangement cannot rotate as one loose bundle.
Afloral specifically recommends connecting artificial plant stems to chicken wire when wind is a concern.
Better Homes & Gardens also identifies chicken wire as a traditional reusable stem-holding structure and notes that decorative pebbles can add weight and help hold stems.
Why Angular Gravel Works Better Than Smooth Pebbles Below
Angular particles interlock more effectively than perfectly smooth stones. They are therefore useful around the lower wire frame where movement control matters more than appearance.
I reserve attractive smooth river rocks for the visible upper layer.
Installation Method
- Shape the chicken wire to fit the liner.
- Fold every cut edge inward.
- Connect the cage to the lower platform or planter insert.
- Add angular gravel around the base.
- Pass artificial stems through two or more wire openings.
- Tie the main stems to the wire.
- Cover the mechanism with larger decorative stones.
Best Applications
- Mixed artificial flowers
- Outdoor grasses
- Shrubs
- Seasonal patio pots
- Restaurant entrances
- Rental displays
Main Limitation
Chicken wire can scratch decorative planters and expose sharp edges.
I place it inside a removable liner and cover every cut end. Fine artificial stems may also need to be bundled around a stronger stake before entering the grid.
Fill 3: River Rocks With Central Stem Sleeves
River rocks create a clean finished surface and add useful weight. They perform best when a rigid sleeve—not the stones—controls the trunk.
Fix one or more rigid stem sleeves to a weighted base, slide the artificial trunk into the sleeves, and place washed river rocks around the structure. The sleeves stop leaning and rotation, while the stones add ballast and conceal the internal hardware.
Best Applications
- Artificial agave
- Snake plants
- Yucca
- Small olive trees
- Hotel lobby planters
- Retail entrances
- Poolside displays
- Modern architectural pots
Why Sleeves Matter
A narrow artificial trunk can rotate inside a pot completely filled with stones. The stones may appear tightly packed, but repeated wind or handling can gradually create space around the stem.
A rigid sleeve provides a repeatable position.
For tall plants, I use two control points:
- A lower sleeve near the ballast
- An upper collar near the planter opening
This two-level support prevents the trunk from pivoting.
Choosing the Rocks
I use washed stones that do not release dust onto pale leaves or planters.
The visible top layer should be:
- Large enough not to scatter easily
- Heavy enough to remain in place
- Below the planter rim
- Removable for inspection
- Compatible with drainage
Main Limitation
A rock-filled pot can become extremely heavy.
Before using this system on a balcony, raised floor, roof terrace, mobile platform, or shelf, the project team should confirm that the surface can safely carry the final load.
Fill 4: Bricks or Pavers With a Crossbar Frame
Large decorative planters often contain more empty volume than the artificial plant needs. Filling the complete pot with gravel wastes material and creates unnecessary weight.
Place bricks or paving blocks at the bottom as concentrated ballast, then install a rigid crossbar frame above them. Attach the nursery pot or trunk sleeve to the crossbars and fill only the visible upper area with lightweight or decorative material.
Best Applications
- Large hotel planters
- Mall entrance pots
- Tall hollow fiberglass containers
- Restaurant terraces
- Wide artificial-tree planters
- Projects requiring removable internal parts
Why This System Saves Material
Bricks and pavers provide dense, predictable units. They can be placed where the planter needs stability without filling every empty space.
The crossbars create a structural bridge across the pot. They may support:
- A nursery pot
- A central stem sleeve
- A wire cage
- A modular floral insert
- A removable artificial tree
The frame should connect securely to the planter insert or ballast assembly. It should not simply rest on loose blocks.
Useful Safety Details
I add non-slip pads between hard blocks and fragile decorative surfaces. The blocks should not be able to slide when the planter is tilted slightly during handling.
I also keep the drainage opening clear. The lower ballast arrangement must not form a sealed wall around the outlet.
Main Limitation
Individual bricks may move when the planter is transported.
For movable displays, I contain them inside a fitted lower tray or strap the ballast modules together.
Fill 5: Reinforced Dry Floral Foam for Protected Outdoor Flowers
Dry floral foam is useful for arranging separate flowers, but it is not a sufficient foundation for a tall artificial tree.
Use dry floral foam only as the stem-positioning layer. Place it above separate ballast, fit it tightly inside a removable tray, and reinforce it with wire netting or a rigid grid. This system is best for covered porches, window boxes, and short seasonal arrangements.
Smithers-Oasis identifies SAHARA as dry floral foam designed for permanent botanicals and dried arrangements.
Best Applications
- Short artificial flowers
- Covered porch pots
- Window boxes
- Seasonal hotel displays
- Restaurant table planters
- Removable flower inserts
Reinforcement Method
I use:
- A weighted lower layer
- A rigid removable tray
- Tightly fitted dry foam
- Wire netting or a perforated upper grid
- Deep stem insertion
- A secured decorative finish
The grid helps distribute pulling force across the complete foam block. Without reinforcement, one heavy hydrangea or branch can tear through a narrow insertion point.
Keep It Protected
Dry floral foam can crumble after repeated stem insertion. Outdoor rain and movement may accelerate deterioration or carry particles toward drainage openings.
I therefore use it mainly where the planter has architectural cover or a removable internal tray.
Main Limitation
Foam is light. Even a tightly fitted block will not prevent a tall narrow pot from tipping.
Treat it as a design tool, not ballast.
Fill 6: Compacted Potting Mix Over a Buried Anchor
Potting mix provides the most familiar planted appearance. It works best when a hidden mechanical structure carries the load.
Install a wire cage, stake, or rigid grid below the surface, pass the artificial stems through it, and then compact clean potting mix around the structure. The buried anchor controls movement; the mix creates the natural appearance.
Afloral’s simplest outdoor method places artificial plant anchor stems in soil, while its stronger-wind method adds chicken wire and ties.
Best Applications
- Covered hanging baskets
- Sheltered porch planters
- Window boxes
- Mixed live and artificial displays
- Seasonal floral containers
- Pots viewed at close range
How to Strengthen It
For individual flowers, I pass the stems through a buried grid before compacting the mix.
For a central plant, I attach the trunk to a coated stake or sleeve that reaches the lower part of the planter.
For a mixed arrangement, I create several anchor zones rather than inserting every stem into one soft area.
Main Advantages
- Natural appearance
- Low initial cost
- Easy seasonal changes
- Familiar installation process
- Flexible stem positioning
Main Limitations
Potting mix can settle, become heavy when wet, support weeds, and wash through drainage openings.
It should not be used as the only wind-control system for a tall exposed plant.
Penn State Extension emphasizes that containers need drainage openings so excess water can leave. Although its guidance concerns living container plants, preserving a clear outlet is equally practical for artificial installations exposed to rain.
Fill 7: Exterior-Compatible Expanding Foam in a Removable Liner
Expanding foam can create a custom-shaped insert where standard foam blocks, grids, or nursery pots do not fit.
Apply an exterior-compatible expanding foam only inside a removable liner, around fixed sleeves or support components. Allow it to cure fully, then place the insert above separate ballast. The foam controls internal movement but should not be treated as the main weight.
DuPont states that its Pond & Stone foam expands to fill gaps and develops a water-resistant outer coating after curing. This supports exterior decorative applications, but it does not mean every expanding foam is suitable for every artificial plant or planter.
Best Applications
- Irregular decorative pots
- Artificial topiaries
- Custom nursery-pot inserts
- Small artificial trees
- Complex multi-stem arrangements
- Planters with large internal cavities
Safer Installation
I first place:
- A removable bucket or liner
- Central stem sleeves
- Drainage channels
- Any required crossbars
- Temporary positioning tubes
I then apply the foam according to the product instructions.
After curing, the insert can be removed, inspected, repaired, or replaced without damaging the decorative planter.
Never Depend on Foam Alone
Cured expanding foam is light. A tall plant fixed inside a foam block may still tip the entire pot.
I combine it with:
- Sandbags
- Gravel
- Bricks
- Metal weight plates
- A concrete lower insert
Main Limitation
Expanding foam can:
- Distort a weak liner
- Expand beyond the planned space
- Block drainage
- Bond permanently to visible surfaces
- Be difficult to remove
- React poorly with incompatible materials
Always test compatibility and follow the safety and curing instructions for the selected product.
Fill 8: Concrete Anchor Puck With a Central Sleeve
Concrete provides the strongest permanent ballast in this list. It works well for large artificial trees and public-facing ground-level installations.
Cast concrete inside a removable liner with a central sleeve, anchor, or support tube. After curing, place the complete puck inside the decorative planter and connect the artificial trunk mechanically. Preserve drainage around the insert and verify the final structural load.
QUIKRETE describes its Fast-Setting Concrete Mix as a blend of cement, sand, and gravel intended for applications such as setting posts, sleeves, and anchors.
Best Applications
- Large artificial olive trees
- Artificial palms
- Hotel entrances
- Mall common areas
- Permanent restaurant terraces
- High-traffic commercial planters
- Displays at risk of being moved or stolen
Why I Use a Removable Puck
Pouring concrete directly into the finished planter creates several problems:
- The planter becomes almost impossible to move
- Drainage may be blocked
- Repairs become difficult
- The decorative container cannot be reused
- Cracking can damage the planter
A separate concrete puck retains the strength while allowing the outer planter to be changed.
Design Details
The puck may include:
- A central metal or plastic sleeve
- Anchor bolts
- Lifting points
- Drainage channels
- Protective feet
- A removable upper grid
Main Limitation
Concrete creates substantial permanent weight.
Balconies, rooftops, raised floors, temporary stages, and elevated platforms may require professional load review. Cement-based products also require the protective equipment and handling practices specified by their manufacturer.
Fill 9: Reusable Perforated Grid Module With Contained Stone
A reusable grid module is the most adaptable option when the planter design changes regularly.
Install a rigid perforated grid or pin-holder module above removable ballast. Insert trunks and stems through dedicated openings, lock important stems below the grid, and use contained stone or a fitted artificial-soil mat as the visible finish.
Floral frogs, chicken wire, and other reusable holders are established methods for keeping decorative stems upright. Decorative stones can then provide additional weight and conceal the support.
Best Applications
- Seasonal hotel entrances
- Retail campaigns
- Restaurant planters
- Wedding and event inventory
- Rental artificial plants
- Displays requiring frequent repairs
- Mixed flower and foliage pots
Grid Options
The holder may be:
- A perforated plastic plate
- A metal pin holder
- A rigid mesh tray
- A custom crossbar plate
- A reusable stem-cell insert
- A modular nursery-pot collar
The grid should connect to the planter or ballast assembly. A loose plate resting on top of gravel can lift with the plant.
Contain the Top Layer
I use a removable mesh pouch, fitted tray, or artificial-soil mat to contain decorative material.
This prevents stones or bark from spilling every time the grid is removed.
Main Limitation
A grid controls the plant but adds little weight. It must remain connected to sandbags, bricks, gravel, or another lower ballast system.
How Do You Stop an Artificial Plant From Leaning or Rotating?
A tall plant can remain upright while slowly turning inside the planter. This changes the approved shape and may expose unfinished branches or support hardware.
Control leaning and rotation at two levels. Secure the trunk near the bottom with a sleeve or anchor, then add an upper collar, grid, or crossbar near the planter opening. Shape the complete canopy before final tightening so its visual weight remains balanced.
Common Causes of Leaning
- The nursery pot is smaller than the decorative planter
- Loose filler compresses over time
- The canopy is opened more heavily on one side
- The trunk has only one shallow support
- The top dressing is mistaken for structural fill
- Water washes material away
- The planter stands on a sloped surface
- Wind repeatedly pushes from one direction
Two-Point Control
The lower support prevents the trunk from lifting or sliding.
The upper support prevents it from pivoting.
For a large artificial tree, both supports should connect to the same ballast or structural insert.
Shape Before Fixing
I open every branch before final installation.
A tree packed tightly for shipping may appear centered while closed. After its branches are spread, the canopy may become heavier on one side.
I adjust the branches first, identify the visual center, and only then lock the trunk.
What Top Dressing Will Not Blow or Spill Away?
Loose moss may look natural but provides almost no weight. Lightweight bark and artificial fibers can also leave the planter during wind or cleaning.
Use medium river rocks, washed gravel, large bark pieces, fixed artificial moss, or a fitted artificial-soil mat. Keep the finish below the planter rim and attach lightweight materials to a removable mesh or backing rather than allowing them to remain loose.
Top-Dressing Comparison
| Top Dressing | Outdoor Stability | Appearance | Maintenance |
|---|---|---|---|
| River rocks | High | Clean and modern | Easy to wash |
| Medium gravel | High | Neutral | Easy to replace |
| Large bark | Medium | Natural and rustic | May need periodic replacement |
| Fixed moss mat | Medium | Soft and botanical | Brush gently |
| Artificial-soil insert | High | Realistic | Remove for cleaning |
| Loose Spanish moss | Low | Soft | Blows and collects debris |
The top dressing should remain removable. Maintenance teams need access to ties, grids, drainage holes, and stem connections.
What Should You Never Put in an Outdoor Artificial Plant Pot?
Convenient packing materials may save space initially but compress, absorb water, or allow the plant to move.
Do not rely on packing peanuts, loose plastic bags, shredded paper, cardboard, lightweight moss, one shallow foam disk, or adhesive alone. Avoid materials that trap rainwater, conceal corrosion, or create more permanent weight than the planter and installation surface can safely support.
Common Fill Failures
| Weak Fill | Why It Fails Outdoors |
|---|---|
| Packing peanuts | Compress and provide almost no ballast |
| Shredded paper | Absorbs water and collapses |
| Loose shopping bags | Shift around the trunk |
| Cardboard spacers | Weaken when damp |
| Thin foam disk | Tears under a tall trunk |
| Loose moss | Blows out and adds no support |
| Rocks without sleeves | Allow the trunk to rotate |
| Expanding foam alone | Holds position but adds little weight |
| Direct-poured concrete | Blocks repair and may trap water |
| Glue-only attachment | Difficult to inspect and unreliable as the sole support |
How Do You Fill an Outdoor Artificial Plant Pot Step by Step?
The planter should be assembled from the installation surface upward. Beginning with decorative stones and adding support later creates hidden weak points.
Shape the artificial plant, inspect the planter, preserve drainage, add low ballast, install a rigid holder, lock the trunk at two levels, contain the side fill, and finish with stable top dressing. Test pulling, rotation, tilt, and drainage before placing the planter in service.
Step 1: Shape the Complete Plant
Open all branches and identify:
- The intended front
- Final canopy width
- Heaviest side
- Main wind-catching surfaces
- Required clearance
Step 2: Inspect the Pot and Location
Check:
- Cracks
- Base width
- Drainage openings
- Floor slope
- Traffic routes
- Finished load
- Wind exposure
Step 3: Install Low Ballast
Use sandbags, gravel, bricks, pavers, or a concrete puck.
The heaviest component should remain near the base.
Step 4: Install the Mechanical Holder
Use chicken wire, sleeves, crossbars, a rigid grid, reinforced foam, or another suitable system.
Connect it to the lower ballast.
Step 5: Lock the Trunk
Create lower and upper control points.
The trunk should not lift, lean, or rotate freely.
Step 6: Contain Empty Space
Use rigid spacers, removable trays, gravel modules, or another stable fill.
Do not use material that compresses significantly.
Step 7: Add Top Dressing
Keep the finish below the rim and away from drainage openings.
Step 8: Test the Installation
Perform:
- Pull test: The plant should resist gentle upward pressure.
- Rotation test: The trunk should not turn freely.
- Movement test: The internal insert should not shift.
- Drainage test: Water should leave through the planned outlet.
Step 9: Create a Severe-Weather Plan
No decorative planter should be described as storm-proof without engineering evidence.
The National Weather Service advises securing or bringing in loose outdoor objects before high winds begin. Removable artificial plants, floral modules, hanging containers, and lightweight planters should therefore have a clear storage or tie-down plan.
My Insights: What to Put in Artificial Plant Pot—9 Proven, Unshakeable Outdoor Fills
The most stable pot does not contain one miracle filler. It contains a layered system that stops three different movements: tipping, trunk rotation, and internal lifting.
The nine proven fills work because each combines weight with control. Sandbags, gravel, bricks, and concrete resist tipping. Chicken wire, sleeves, grids, foam cages, and anchors stop the plant from moving. Stable rocks or fitted mats conceal the structure without becoming the only support.
My central insight is that outdoor planter stability should be evaluated through its complete movement path.
Movement 1: The Whole Planter Tips
Control this with:
- A wide base
- Low ballast
- Reduced canopy width
- A level installation surface
- Structural attachment where required
Movement 2: The Trunk Leans or Rotates
Control this with:
- A central sleeve
- A buried anchor
- A chicken-wire core
- A lower fixing point
- An upper collar or grid
Movement 3: The Internal Insert Lifts Out
Control this by connecting:
- The holder to the ballast
- The grid to the planter liner
- The nursery pot to the crossbars
- The trunk to the internal frame
The Nine-Fill Decision Guide
| Main Requirement | Best Fill |
|---|---|
| Removable heavy ballast | Sealed sandbags |
| Reusable mixed arrangement | Gravel and chicken wire |
| Clean architectural finish | River rocks and sleeves |
| Large hollow planter | Bricks and crossbars |
| Covered seasonal flowers | Reinforced dry foam |
| Natural planted appearance | Potting mix and buried anchor |
| Irregular container interior | Exterior foam insert |
| Maximum permanent stability | Concrete anchor puck |
| Frequent redesign | Reusable perforated grid |
Best Overall Reusable System
For most outdoor artificial plants, I prefer:
- A planter with open drainage
- Several sealed sandbags at the bottom
- A rigid support deck
- A central sleeve or chicken-wire cage
- A second upper support point
- A contained gravel top layer
This system is strong, adjustable, and repairable.
Best Permanent System
For a large ground-level commercial artificial tree, I use a removable concrete anchor puck with a central sleeve and upper brace.
The final weight, planter, surface, and structural requirements must be reviewed before installation.
Best Seasonal System
For flowers and small shrubs that change several times each year, I use gravel ballast, secured chicken wire, and removable top dressing.
The materials can be reused without breaking concrete or discarding a complete foam-filled pot.
My Final Outdoor Fill Rule
Never judge the planter only by how heavy it feels.
A pot can be extremely heavy while its trunk still rotates. Another can grip the trunk tightly while the entire container tips.
A reliable outdoor build needs:
- Low weight
- A rigid stem connection
- A contained finish
- Open drainage
- A maintenance route
- A severe-weather plan
When these controls are combined, the artificial plant remains centered, the top dressing stays contained, and the planter becomes far less likely to shift during ordinary outdoor use.
Conclusion
Use low ballast to stop tipping, a rigid two-point holder to stop trunk movement, stable top dressing, and open drainage. Gravel with chicken wire offers the best reusable balance.