

Outdoor artificial flowers may look stable on a calm day, yet one strong gust can pull out stems, scatter stones, or overturn the complete planter.
To secure outdoor artificial flowers, connect the stems to a rigid internal structure, add dense ballast at the bottom, and lock the planter or insert against rotation. Chicken wire, outdoor-rated cable ties, stem sleeves, reinforced dry foam, crossbars, gravel, sandbags, brackets, and removable storm modules provide the strongest practical protection.
No decorative flower arrangement is completely wind-proof. The safest system is designed for its location, inspected regularly, and removed or secured further when damaging winds are forecast.
Why Do Outdoor Artificial Flowers Blow Away?
Artificial flowers have no root system. Their petals and leaves can catch wind while their lightweight stems depend entirely on the planter’s hidden support.
Outdoor faux flowers shift when stems are inserted too shallowly, foam is not attached to the planter, top dressing is mistaken for ballast, or the complete container has a narrow base. Tall flowers, hanging foliage, broad leaves, and dense arrangements create more wind-catching surface area than compact designs.
Wind can cause several different failures:
| Wind Failure | What Moves | Main Solution |
|---|---|---|
| Stem pullout | Individual flowers | Deeper insertion and mechanical ties |
| Stem rotation | Complete flower cluster | Two-level grid or sleeve |
| Insert lift | Foam or inner pot | Connect insert to ballast or planter |
| Top-dressing loss | Moss, bark, or stones | Contained or fixed finishing layer |
| Planter sliding | Complete container | Non-slip base or surface attachment |
| Planter tipping | Complete arrangement | Wider base and low ballast |
| Hanging-basket failure | Basket or hanger | Rated brackets and secondary retention |
The National Weather Service advises securing loose outdoor objects when strong winds are possible because items that normally appear harmless can blow around and become hazards. Artificial flowers, removable planters, hanging baskets, and floral wall sections should be included in that preparation.
What Is the Best Way to Anchor Artificial Flowers Outdoors?
Loose soil, stones, or moss may hide the stems, but they do not create a dependable connection by themselves.
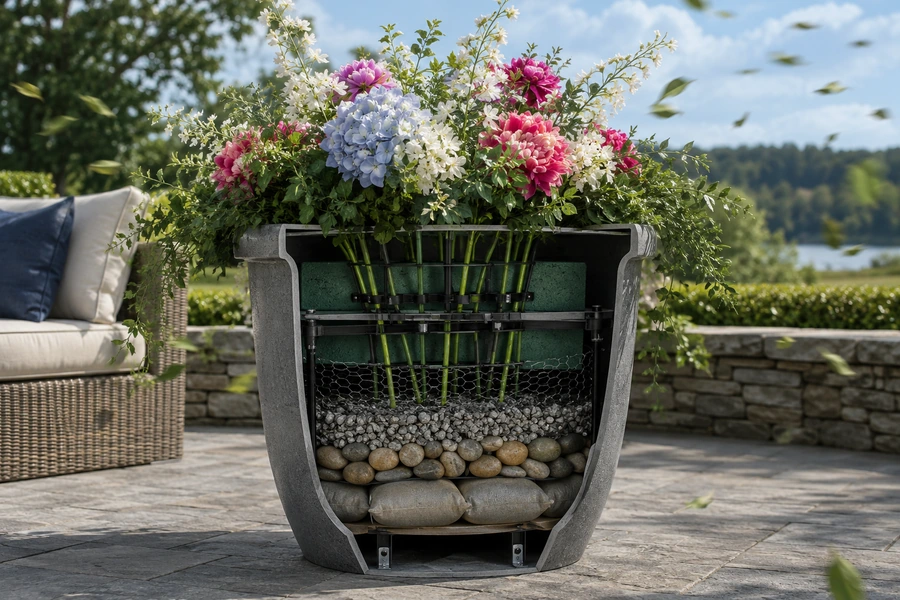
The best general-purpose method is a secured chicken-wire cage placed above low ballast. Pass each major stem through at least two wire openings and fasten anchor stems to the cage with outdoor-rated ties. Connect the cage to the inner pot, crossbars, or ballast so the complete insert cannot lift out.
Afloral’s outdoor-planter guidance recommends attaching artificial stems to a chicken-wire ball with ties in windy locations. Its related artificial-plant guidance similarly uses chicken wire as the stronger alternative to placing an anchor stem in loose soil alone.
The Three-Part Wind-Control System
Every dependable outdoor flower pot needs three connected controls:
- Stem control: Stops individual flowers from pulling out.
- Insert control: Stops the internal arrangement from rotating or lifting.
- Planter control: Stops the complete container from sliding or tipping.
Securing only one level leaves another failure point.
Fix 1: Start With Outdoor-Rated, Low-Profile Flowers
The easiest arrangement to secure is one that does not create unnecessary wind resistance.
Choose products intended for outdoor or covered-outdoor use, then favor compact flower heads, flexible wired stems, and moderate foliage. Short geraniums, lavender, boxwood, grasses, and clustered flowering bushes are generally easier to stabilize than tall delphiniums, wide hydrangeas, or long unsupported branches.
An outdoor-use description does not prove that a flower is resistant to every weather condition. Product listings may distinguish between UV-treated, water-resistant, indoor-outdoor, and covered-outdoor use. Buyers should follow the exposure limits for the exact flower rather than applying one label to an entire arrangement.
Reduce the Wind-Catching Shape
Before installation, I remove unnecessary surface area by:
- Shortening excessively long stems
- Dividing one dense bouquet into smaller modules
- Turning broad leaves rather than stacking them forward
- Keeping the widest flowers below the planter’s centerline
- Using compact flowers around the outer edge
- Avoiding a perfectly solid wall of petals
The arrangement should still appear full, but air needs paths through it.
A dense artificial hydrangea dome behaves differently from a loose arrangement of short lavender stems. More flowers are not automatically more secure.
Fix 2: Build a Chicken-Wire Anchor Cage
Chicken wire is one of the most useful supports because it controls several stems without requiring permanent foam.
Shape galvanized or suitably coated wire mesh into a tight ball, cylinder, or folded grid that fits the inner planter. Secure the cage before inserting flowers. Pass each important stem through two levels of mesh and tie the strongest stems to the lower section.
Afloral specifically recommends chicken wire with zip ties, twist ties, string, or similar fasteners when an outdoor artificial arrangement needs greater wind security.
How to Build the Cage
- Wear suitable gloves.
- Cut enough wire to create a deep structure.
- Fold sharp cut edges inward.
- Place the cage inside a removable liner.
- Attach it to crossbars, the nursery pot, or the lower ballast system.
- Pass stems through the upper and lower mesh.
- Tie the main stems below the visible surface.
- Cover the grid with contained top dressing.
The cage should not float on top of loose soil. Wind can lift the flowers and cage together unless the wire is connected to something heavier.
Best Uses
- Mixed flower planters
- Artificial geraniums
- Lavender
- Grasses
- Window boxes
- Seasonal hotel displays
- Restaurant terrace pots
Fix 3: Use UV-Resistant Outdoor Cable Ties
An indoor cable tie may become brittle after long exposure to sunlight, heat, cold, and moisture.
Use cable ties specifically identified by their manufacturer as UV- and weather-resistant for exterior applications. Match the tie size and strength to the stem bundle, avoid crushing hollow stems, trim the tail cleanly, and position the locking head below the decorative surface.
HellermannTyton identifies its black PA66W cable ties as UV-resistant and suitable for outdoor use. This demonstrates why buyers should verify the actual tie material and rating rather than assume that every black plastic tie is exterior-grade.
Where to Place the Ties
I normally use at least two connections for a major stem group:
- One near the lower cage or support deck
- One near the upper grid
This prevents the bundle from pivoting around one fixing point.
For delicate stems, I attach the flowers to a stronger coated stake first. The tie holds the structural stake rather than squeezing individual fabric-covered wires.
Inspect the Ties
Check them for:
- Cracking
- Whitening
- Looseness
- Brittle locking heads
- Sharp trimmed ends
- Movement around the stem
- Damage after freezing or extreme heat
Cable ties are replaceable maintenance parts, not permanent structural guarantees.
Fix 4: Lock Stems at Two Different Depths
A flower inserted through one shallow layer can still rotate like a lever.
Create two holding levels inside the planter. The upper grid controls spacing and sideways movement, while the lower cage, sleeve, or anchor resists lifting. Tall stems should pass through both levels before being tied or locked.
Simple Two-Level Layout
| Support Level | Position | Function |
|---|---|---|
| Upper grid | Near planter opening | Controls angle and spacing |
| Lower grid | Near ballast | Stops lifting and rotation |
| Ballast | Bottom of planter | Resists tipping |
This structure is especially effective for:
- Tall flowering branches
- Artificial delphiniums
- Foxgloves
- Orchids
- Large hydrangeas
- Blossom stems
- Mixed centerpieces in deep planters
A shallow foam block near the planter opening may hold flowers neatly, but it creates little resistance to upward pull. The lower support must carry the wind force into the planter’s ballast.
Fix 5: Add Coated Stakes or Rigid Stem Sleeves
Thin artificial stems may flex even when their lower ends remain secure.
Bundle weak flowers around a coated stake, fiberglass rod, or rigid sleeve that extends deep into the planter. Secure the flowers to the support at several points, then connect the support to the internal cage or base. Cap or conceal every hard end.
When to Use a Stake
Use hidden reinforcement for:
- Tall delphiniums
- Long blossom branches
- Large hydrangeas
- Heavy peony clusters
- Artificial sunflowers
- Trailing flowers that begin on a tall central stem
- Flower arrangements installed above eye level
Stem Sleeves
A sleeve is useful when arrangements need to be removed quickly.
The sleeve remains attached to the weighted insert. A flower module slides into it and is secured with a pin, clamp, or tie.
This method works well for hotels, restaurants, malls, and event venues that change flowers seasonally.
Safety Detail
Do not leave exposed metal stakes, pointed rods, or hard wire ends near guests, children, employees, or maintenance routes.
Every structural component should end below the planter rim or receive a secure protective cap.
Fix 6: Reinforce Dry Floral Foam Instead of Using It Alone
Dry floral foam positions artificial stems well, but an unsecured block may lift or crumble under repeated movement.
Fit dry foam tightly inside a removable tray, attach the tray to the planter, and reinforce the foam with wire mesh, tape, or a rigid upper grid. Insert stems deeply and at different angles. Add separate ballast because foam contributes little useful weight.
OASIS identifies SAHARA as dry floral foam intended for permanent botanicals and dried arrangements. The material is suitable for arranging artificial stems, but its intended use does not make a loose block wind-resistant by itself.
Reinforced-Foam Structure
- Add sandbags or gravel at the bottom.
- Place foam inside a fitted plastic liner.
- Strap the foam to a rigid tray.
- Cover the block with wire mesh.
- Insert stems through the mesh and foam.
- Tie major stems to the mesh.
- Connect the tray to the lower support.
- Cover the top with stable decorative material.
Best Uses
- Covered porches
- Window boxes
- Short flowering arrangements
- Seasonal inserts
- Artificial flowers under an overhang
- Displays removed during storms
I avoid depending on dry foam for an exposed rooftop, open balcony, or large artificial tree.
Fix 7: Add Low Ballast Beneath the Flower Holder
A well-secured flower insert can still overturn its planter when the container is too light.
Place dense ballast at the lowest practical point. Sealed sandbags, angular gravel, bricks, pavers, or a removable concrete weight lower the center of gravity. Connect the flower holder to this weighted layer rather than placing it loosely above the ballast.
Ballast Comparison
| Ballast | Main Advantage | Main Limitation |
|---|---|---|
| Sealed sandbags | Removable and adjustable | Can be punctured |
| Angular gravel | Dense and easy to distribute | Heavy to remove |
| Bricks or pavers | Predictable modular weight | May slide during transport |
| River rocks | Attractive and heavy | Less efficient as structural fill |
| Concrete insert | Maximum concentrated weight | Difficult to move |
| Metal plate | Thin and reusable | Can corrode if unsuitable |
For permanent artificial trees, a concrete puck with a sleeve can create a strong removable anchor. Fast-setting concrete products are manufactured for setting posts, sleeves, and similar anchors, but the complete planter weight and installation surface still need review.
Do Not Add Weight Blindly
Heavy planters can create separate hazards on:
- Balconies
- Roof terraces
- Raised floors
- Shelves
- Temporary stages
- Mobile platforms
- Wall-mounted brackets
The location must be capable of carrying the completed load.
Fix 8: Lock the Inner Insert to the Decorative Planter
A weighted decorative pot does not help when the lightweight inner arrangement can lift straight out.
Connect the nursery pot, foam tray, wire cage, or flower module to the decorative planter’s internal frame. Use crossbars, clips, bolts, straps, or manufacturer-approved attachment points. The insert should resist upward pull, sideways movement, and rotation.
Removable Crossbar Method
For a deep planter, I install two rigid bars across the interior.
The bars support and restrain:
- A nursery pot
- A flower tray
- A stem sleeve
- A wire cage
- A modular arrangement
The insert can be connected to the bars with outdoor-rated ties, clamps, or bolts.
This provides a repairable system. The flowers can still be replaced without emptying the entire decorative container.
Avoid Glue as the Only Connection
Adhesive may help control a small component, but it should not be the sole support for a heavy or public-facing arrangement unless the adhesive manufacturer confirms the materials, loading, environment, and application.
Mechanical connections are easier to inspect and replace.
Fix 9: Contain the Top Dressing
Loose moss, light bark, artificial soil, and small pebbles may leave the planter before the flowers do.
Use medium or large stones, a fitted mesh pouch, fixed moss mat, or removable artificial-soil panel. Keep the top dressing below the rim and secure lightweight materials to a backing. Never rely on decorative moss to hold stems or resist wind.
Top-Dressing Options
| Finish | Wind Resistance | Best Use |
|---|---|---|
| Medium river rocks | High | Modern planters |
| Angular gravel | High | Practical outdoor containers |
| Large bark pieces | Medium | Rustic displays |
| Moss fixed to mesh | Medium | Covered locations |
| Artificial-soil mat | High | Removable commercial inserts |
| Loose Spanish moss | Low | Protected indoor use |
Use a Retaining Mesh
A mesh layer below the visible stones keeps smaller fill from escaping through drainage holes or mixing with the internal support.
The mesh should not seal the planter. Water still needs a clear route out.
The CDC recommends regularly emptying, covering, or maintaining planters and other containers that collect water because standing water can support mosquito breeding.
Fix 10: Secure the Complete Planter or Hanging Container
Internal flower security cannot prevent the whole pot from sliding, overturning, or falling from a railing.
Use a wide, heavy planter at ground level or connect the container to a suitable surface with manufacturer-approved brackets, bolt holes, straps, or mounting hardware. Elevated and hanging planters require rated supports and secondary retention. Do not drill waterproofing or structural surfaces without approval.
Commercial planters can be manufactured with anchor-bolt holes specifically to reduce tipping risk. This is particularly relevant where containers stand above occupied areas or in exposed public locations.
Ground-Level Planters
Possible controls include:
- Non-slip pads
- Wide bases
- Hidden brackets
- Manufacturer-provided bolt holes
- Connected planter groups
- Structural anchor plates
- Low concrete or metal inserts
Railing and Window Boxes
Use brackets designed for the:
- Railing shape
- Planter width
- Completed load
- Exposure
- Building material
A cable tie around a railing should not be treated as the only support for a heavy planter.
Hanging Baskets
A secure hanging display needs:
- A rated overhead point
- Compatible hook or bracket
- Locked connector
- Multiple basket chains or cables
- Secondary safety retention
- Regular corrosion inspection
- A storm-removal procedure
The flower stems inside the basket must also be tied to the basket frame. Otherwise, the basket may remain hanging while the floral insert blows out.
Fix 11: Create a Storm-Removal and Inspection Plan
Permanent-looking décor still needs a weather response.
Inspect outdoor artificial flowers after strong winds, heavy rain, freezing conditions, or maintenance work. Remove lightweight modules and hanging displays when severe wind is forecast. Replace brittle ties, loose stems, cracked foam, displaced ballast, and damaged brackets before returning the arrangement to service.
The National Weather Service advises people to secure loose outdoor items and adjust plans when strong-wind alerts are issued. A removable-flower strategy is therefore often safer than adding unlimited weight to a decorative container.
Suggested Inspection Schedule
| Exposure | Routine Inspection |
|---|---|
| Covered porch | Monthly and after storms |
| Open patio | Every two weeks |
| Rooftop | Weekly and after wind events |
| Hotel or mall entrance | Weekly |
| Hanging basket | Weekly |
| Seasonal event | Before and after every use |
| Public elevated display | According to an approved maintenance plan |
Check These Components
- Flower-head attachment
- Main stem ties
- Lower anchor
- Upper grid
- Foam condition
- Ballast position
- Drainage outlet
- Top-dressing containment
- Planter cracks
- Brackets and bolts
- Secondary safety cable
- UV or weather damage
Photographing the approved arrangement helps staff detect rotation, leaning, or missing stems.
How Do You Secure Artificial Flowers in a Window Box?
Window boxes have limited depth and may sit above people, vehicles, or property. Their complete mounting system matters more than adding heavy loose filler.
Secure the box to its approved brackets first. Install a low rigid grid or chicken-wire cage inside, tie flower bundles to the grid, and add a contained gravel layer. Keep the design low and compact, preserve drainage, and remove the insert when severe winds are expected.
Recommended Window-Box Build
- Confirm the box and brackets are compatible.
- Check the completed load.
- Fit a removable perforated liner.
- Attach chicken wire to the liner.
- Pass flowers through two mesh levels.
- Tie the main bundles below the surface.
- Add a small amount of low ballast.
- Cover it with secured stones or artificial soil.
- Keep drainage openings clear.
- test the complete insert before installation.
I avoid tall blossom branches and broad hydrangeas in shallow elevated boxes. Compact geraniums, lavender, grasses, small ferns, and trailing greenery create less leverage.
How Do You Secure Artificial Flowers in Soil?
Direct burial is quick, but loose soil alone does not prevent rotation or pullout in exposed areas.
Attach the artificial flowers to a coated stake, buried mesh, or underground anchor before covering the support with soil. Insert the anchor deeply enough for the location, keep artificial stem ends protected from standing water, and mark buried hardware for future maintenance.
For a simple protected display, a long anchor stem may be adequate. In stronger wind, Afloral recommends securing the artificial plant to chicken wire before covering the support with real soil.
Do not place hidden sharp wire where gardeners, children, pets, or maintenance crews may encounter it.
How Do You Secure Artificial Flowers Without Floral Foam?
Floral foam is optional. Mechanical holders can be stronger, reusable, and easier to inspect.
Use chicken wire, perforated grids, floral frogs, crossbars, stem sleeves, stakes, gravel, or modular inserts. Connect the holder to low ballast and attach each major stem mechanically. Cover the support with stones, fixed moss, bark, or an artificial-soil mat.
Best Foam-Free Options
| Arrangement | Foam-Free Holder |
|---|---|
| Mixed flower pot | Chicken-wire cage |
| Tall branches | Stem sleeves and crossbars |
| Window box | Perforated liner |
| Small bowl | Floral frog |
| Artificial grasses | Rigid multi-hole grid |
| Seasonal planter | Removable wire module |
| Large tree with flowers | Central sleeve and side grid |
Foam-free systems are particularly useful for rental inventory and commercial displays because stems can be changed without cutting a new block for every design.
What Should You Avoid When Wind-Proofing Faux Flowers?
Some quick fixes create hidden failure points or damage the planter.
Avoid shallow foam alone, loose moss, lightweight packing material, indoor cable ties, exposed wire ends, blocked drainage, and adhesive-only connections. Do not pour permanent concrete directly into a valuable planter or add heavy ballast to an elevated structure without checking the allowable load.
Common Wind-Proofing Mistakes
| Mistake | Why It Fails |
|---|---|
| Pushing stems into loose soil only | Stems rotate or pull out |
| Using one shallow foam disk | Insert lifts as one piece |
| Adding rocks only at the top | Raises weight without locking stems |
| Using indoor ties outdoors | Fasteners may degrade |
| Attaching flowers to loose chicken wire | Wire and flowers lift together |
| Filling drainage holes | Traps rainwater |
| Using loose moss | Blows away |
| Making every flower tall | Increases wind-catching area |
| Anchoring stems but not the pot | Complete planter can tip |
| Adding unlimited concrete | Creates excessive or immovable weight |
| Ignoring weather alerts | Exposes removable décor unnecessarily |
My Insights: How to Secure Outdoor Artificial Flowers—Which 11 Wind-Proof Fixes Work Best
A strong arrangement is not created by making every component heavier. It is created by transferring wind force from the flower into a connected holder, then into low ballast or an approved structural anchor.
The 11 most effective fixes are compact outdoor flowers, chicken-wire cages, UV-resistant ties, two-level stem control, hidden stakes, reinforced dry foam, low ballast, locked inner inserts, contained top dressing, secured planters, and a storm-response plan. Chicken wire tied to a weighted removable insert offers the best balance for most installations.
My main insight is that outdoor artificial flowers fail through a chain of movement.
Movement 1: Petals and Leaves Catch the Wind
Control this with:
- Compact flower choices
- Reduced canopy width
- Open spacing
- Shorter stems
- Flexible positioning
Movement 2: Individual Stems Pull Out
Control this with:
- Deep insertion
- Chicken wire
- Outdoor-rated ties
- Stakes
- Two holding levels
Movement 3: The Complete Insert Lifts
Control this by attaching:
- Foam to a tray
- The tray to crossbars
- The wire cage to the inner pot
- The inner pot to the ballast structure
Movement 4: The Planter Tips or Slides
Control this with:
- Low ballast
- A wide base
- Non-slip support
- Manufacturer-approved brackets
- Structural attachment where appropriate
Movement 5: Extreme Weather Exceeds the Design
Control this with:
- Forecast monitoring
- Removable modules
- A named storage location
- Assigned staff responsibility
- A safe removal procedure
The 11-Fix Summary
| Fix | Main Purpose |
|---|---|
| 1. Select compact outdoor-rated flowers | Reduces wind load |
| 2. Build a chicken-wire cage | Holds multiple stems |
| 3. Use UV-resistant ties | Maintains exterior connections |
| 4. Lock stems at two depths | Stops rotation |
| 5. Add stakes or sleeves | Reinforces tall flowers |
| 6. Reinforce dry foam | Prevents foam pullout |
| 7. Add low ballast | Resists tipping |
| 8. Lock the inner insert | Prevents lifting |
| 9. Contain top dressing | Stops surface material loss |
| 10. Secure the planter | Controls the complete container |
| 11. Plan inspection and removal | Manages severe weather |
Best Method for a Porch Planter
For a covered porch, I use:
- A wide planter
- Sealed sandbags at the bottom
- A rigid support deck
- A chicken-wire cage
- UV-resistant ties
- Medium river-rock top dressing
The flower insert remains removable for cleaning or storm storage.
Best Method for a Window Box
I use a secured bracket system, low perforated liner, chicken-wire grid, compact flowers, and contained gravel.
I avoid tall stems that create leverage above the narrow box.
Best Method for a Commercial Entrance
For hotels, restaurants, offices, and malls, I use:
- A manufacturer-approved anchored planter
- A removable weighted internal insert
- Two-level stem retention
- Replaceable floral modules
- Documented inspections
- A severe-weather procedure
The modular design allows one damaged flower section to be replaced without dismantling the complete planter.
Best Method for Seasonal Flowers
Chicken wire and reusable grids outperform permanent foam when the arrangement changes several times each year.
The main stems can be untied, removed, cleaned, and stored while the ballast remains in the planter.
My Final Wind-Proof Rule
Do not ask one material to solve every movement problem.
Foam positions flowers. Ties connect stems. Chicken wire distributes force. Stakes reinforce height. Ballast resists tipping. Brackets control the container. A storm plan manages conditions beyond the normal design.
When all six functions are connected, outdoor artificial flowers become far more stable, easier to maintain, and safer than an arrangement pushed into loose soil or foam alone.
Conclusion
Secure stems to a two-level wire structure, connect the insert to low ballast, contain the top dressing, anchor the planter where needed, and remove vulnerable displays before severe winds.