

Artificial flowers lose their realism when gray dust settles inside flower centers, dulls layered petals, and turns naturally soft leaves into visibly neglected décor.
To dust artificial flowers safely, work from the top downward with a soft brush, microfiber cloth, cotton swab, or controlled cool air. Support every bloom, clean small sections, capture loosened dust instead of spreading it, avoid oily sprays and excessive suction, and follow a regular maintenance schedule based on the display’s location.
“Proven” describes repeatable, low-risk cleaning practices supported by current manufacturer care guidance and established conservation principles. It does not mean one method is safe for every fabric, coating, adhesive, flower center, or decorative finish.
What Is the Best Way to Dust Artificial Flowers?
The best method removes loose particles without changing the flower’s shape, finish, color, or construction.
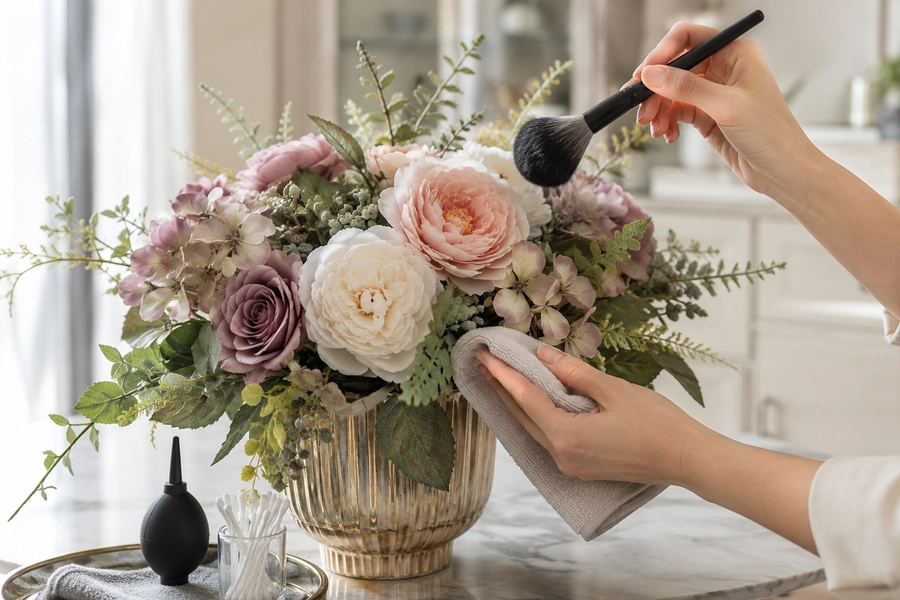
For most artificial flowers, begin with a clean, soft-bristled brush while supporting the bloom from underneath. Follow with a dry microfiber cloth on broad leaves and a cotton swab in detailed centers. Use low-suction vacuuming or cool air only when the product is secure enough to tolerate it.
Current Balsam Hill guidance recommends a soft, dry cloth, microfiber cloth, or fabric duster for artificial florals and warns against chemical sprays or soapy water for its products. Nearly Natural recommends soft brushes or controlled compressed air for detailed flowers, along with microfiber cloths and cotton swabs for accessible surfaces and tight spaces.
Quick Dusting Method Guide
| Flower or Surface | Best Starting Tool | Main Risk |
|---|---|---|
| Soft fabric petals | Fine soft brush | Fraying or distortion |
| Broad plastic leaves | Dry microfiber cloth | Scratching or excessive shine |
| Flower centers | Cotton swab or small artist’s brush | Detaching decorative details |
| Dense hydrangeas | Soft brush plus controlled cool air | Trapping dust deeper |
| Real-touch petals | Soft dry microfiber | Sticky or marked coating |
| Flocked or velvet flowers | Very soft brush | Removing the surface finish |
| Glittered flowers | Gentle cool air | Glitter loss |
| Large commercial display | Brush with low-suction dust capture | Pulling off petals |
| Fixed wreath or garland | Soft brush from top downward | Bending frames or attachments |
| Antique or valuable flowers | Specialist assessment | Irreversible material damage |
The cleaner should always begin with the least aggressive tool and increase intervention only when necessary.
Why Do Artificial Flowers Become So Dusty?
Artificial flowers have broad horizontal surfaces, layered petals, textured centers, and narrow gaps where airborne particles can settle.
Dust becomes highly visible on faux flowers because it accumulates along petal edges, veins, branch joints, flower centers, and upward-facing leaves. Friction between synthetic materials may also contribute to static cling, making fine particles harder to remove from some polyester and plastic surfaces.
Dust accumulation increases in displays located near:
- Open doors
- Roads and loading areas
- Air-conditioning outlets
- Ceiling fans
- Kitchens
- Candles
- Smoking areas
- Construction work
- Fabric-heavy interiors
- Frequently opened windows
- High-traffic reception areas
A display may appear clean from across the room while holding a visible dust line along the rear petals. Inspecting from several angles is therefore essential.
Dust Changes More Than Color
Accumulated dust can make artificial flowers look:
- Grayer
- Flatter
- Older
- Less detailed
- More obviously artificial
- Unevenly colored
- Poorly maintained
Dense dust may also combine with moisture, grease, perfume, smoke, or cleaning residue. Once that happens, dry dusting alone may no longer be sufficient.
What Are the 11 Best Tricks for Dusting Artificial Flowers?
The strongest routine combines appropriate tools, controlled direction, physical support, and a schedule that prevents loose dust from becoming embedded dirt.
The 11 best tricks are to photograph and inspect first, move portable flowers to a cleaning zone, work from top to bottom, support each bloom, use separate brushes by detail level, wipe broad surfaces with microfiber, clean centers with cotton swabs, capture dust with low suction, use controlled cool air selectively, clean containers and mechanics, and maintain a location-based schedule.
Trick 1: Photograph and Inspect the Arrangement Before Cleaning
Cleaning can change the angle of a stem or loosen a component without the cleaner noticing immediately.
Photograph the arrangement from the front, sides, and top before touching it. Check for loose petals, exposed wire, cracked glue, fading, sticky coatings, frayed fabric, and unstable stems. Repair or isolate fragile components before beginning routine dust removal.
The photographs provide a reference for:
- Stem direction
- Arrangement height
- Flower placement
- Foliage spacing
- Intended front
- Missing components
- Post-cleaning reshaping
Pre-Cleaning Inspection
| Check | Why It Matters |
|---|---|
| Loose flower head | May detach during brushing |
| Cracked adhesive | Can fail under minor movement |
| Exposed wire | May scratch petals or hands |
| Flaking pigment | Should not be brushed aggressively |
| Sticky surface | Dry dust may be bonded to coating |
| Torn petal | Can catch on microfiber |
| Loose artificial pollen | May be removed unintentionally |
| Unstable planter | Could tip during cleaning |
| Battery or lighting components | Require separate handling |
| Visible mould or unusual residue | Needs assessment beyond routine dusting |
Do not treat mould, pest material, heavy grease, or unknown chemical residue as ordinary dust.
For commercial inventory, mark damaged stems and move them to a repair area rather than returning them directly to the display.
Trick 2: Move Portable Flowers to a Controlled Cleaning Zone
Dusting a bouquet in place may simply transfer particles onto desks, merchandise, food-service surfaces, or upholstered furniture.
Move portable arrangements to a clean, well-lit work area before dusting. Use a washable table covering, clean tray, or large sheet of paper to collect debris. Keep pale flowers away from dirty tools, wet surfaces, and dark textile fibers.
Balsam Hill recommends cleaning artificial plants outdoors when practical so loosened dust is not redistributed through the interior. Its care process begins at the top of the plant and proceeds downward.
Outdoor cleaning should still occur in:
- Calm weather
- Shade
- A clean area
- Low humidity
- A location away from vehicle exhaust
- A surface where dropped petals can be recovered
Do not clean delicate flowers in direct sun, strong wind, or near garden hoses and sprinklers.
For Fixed Commercial Displays
When the arrangement cannot be moved:
- Close or protect nearby merchandise.
- Place a clean sheet below the display.
- Turn off nearby fans temporarily.
- Use a portable dust-capture method.
- Work in small sections.
- Clean the surrounding surface afterward.
- Reopen the area only after loose dust is removed.
This prevents a “clean” flower display from creating a dirty room.
Trick 3: Dust From the Top Down
Cleaning direction matters. Dust released from upper flowers will settle onto lower leaves and containers.
Begin with the highest branches and outer petals, then work toward lower blooms, stems, top dressing, planter rim, and surrounding surface. Tilt detachable stems slightly forward so loosened particles fall away rather than deeper into the flower center.
Balsam Hill’s artificial-plant care instructions recommend brushing from the top downward and finishing with dust accumulated around the planter base.
Top-to-Bottom Sequence
- Tall branches
- Upper leaves
- Outer flower petals
- Flower centers
- Lower foliage
- Stems and branch joints
- Decorative moss or stones
- Planter rim
- Container exterior
- Shelf, counter, or floor
Do not repeatedly brush dust across the same clean area.
After completing one upper section, move the collection cloth or vacuum position before continuing lower.
Trick 4: Support Every Bloom While Brushing
A flower head should not swing freely while a brush pushes against its petals.
Hold the stem or calyx securely and support the underside of the bloom with one hand. Brush with the other hand using slow, light strokes. Move from the flower center toward the outer edge unless the construction requires another direction.
Supporting the bloom reduces stress on:
- Glue joints
- Wire connections
- Fabric folds
- Calyx attachments
- Painted centers
- Heavy flower heads
The Smithsonian Museum Conservation Institute recommends clean, soft brushes for controlled surface-dust removal on stable objects and emphasizes gentle, directional brushing rather than uncontrolled rubbing. Although artificial flowers are not paintings, the same low-force principle is useful for delicate petals and painted details.
Brush Pressure Test
The brush pressure is too strong when:
- Petals fold sharply
- The flower head moves on its stem
- Artificial pollen falls away
- Threads appear along the edge
- Surface pigment transfers
- The center begins rotating
- Leaves remain bent after the brush passes
The objective is to lift dust, not polish the flower.
Trick 5: Use Different Brushes for Petals, Centers, and Foliage
One large duster cannot clean every detail safely.
Use a broad soft brush for leaves, a medium brush for ordinary petals, and a fine artist’s brush for flower centers, veins, berries, and branch joints. Keep the brushes clean and dedicate them to artificial-flower maintenance rather than paint, cosmetics, or household chemicals.
Useful Brush Set
| Tool | Best Use |
|---|---|
| Large soft paintbrush | Broad foliage and large displays |
| Medium natural- or synthetic-hair brush | Roses, peonies, orchids |
| Fine artist’s brush | Centers, stamens, veins |
| Makeup-style fan brush | Wide delicate petals |
| Soft toothbrush | Only durable molded plastic details |
| Anti-static detailing brush | Compatible plastic components |
| Small round brush | Narrow branch joints |
A used paintbrush may contain pigment, solvent, oil, or construction dust. A cosmetic brush may contain skin oil or makeup.
Label the floral-cleaning brushes and store them in a closed clean container.
Brush Cleaning
After each maintenance session:
- Remove trapped dust
- Wash only according to the brush manufacturer’s guidance
- Dry completely
- Reshape the bristles
- Store away from chemicals
- Replace brushes that become stiff or oily
A dirty brush redistributes residue rather than removing it.
Trick 6: Use Dry Microfiber on Broad, Stable Surfaces
Microfiber is especially useful for large leaves and durable petals because it collects particles rather than merely pushing them around.
Wrap a clean dry microfiber cloth around two fingers, support the leaf from below, and wipe from the stem connection toward the tip. Use a fresh section of cloth frequently. Do not pinch delicate fabric petals tightly or drag rough cloth across frayed edges.
Balsam Hill describes gentle dry microfiber wiping as a primary method for refreshing artificial florals. Nearly Natural also recommends microfiber cloths for routine dust removal on artificial flowers and plants.
Best Microfiber Candidates
- Magnolia leaves
- Rubber foliage
- Monstera
- Bird of paradise
- Orchids
- Calla lilies
- Snake plants
- Artificial eucalyptus
- Molded succulent leaves
Higher-Risk Surfaces
Use a brush instead on:
- Poppies
- Sweet peas
- Frayed silk-style petals
- Flocking
- Velvet
- Glitter
- Artificial pollen
- Very soft real-touch coatings
- Hand-painted surfaces
A microfiber cloth can catch loose threads or decorative texture. Test one concealed area before using it across the complete display.
Use Multiple Cloths
For a large commercial display, assign separate cloths to:
- Pale petals
- Dark flowers
- Green foliage
- Planters
- Greasy or high-soil areas
This prevents dark residue from moving onto ivory or white flowers.
Trick 7: Clean Flower Centers With Cotton Swabs
Dust frequently becomes trapped around artificial stamens, pistils, resin details, and narrow petal layers.
Use a dry cotton swab or fine brush to lift dust from flower centers. Roll the swab gently rather than forcing it between fragile parts. Replace it as soon as it becomes dirty, distorted, or caught on glue and decorative fibers.
Nearly Natural recommends cotton swabs for artificial-flower centers and other hard-to-reach areas.
Cotton-Swab Technique
- Support the flower head.
- Inspect the center under bright light.
- Begin at the most accessible edge.
- Roll the swab lightly.
- Avoid pulling artificial stamens.
- Remove loosened particles with a brush.
- Check that no cotton fibers remain.
- Rotate the flower and repeat.
Do not soak the swab unless localized damp cleaning has been approved for the exact material.
Alternative Detail Tools
When cotton catches on the construction, use:
- A fine soft brush
- A rubber air blower
- A clean foam-tipped swab
- A low-suction micro-vacuum positioned nearby
- A wooden stick covered with clean soft cloth
Never use sharp tweezers inside a delicate flower center unless removing a clearly identified loose foreign object.
Trick 8: Capture Dust With a Low-Suction Vacuum
A vacuum can collect particles released by brushing, but direct suction may remove petals, berries, moss, and decorative centers.
Use a variable low-suction or handheld vacuum with a protective mesh between the flower and nozzle. Keep the nozzle slightly away from the petals while a soft brush guides dust toward the airflow. Never press a vacuum attachment directly against delicate flowers.
Smithsonian textile-care guidance recommends weak suction and protective screening when vacuuming loose surface dust. Research from the Smithsonian Museum Conservation Institute also found that pressing a vacuum brush against a screened object can greatly increase local airflow, reducing the screen’s protective benefit.
Safer Vacuum Setup
- Low or variable suction
- Clean nozzle
- Fine mesh or screen over the opening
- No rotating brush
- No crevice tool touching petals
- Adequate lighting
- One person supporting the display
- Small test area first
Best Use
A vacuum is most effective as a dust collector positioned near the brush—not as the brush itself.
One hand gently loosens dust. The other positions the screened nozzle several centimeters away to capture particles before they settle elsewhere.
Avoid Vacuuming When:
- Petals are loose
- Glitter is present
- Artificial pollen detaches easily
- Moss is unsecured
- Fine feathers are included
- Adhesive is failing
- The arrangement contains small detachable berries
- The product is antique or highly valuable
Trick 9: Use Controlled Cool Air for Dense Flowers
Cool air can remove particles from hydrangeas, peonies, ferns, garlands, and dense arrangements that are difficult to reach with a cloth.
Use a hand air blower, controlled compressed air, or a hair dryer set strictly to cool and low airflow. Keep the nozzle at a safe distance, direct dust away from the flower center, and stop if petals flutter violently or attachments move. Never use heated air.
Nearly Natural recommends soft brushes or compressed air for hard-to-reach areas. Balsam Hill also lists a hair dryer on a cool setting as an option for faux floral care.
Controlled-Air Rules
- Work outside or beside dust capture
- Use short bursts
- Begin at the lowest pressure
- Keep the nozzle distant
- Support the flower
- Blow from several angles
- Avoid direct pressure into glued centers
- Protect eyes and nearby products
- Never use workshop air containing oil or moisture
Why Heat Is Dangerous
Heat may affect:
- Adhesive
- Foam
- Plastic
- Real-touch coating
- Stem wrapping
- Painted details
- Flower shape
Cool air removes loose dust. It should not be used as a high-pressure cleaning shortcut.
Trick 10: Clean the Stems, Container, and Top Dressing
A dust-free flower placed in a dirty vase still looks neglected.
After cleaning the petals, wipe the stems, branch joints, planter rim, vase exterior, support grid, stones, moss, and surrounding surface. Stabilize loose top dressing before cleaning, and replace materials that cannot be cleaned without crumbling or spreading residue.
Balsam Hill’s artificial-plant instructions specifically remind owners to clean dust accumulated at the planter base.
Commonly Missed Areas
- Rear leaves
- Lower stems
- Vase handles
- Planter rims
- Artificial soil
- Moss
- River rocks
- Inner nursery pots
- Support stakes
- Shelf corners
- Wall behind the arrangement
- Floor below tall planters
Cleaning Decorative Stones
Remove washable stones only when the arrangement’s internal support will remain stable.
Clean and dry them completely before returning them to the planter. Do not introduce damp stones around exposed wire, foam, paper wrapping, or unsealed wood.
Artificial Moss
Loose moss may:
- Hold dust
- Catch microfiber fibers
- Lift under vacuum suction
- Spread across the work area
For commercial displays, I prefer moss attached to a removable mesh or fitted insert. The complete top layer can then be removed, cleaned, replaced, or inspected separately.
Trick 11: Dust on a Location-Based Schedule
Waiting until flowers appear gray allows dust to settle deeper and combine with other residues.
Set the cleaning frequency according to traffic, airflow, cooking residue, outdoor exposure, viewing distance, and flower complexity. Use frequent light dusting rather than infrequent aggressive cleaning. Record each service date for commercial displays and event inventory.
Balsam Hill advises establishing a routine cleaning schedule, while Nearly Natural recommends periodic dust removal rather than treating faux plants as maintenance-free.
Practical Inspection Schedule
| Location | Suggested Inspection |
|---|---|
| Restaurant or café | Weekly |
| Hotel reception | Weekly |
| Retail entrance | Weekly |
| Salon or spa | Weekly |
| Office reception | Every one to two weeks |
| Meeting room | Every two to four weeks |
| Guest room | During routine room inspection |
| Home living room | Every two to four weeks |
| High shelf | Monthly with safe access |
| Exterior covered display | Weekly and after dust events |
| Event-rental inventory | Before and after every use |
| Stored flowers | During scheduled inventory audits |
These are operational starting points rather than universal requirements. Increase cleaning when a white cloth reveals visible dust before the planned service date.
Use a White-Cloth Test
Wipe one concealed leaf with a clean white cloth.
- No visible mark: routine cleaning may wait.
- Light gray mark: dry dusting is due.
- Dark or greasy mark: deeper material-compatible cleaning may be required.
- Color transfer: stop and inspect the surface finish.
Which Tools Should Every Cleaner Have?
A small controlled kit is safer than a cupboard full of untested sprays.
Artificial-Flower Dusting Kit
| Tool | Purpose |
|---|---|
| Soft large brush | General foliage |
| Medium artist’s brush | Petals |
| Fine detailing brush | Centers and joints |
| Dry microfiber cloths | Broad surfaces |
| Cotton or foam swabs | Tight details |
| Rubber air blower | Delicate dry airflow |
| Low-suction vacuum | Dust capture |
| Protective mesh | Prevents loose pieces entering vacuum |
| White inspection cloth | Detects residue and color transfer |
| Padded tray | Supports removed stems |
| Camera or phone | Records arrangement shape |
| Product-care file | Confirms permitted methods |
| Repair labels | Isolates damaged stems |
| Gloves where appropriate | Protects products from skin oils |
Cleaning tools should remain separate from bathroom, kitchen, automotive, and construction equipment.
Can You Use a Feather Duster?
A feather duster can remove light surface dust, but it is less precise than a brush.
Use a clean, soft feather or fabric duster only for robust displays and routine maintenance. Move gently from top to bottom and avoid catching it on wires, petals, berries, or artificial stamens. Follow with microfiber or detail brushing where dust remains.
Both Balsam Hill and Nearly Natural include soft dusters among acceptable routine tools for their artificial décor.
A duster is less suitable for:
- Loose flower centers
- Frayed petals
- Glittered stems
- Wreaths with wire
- Dense hydrangeas
- Delicate poppies
- Valuable vintage flowers
A duster may redistribute dust unless it is cleaned regularly and used beside a collection surface.
Can You Use an Anti-Static Spray?
An anti-static product may reduce static on certain compatible synthetic surfaces, but it may also alter color, texture, gloss, adhesion, flammability, or dust attraction.
Do not spray artificial flowers unless the flower manufacturer and spray manufacturer both confirm compatibility with the exact petals, leaves, dyes, coatings, adhesives, and intended location. Test a spare stem first and document any treatment applied to commercial displays.
Avoid treating the full arrangement when the product:
- Has no clear ingredient or compatibility information
- Contains oil
- Adds gloss
- Leaves fragrance
- Feels sticky
- Is intended for electronics rather than décor
- Has not been assessed against project fire requirements
- Changes the approved cleaning procedure
For most displays, reduced friction, regular dry cleaning, stable indoor conditions, and fewer unnecessary handling cycles provide safer static management than an unknown surface treatment.
Should You Use Furniture Polish or Leaf Shine?
No general-purpose polish should be used automatically.
Furniture polish, oil, silicone shine, and household leaf products may create an unnatural reflective surface, trap dust, soften adhesives, or change the color of artificial petals. Use only a product specifically approved for that exact artificial flower.
An artificial magnolia or rubber leaf may naturally have some reflection. That does not mean it should look wet.
The most convincing finish is species-appropriate:
- Matte rose petals
- Softly waxy tulips
- Slightly reflective magnolia leaves
- Smooth orchid leaves
- Matte eucalyptus
- Structured but non-oily monstera
When a flower looks faded because of actual UV damage, polish does not repair the pigment. Replace the affected component.
Can You Shake Artificial Flowers to Remove Dust?
Shaking is fast but uncontrolled.
Do not shake delicate bouquets, wreaths, garlands, or foam-based arrangements. For strong detachable stems, a very gentle movement outdoors may release loose particles, but brushing provides better control and creates less stress on glue joints and wired branches.
Shaking may cause:
- Detached petals
- Bent stems
- Lost berries
- Cracked foam
- Spilled top dressing
- Shifted bouquet shapes
- Dust transfer onto clothing
- Scratched neighboring flowers
A cleaner should be able to see which component is moving and how much force is being applied.
When Is Dusting Not Enough?
Dry dusting is appropriate for loose surface particles. It does not reliably remove grease, smoke residue, sticky coatings, water marks, mould, or embedded dirt.
Move beyond dry dusting only after identifying the materials and checking the manufacturer’s instructions. Use localized damp wiping before immersion, test every cleaner on a hidden area, and replace a low-value stem when stronger treatment creates greater risk than the item justifies.
Nearly Natural allows a slightly damp microfiber cloth with a small amount of mild soap for deeper cleaning of suitable products. Balsam Hill’s flower-care guidance is more restrictive and warns against chemical sprays or soapy water on its florals. These differences show why the exact product—not a generic “silk flower” label—must determine the method.
Stop Routine Dusting and Assess Further When You Find:
- Sticky residue
- Heavy cooking grease
- Smoke staining
- Mould-like growth
- Pest material
- Rust marks
- Strong odor
- Color transfer
- Flaking pigment
- Softened adhesive
- Crumbling foam
- Water damage
Do not return an affected commercial arrangement to a guest-facing area until the cause and condition are understood.
Commercial Dusting SOP
| Step | Action | Acceptance Test |
|---|---|---|
| 1 | Identify product and care instructions | Correct method confirmed |
| 2 | Photograph arrangement | Original shape recorded |
| 3 | Inspect damage | Loose parts isolated |
| 4 | Move or protect work area | Dust contained |
| 5 | Brush from top downward | No petal movement or shedding |
| 6 | Wipe broad leaves | No scratching or color transfer |
| 7 | Detail flower centers | No cotton or loose parts remain |
| 8 | Capture particles with low suction | No components removed |
| 9 | Clean planter and top dressing | Complete display is clean |
| 10 | Reshape stems | Original silhouette restored |
| 11 | Inspect under display lighting | No visible dust |
| 12 | Record service date | Maintenance history updated |
My Insights: How to Dust Artificial Flowers—Which 11 Proven Tricks Create Dust-Free Displays
The most successful dusting method is not the fastest tool. It is a repeatable maintenance system that removes particles before they become attached residue.
The 11 proven tricks combine inspection, controlled work zones, top-down cleaning, physical support, purpose-specific brushes, microfiber wiping, cotton-swab detailing, low-suction dust capture, selective cool air, complete planter cleaning, and location-based scheduling. Together, they protect flower shape while keeping the full display consistently presentable.
My central insight is that cleaners should capture dust, not merely move it.
The 11-Trick Summary
| Trick | Main Benefit |
|---|---|
| 1. Photograph and inspect | Prevents unnoticed damage |
| 2. Use a controlled cleaning zone | Stops redistribution |
| 3. Work from top to bottom | Avoids re-soiling clean areas |
| 4. Support each bloom | Protects glue and wire connections |
| 5. Use several brush sizes | Reaches details safely |
| 6. Wipe broad leaves with microfiber | Collects fine surface dust |
| 7. Detail centers with swabs | Cleans tight spaces |
| 8. Capture dust with low suction | Keeps particles out of the room |
| 9. Use cool air selectively | Reaches dense flower clusters |
| 10. Clean the complete display | Removes hidden dust sources |
| 11. Follow a schedule | Prevents heavy buildup |
The Best Everyday Method
For ordinary home or office arrangements, I use:
- A photograph
- A soft medium brush
- A dry microfiber cloth
- Cotton swabs
- A clean sheet beneath the arrangement
- Top-to-bottom cleaning
- A final inspection under display lighting
This method requires no liquid and works for many stable artificial flowers.
The Best Method for Delicate Fabric Flowers
For poppies, peonies, sweet peas, and fine silk-style flowers:
- Support each flower head
- Use a very soft brush
- Avoid rubbing the edges
- Keep suction distant
- Avoid direct compressed air
- Clean only a few petals at a time
- Replace the stem when the surface is already failing
The Best Method for Broad Plastic Leaves
For monstera, rubber foliage, magnolia, orchids, and bird of paradise:
- Brush loose particles first
- Support the leaf
- Wipe from base to tip with dry microfiber
- Use a fresh cloth section frequently
- Clean the underside
- Inspect for scratches and UV fading
Broad-leaf products are usually faster to maintain because each surface is accessible.
The Best Method for Large Commercial Displays
For hotel, retail, restaurant, or office installations:
- Close or protect the working area
- Photograph the approved appearance
- Use two-person access where required
- Brush while capturing dust with low suction
- Clean the planter and surrounding surfaces
- Check brackets and stem attachments
- Replace damaged modules
- Record the service date
- Photograph the completed work
Cleaning should be coordinated with facility access and safe working-at-height procedures where necessary.
The Most Common Dusting Mistake
The most common mistake is waiting until the arrangement looks dirty from across the room.
At that stage, particles may already be embedded in:
- Flower centers
- Petal seams
- Artificial pollen
- Flocking
- Moss
- Greasy leaves
- Branch joints
Frequent light maintenance is safer and faster than occasional aggressive cleaning.
My Final Dust-Free Rule
Use this sequence:
- Inspect before touching.
- Confirm the permitted care method.
- Protect the work area.
- Support the flower.
- Brush from top downward.
- Wipe only stable broad surfaces.
- Clean centers with small tools.
- Capture loosened dust.
- Avoid heat, oil, and untested sprays.
- Clean the planter and surroundings.
- Repeat before buildup becomes visible.
A dust-free-looking display is created by consistency, not by one powerful cleaning session.
Conclusion
Support every bloom, brush from the top downward, wipe stable leaves with dry microfiber, capture loosened dust, avoid untested sprays, and clean often enough to prevent buildup.