
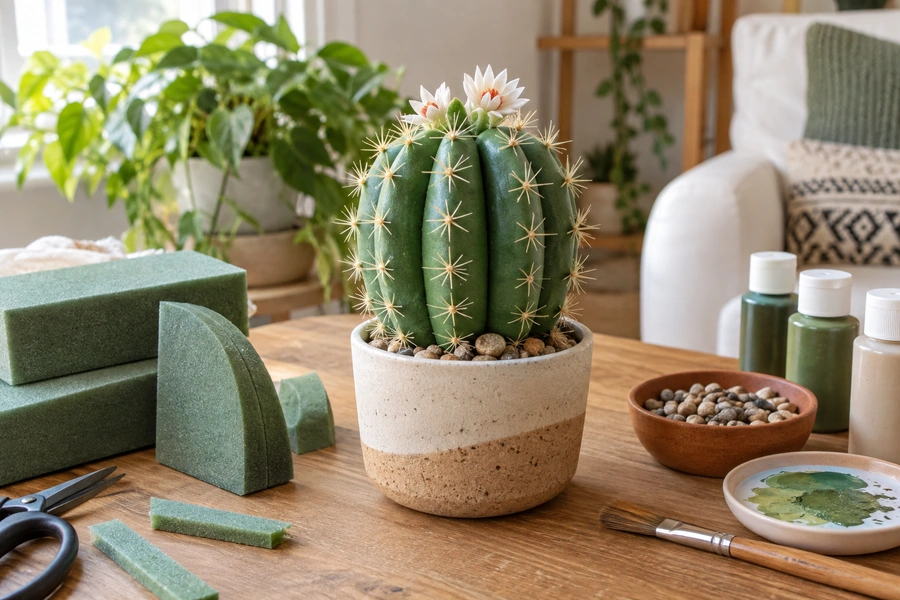
A fake cactus can add desert style to a room without watering, sunlight, sharp real spines, or the risk of losing a living plant.
I make a fake cactus by shaping foam, cardboard, felt, clay, socks, or smooth stones into a cactus form, painting it in natural green tones, adding ribs and imitation spines, and fixing it inside a weighted planter. For a realistic home décor piece, I prefer a shaped foam base with a textured surface and matte acrylic paint.
I do not think the hardest part is creating the basic cactus shape. The real difference comes from proportion, texture, color variation, branching, and the way I finish the planter.
What Materials Can I Use to Make a Fake Cactus?
A DIY cactus does not require one specific material. I can make a simple decorative version from recycled objects or build a more realistic artificial cactus from foam and textured coatings.
I can make a fake cactus from craft foam, cardboard, papier-mâché, felt, fabric, socks, clay, plastic packaging, or painted stones. Foam is one of my favorite materials for a larger realistic cactus because I can easily cut and shape it, while felt, socks, cardboard, and rocks work well for smaller decorative projects.
I Choose the Material Based on the Finished Look
Before I start, I decide what kind of fake cactus I want.
If I want a small craft for a desk or shelf, I do not need a complicated structure. Painted stones can work well. A current painted-rock cactus tutorial uses different rock shapes, several shades of green acrylic paint, and small white painted lines or dots to imitate cactus spines.
If I want a soft cactus for a bedroom, nursery, or children’s craft area, felt or fabric can make more sense. A felt cactus can be cut, sewn or glued, filled with stuffing, and placed in a small pot. One established felt-cactus method uses felt, stuffing, skewers, small stones, and foam to create upright decorative cacti.
I can even make a cactus from socks. One DIY method uses socks, stuffing, felt, rocks, foam, needle and thread, and hot glue to create several different faux cactus shapes.
For a larger decorative artificial cactus, I prefer rigid foam because it gives me more control over the silhouette.
| Material | Best for | Main advantage |
|---|---|---|
| Craft foam | Large faux cactus | Easy to cut and sculpt |
| Cardboard | Low-cost projects | Easy to find |
| Papier-mâché | Textured cactus | Creates an organic surface |
| Felt | Soft decorative cactus | Easy to sew and stuff |
| Socks | Quick soft cactus | Simple and inexpensive |
| Air-dry clay | Small detailed cactus | Good surface detail |
| Smooth stones | Mini cactus garden | Very durable |
| Recycled plastic | Flat or sculptural crafts | Reuses existing material |
My Preferred Materials for a Realistic Foam Cactus
For a medium-size indoor faux cactus, I usually prepare:
- Rigid craft foam or polystyrene foam
- A utility knife or foam-cutting tool
- Wooden dowels or skewers
- Lightweight papier-mâché or suitable craft texture paste
- Acrylic paint
- Several green paint colors
- A small brush
- A dry brush or sponge
- A decorative planter
- Floral foam or another stable filler
- Small stones, sand, or gravel
- Strong craft adhesive
- Optional artificial cactus flowers
A published papier-mâché cactus project uses foam as the internal shape, covers it with CelluClay, allows it to dry, and finishes the surface with acrylic craft paint.
I like this approach because the foam gives me structure while the outer layer prevents the finished cactus from looking like a piece of packaging foam.
I also avoid adding real needles when the cactus will be used as ordinary home décor. I can create the impression of spines with paint, short soft fibers, thread, or other safer decorative details.
How Do I Make a Fake Cactus Step by Step?
I can make many styles of faux cactus, but a foam-based version gives me enough structure for a realistic decorative plant without making the project unnecessarily difficult.
To make a fake cactus, I sketch the cactus shape, cut it from foam, round the edges, add branches with dowels or adhesive, cover the surface with a thin textured layer, let it dry, paint it with several green tones, add ribs and imitation spines, and secure the finished cactus in a weighted decorative pot.
Step 1: I Choose a Real Cactus Shape
I start with a visual reference.
I do not draw a random green fork and assume it will look like a cactus. Different cactus species have recognizable forms.
For a classic decorative cactus, I may use a saguaro-inspired shape with one tall central column and a few upward-growing arms.
For a simpler shape, I can make:
- A columnar cactus
- A barrel cactus
- A bunny-ear cactus
- A paddle cactus
- A clustered cactus
DIY artificial-cactus projects commonly reproduce several of these recognizable forms, including columnar, bunny-ear, barrel, and saguaro-style cacti.
I sketch the shape on paper first.
I keep the sides slightly irregular because a perfectly symmetrical cactus can look more like a logo than a plant.
Step 2: I Cut the Main Body
I transfer the outline to the foam.
Then I cut around the basic silhouette with an appropriate foam-cutting tool or craft knife. When using sharp tools, I work carefully on a protected surface and keep them away from children.
After the main form is cut, I soften the hard edges.
This step matters.
A real cactus normally has rounded volume. If I leave the foam completely flat with sharp 90-degree edges, the finished object may look like a sign rather than an artificial plant.
For a thick three-dimensional cactus, I can laminate several foam layers together before shaping the outer edge.
Step 3: I Add the Arms
If I want a saguaro shape, I create the arms separately.
I cut each arm from foam and attach it to the main stem. A short wooden dowel or skewer inside the joint can help stabilize the connection.
I avoid placing both arms at exactly the same height.
Natural asymmetry makes the result more believable.
One arm can be shorter. One can bend outward before turning upward. The central stem can also lean very slightly rather than standing with machine-like perfection.
Step 4: I Add Surface Texture
This is where I can make a basic foam shape look much better.
I apply a thin layer of lightweight papier-mâché, paper clay, or another compatible craft surface material.
Lia Griffith’s papier-mâché cactus method similarly places CelluClay over a foam form and allows the surface to dry before painting.
I do not try to make the coating perfectly smooth.
Small variations can create a more organic surface.
If I want visible cactus ribs, I form shallow vertical grooves while the surface is workable. I keep them fairly consistent but not mechanically perfect.
Then I allow the cactus to dry completely.
Step 5: I Paint the Base Color
I rarely use one flat green.
Instead, I create a base using two or three related shades.
For example, I might combine:
- Medium cactus green
- Dark olive green
- Muted yellow-green
- A small amount of gray
I apply the medium green first.
Then I use darker green in the grooves and slightly lighter green on raised areas.
Painted-rock cactus instructions also recommend using more than one shade of green to create additional depth and realism.
This simple color variation can make a major visual difference.
Step 6: I Add Areoles and Fake Spines
Cactus spines usually grow from small structures called areoles.
Instead of drawing random white lines everywhere, I first create small dots or clusters in a repeated pattern.
Then I add tiny pale strokes around them.
For a simple decorative cactus, painted spines are enough.
For a more dimensional indoor display, I can experiment with short pieces of light-colored thread or another soft craft material. I keep them short and controlled.
I avoid using exposed pins or sharp wire when the finished cactus will be placed where children or pets may touch it.
Step 7: I Plant the Fake Cactus
A realistic cactus needs a believable base.
I place floral foam, rigid foam, or another stable filler inside the planter. Then I insert a wooden dowel extending from the cactus into the base.
For a taller fake cactus, I make sure the pot has enough weight so the plant does not tip over.
I can add stones or another weighted material beneath the decorative top layer.
Then I hide the structural material with:
- Sand
- Fine gravel
- Small stones
- Decorative pebbles
Several DIY faux cactus projects use rocks, sand, or similar material to secure or visually finish the pot.
At that point, my basic fake cactus is complete.
How Do I Make a Fake Cactus Look Realistic?
A cactus can have the correct shape and still look obviously artificial. I find that realism comes from small imperfections rather than adding more decorative elements.
I make a fake cactus look realistic by copying the proportions of a real species, rounding the body, adding vertical ribs, using several muted green tones, creating organized areoles and spines, avoiding excessive gloss, and placing the cactus in a natural-looking pot with sand or gravel. Slight asymmetry usually makes the final plant more convincing.
I Avoid Bright Artificial Green
Color is often the first detail that makes a fake cactus look artificial.
Real cactus colors can include blue-green, gray-green, olive, dark green, or yellow-green. The surface can also change depending on age, light, and species.
I therefore avoid choosing the brightest green paint simply because it says “green.”
I usually mute the color slightly.
A tiny amount of gray, brown, yellow, or blue mixed into the green can produce a more natural result.
I Add Depth to the Ribs
For a ribbed cactus, I use light and shadow.
I paint the deepest grooves slightly darker. Then I use a dry brush with a lighter green across the raised portions.
I keep this effect subtle.
If the contrast becomes too strong, the cactus starts to look illustrated rather than natural.
I Keep the Surface Matte
Strong shine often makes artificial greenery look more plastic.
For most cactus styles, I prefer a matte or low-sheen surface.
If I need to protect the paint, I choose a compatible matte clear finish rather than automatically using a glossy coating.
I test it first because clear finishes can change the depth and color of paint.
I Study the Spine Pattern
Spines should support the shape instead of covering it randomly.
On many cacti, the areoles follow the ribs or repeat in an organized pattern.
I first mark the locations lightly.
Then I add the spine detail.
This keeps the cactus from looking like a green object with random white scratches.
I Use Imperfection Carefully
I do not make both sides identical.
I vary:
- Branch height
- Rib width
- Green tones
- Spine direction
- Surface marks
- Flower placement
The difference should be subtle.
I still want the cactus to look intentionally made, but I do not want it to look manufactured by a perfectly repeating pattern.
The Pot Can Increase or Reduce Realism
The planter is part of the final cactus.
I usually choose terracotta, stone-effect pottery, ceramic, or another container that works naturally with desert plants.
A brightly colored novelty pot can be attractive, but it creates a more playful craft style.
If I want realism, I keep the planter simple.
| Detail | Less realistic | More realistic |
|---|---|---|
| Green color | One bright green | Several muted greens |
| Shape | Perfect symmetry | Slight natural irregularity |
| Surface | Flat | Ribs and texture |
| Finish | High gloss | Matte or low sheen |
| Spines | Random marks | Organized areole pattern |
| Base | Visible foam | Sand, gravel, or stones |
| Pot | Undersized plastic | Properly scaled planter |
| Branches | Identical | Different heights and angles |
I find that these details matter more than adding complicated decorations.
What Is the Easiest Way to Make a Fake Cactus?
Not every faux cactus needs a sculpted foam structure. When I want a quick project, I simplify the materials instead of simplifying the visual idea.
The easiest fake cactus can be made by painting smooth oval rocks green, adding white spine details, and placing them upright in a pot filled with gravel. For a soft version, I can sew or glue green felt or a green sock into a cactus shape, add stuffing, and secure it inside a small planter.
Painted Rocks Are My Simplest Option
For a beginner project, painted stones are difficult to beat.
I select smooth stones with shapes that already resemble cacti.
A long stone can become a columnar cactus.
A round stone can become a barrel cactus.
Several stones can create a miniature cactus garden.
I clean and dry them first.
Then I paint each stone with green acrylic paint. After the base color dries, I use a fine brush or paint marker to create ribs, dots, and spine patterns.
A recent craft guide uses this same basic method and recommends varying rock shapes and using white lines or dots for the cactus spines.
I place the finished rocks in gravel.
No complicated frame is required.
Felt Works Well When I Want Something Soft
Felt is another easy option.
I cut two matching cactus shapes.
I stitch or glue around the edges while leaving a small opening.
Then I add stuffing.
After closing the shape, I secure it to a skewer or support and place it inside a small pot.
I can add stitched white lines for ribs and small felt flowers at the top.
This version works especially well when I want a playful handmade style rather than botanical realism.
Cardboard and Recycled Materials Keep the Cost Low
Cardboard can create a simple three-dimensional cactus when I cut two matching profiles with central slots and slide them together.
An upcycled faux cactus project uses a similar interlocking method with decorated recycled plastic packaging.
I can adapt the same idea to sturdy cardboard.
This is useful for party decorations, classroom crafts, temporary displays, and large props.
I would not expect untreated cardboard to perform well outdoors or in damp areas.
For indoor temporary décor, however, it can be a very efficient material.
My insights: How to Make a Fake Cactus
The basic craft is easy, but I think the best method depends on whether I want a quick handmade object, a soft decorative cactus, or a realistic artificial plant.
I make the most convincing fake cactus by starting with a rigid foam shape, building realistic volume and ribs, adding a thin textured coating, painting several natural green tones, placing imitation spines in organized patterns, and securing the finished plant in a weighted pot with gravel. For simpler projects, painted stones, felt, socks, cardboard, and recycled materials also work well.
My First Insight: I Choose the Technique Before Buying Materials
I do not begin by collecting random craft supplies.
I first decide what the finished cactus needs to do.
If I want a small children’s craft, I may choose paper, felt, or cardboard.
If I want a decorative desk cactus, painted rocks are enough.
If I want a soft object, fabric or socks work well.
If I want a realistic floor-standing artificial cactus, I need a stronger internal structure.
That decision controls the entire project.
| Goal | Method I would choose |
|---|---|
| Very easy DIY | Painted rocks |
| Children’s project | Paper or cardboard |
| Soft décor | Felt or socks |
| Small realistic cactus | Clay |
| Large home décor cactus | Foam + textured coating |
| Temporary event prop | Cardboard or foam |
| Sculptural handmade piece | Papier-mâché |
My Second Insight: Shape Matters More Than Extra Decoration
I find that people often focus on cactus spines too early.
If the silhouette is wrong, hundreds of tiny spine marks will not make the cactus realistic.
I start with proportion.
The central body needs enough width.
The arms need believable angles.
The pot must be large enough.
The cactus should not appear perfectly symmetrical.
Only after the shape works do I add surface detail.
This is also why foam is useful for larger projects. Published faux cactus tutorials repeatedly use foam because it can be cut into the basic plant silhouette and shaped before the decorative finish is applied.
My Third Insight: Color Variation Creates More Realism Than Bright Green
A single solid green quickly tells me that I am looking at a craft object.
I prefer several related colors.
I put darker shades into recesses.
I use muted medium green for the main surface.
I add a little lighter green where the form would naturally catch light.
I may also use a tiny amount of dusty gray or blue depending on the cactus style.
The effect should be subtle.
I am not trying to paint stripes. I am trying to stop the plant from looking flat.
My Fourth Insight: The Base Should Look as Finished as the Cactus
I never consider the project finished when the cactus itself is painted.
The planter matters.
A visible piece of foam at the bottom can immediately reveal the construction.
I hide it with gravel, sand, pebbles, or another appropriate top dressing.
I also add enough weight to stabilize taller cacti.
This is both a visual and practical improvement.
Several DIY methods use rocks or sand as part of the final display, which makes sense because these materials naturally support a desert-style presentation.
My Fifth Insight: The Best Fake Cactus Is Designed for Its Viewing Distance
This is the part I find most useful.
I do not need the same level of detail for every project.
A fake cactus on a high shelf may only need a strong silhouette and good color.
A floor cactus beside a sofa needs better branches, texture, and potting details.
A small cactus placed on a desk will be viewed very closely, so the ribs, painted spines, and surface finish become more important.
For event décor, the cactus may need to look strong from several meters away. In that case, proportion and color may matter more than tiny spine detail.
So when someone asks me “How to make a fake cactus?”, I do not think there is only one correct material or one correct craft technique.
I use the simplest construction that still looks convincing from the distance where people will normally see it.
For a realistic home décor cactus, that usually means foam for structure, a thin textured coating, matte acrylic color, subtle shading, organized spine details, and a properly finished planter.
For a quick decorative project, painted stones or felt can achieve the same cactus idea with much less work.
The best method is the one that matches the size, style, location, and level of realism I actually need.
Conclusion
I can make a fake cactus from many materials, but realistic shape, natural green variation, subtle texture, believable spine patterns, and a well-finished planter make the biggest difference.