
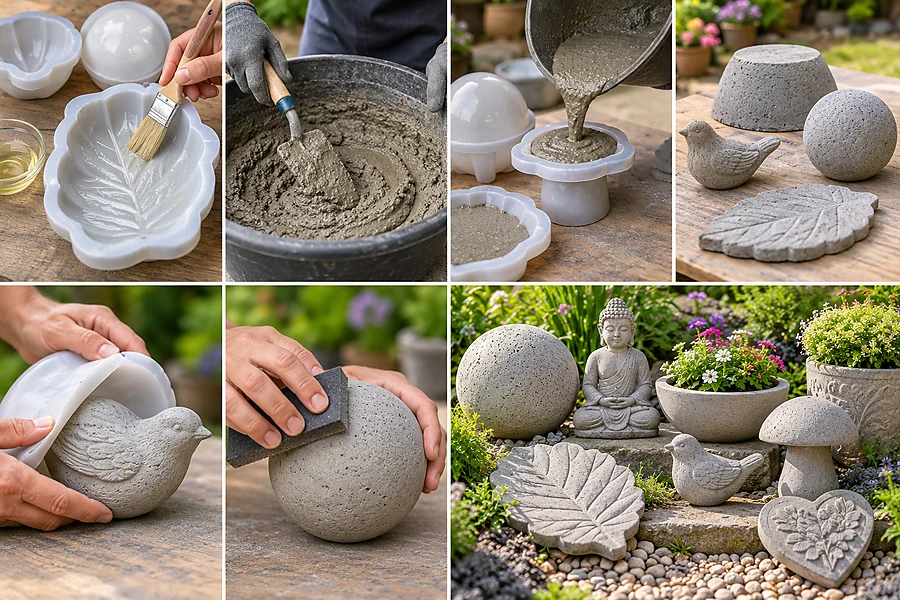
Concrete garden ornaments can look expensive, but poor molds, watery concrete, trapped air, or rushed curing can leave them cracked, weak, and full of surface holes.
To make concrete ornaments for gardens, choose a mold, prepare it with the correct release system, mix a suitable fine concrete or mortar product, pour and vibrate the mixture, cure it slowly, demold carefully, then finish and seal it if needed. Good mold preparation, controlled water, and patient curing matter more than complicated equipment.
The same basic method can make garden spheres, leaves, stepping stones, small statues, planters, mushrooms, birds, plaques, and decorative bowls. The details change with size, but the casting sequence stays surprisingly consistent.
How Do I Create Molds for Concrete Garden Ornaments?
Concrete garden ornaments can be cast in purchased molds, household containers, flexible silicone molds, or custom rubber molds made from an original model.
For beginners, use a simple flexible plastic or silicone mold with few undercuts. For detailed repeatable ornaments, create a silicone, latex, or polyurethane rubber mold around a master model and support flexible molds with a rigid shell when necessary. Always design the mold so the hardened concrete can be released without breaking delicate details.
Start With a Simple Shape
Your first concrete ornament does not need to be a detailed angel statue.
Begin with something easy:
- Bowl
- Sphere
- Leaf
- Stepping stone
- Mushroom
- Small planter
- Simple plaque
These shapes let you learn how concrete:
- Flows
- Traps air
- Sets
- Releases
- Cures
before you attempt intricate noses, fingers, wings, or thin decorative edges.
Option 1: Use Ready-Made Molds
Commercial molds are the simplest choice.
They may be made from:
- Silicone
- Plastic
- Rubber
- Polyurethane
Flexible molds are especially useful for detailed castings because you can peel the mold away from the hardened piece instead of forcing the ornament out.
Option 2: Repurpose Household Containers
For simple ornaments, you may already have usable forms.
Examples include:
- Plastic bowls
- Buckets
- Food containers
- Plant pots
- Bottles
- Trays
QUIKRETE demonstrates small concrete casting projects using ordinary bottles as forms, showing how simple household shapes can become casting molds.
For a planter or hollow ornament, use:
one larger outer container + one smaller inner container
The gap between them becomes the concrete wall.
Option 3: Make a Silicone or Rubber Mold
If you want to reproduce:
- An animal
- Face
- Sculpture
- Decorative plaque
- Detailed leaf
- Existing ornament
start with a master model.
The basic process is:
- Clean the original.
- Repair small defects.
- Seal porous materials if required.
- Fix the model inside a mold box.
- Mix the mold rubber according to its instructions.
- Pour or brush it around the master.
- Let the rubber cure fully.
- Remove the mold box.
- Separate the mold from the master.
Detailed mold-making guides commonly use latex, polyurethane, or silicone-style flexible molding systems for concrete casting.
Avoid Deep Undercuts
An undercut is a shape that mechanically traps the casting.
Imagine a statue with:
- Arms pressed against the body
- Deep folds
- Curled tails
- Hooks
- Hollow recesses
A rigid one-piece mold may lock around those details.
Complex ornaments may require:
- Multi-part molds
- Flexible rubber
- Strategic seam lines
For beginners, simpler is better.
Support Flexible Molds
Wet concrete is heavy.
A soft silicone mold can bulge outward when filled.
Support it with:
- Sand
- A wooden frame
- A fitted box
- A rigid mother mold
so the finished ornament retains the intended shape.
Make Sure the Mold Is Level
Place the mold on a:
- Flat board
- Stable workbench
- Level concrete surface
before pouring.
An uneven mold can create:
- Sloping bases
- Uneven walls
- Tilted ornaments
Use shims if necessary.
Should You Use Mold Release?
That depends on the mold material and manufacturer’s instructions.
Some casting systems require or benefit from a compatible release agent.
Others, especially some silicone molds, may release easily without one.
When release is required, apply a thin and even coating rather than flooding the surface.
Too much material can obscure fine details or leave surface marks.
Five Easy Beginner Mold Ideas
| Ornament | Simple Mold |
|---|---|
| Garden sphere | Plastic globe or round form |
| Leaf plaque | Real leaf + shallow tray |
| Stepping stone | Plastic tray |
| Planter | Two nested containers |
| Decorative bowl | Large bowl + smaller bowl |
What Is the Best Concrete Mix for Garden Ornaments?
The best mix depends on ornament size and surface detail. Small detailed castings generally benefit from finer aggregate, while larger ornaments can use conventional concrete mixes.
For small detailed garden ornaments, use a fine concrete, countertop mix, mortar-style casting mix, or another product intended for detailed concrete work. For thicker, larger ornaments, standard concrete can work well. Add only the water specified by the product manufacturer; excessively wet mixes may be easy to pour but can reduce strength and increase surface defects.
Concrete and Cement Are Not the Same Thing
These words are often used interchangeably in DIY projects.
But they are different.
Cement is a binder.
Concrete generally combines:
- Cement
- Fine aggregate
- Coarse aggregate
- Water
Mortar typically uses cementitious binder, sand, and water without the larger stone found in conventional concrete.
For very fine ornament details, coarse gravel can become inconvenient.
Beginners Can Use a Bagged Mix
For consistency, a ready-mixed bag is often easier than creating your own recipe.
That removes uncertainty about:
- Cement proportion
- Sand proportion
- Aggregate proportion
Then you mainly need to control the water.
QUIKRETE’s small decorative casting instructions use its commercial countertop mix for concrete vases, while larger cast projects use products such as 5000 Concrete Mix.
Do Not Add Too Much Water
This is one of the most common beginner mistakes.
The thinking is:
More water makes concrete easier to pour.
That is true.
But too much water can also create:
- Lower strength
- Greater shrinkage
- Poorer surface quality
- More segregation
Follow the packaged mix instructions instead of trying to make the concrete as liquid as paint.
For many castings, you want a mixture that is workable enough to fill details but not excessively soupy.
Mix Small Batches
Concrete has a limited working time.
For decorative casting, smaller batches give you more control.
A useful process is:
- Put the required dry mix in a clean tub.
- Measure water.
- Add most of the water gradually.
- Mix thoroughly.
- Adjust only as the product instructions allow.
Do not estimate water casually each time if you want several ornaments to have similar:
- Strength
- Color
- Texture
Fill the Fine Details First
If your mold contains:
- Faces
- Lettering
- Leaf veins
- Feather patterns
- Small decorative edges
work a small amount of concrete into those areas before filling the rest of the mold.
This reduces hidden voids.
Fill the Mold in Stages
For many ornaments:
- Add part of the mix.
- Work it into corners.
- Tap or vibrate.
- Add more concrete.
- Vibrate again.
- Level the back.
QUIKRETE specifically recommends vibrating cast molds to bring trapped air toward the surface.
Remove Air Bubbles
Air can create:
- Pinholes
- Voids
- Missing detail
- Weak corners
You do not necessarily need a professional vibrating table.
For small DIY molds, you can gently:
- Tap the sides
- Tap the supporting board
- Use a rubber mallet against the exterior
- Move a suitable tool through the mixture carefully
The goal is to settle the concrete, not splash it out of the mold.
Do Large Ornaments Need Reinforcement?
Sometimes.
Large or thin objects may benefit from suitable reinforcement.
Examples include:
- Long plaques
- Large planters
- Thin benches
- Tall statues
Reinforcement must be positioned properly inside the concrete rather than sitting directly on the surface.
For small thick ornaments such as garden mushrooms or simple spheres, reinforcement may not be necessary.
Basic Tool List
| Tool | Purpose |
|---|---|
| Mixing tub | Holds concrete |
| Measuring container | Controls water |
| Trowel | Mixing and filling |
| Mold | Creates shape |
| Waterproof gloves | Skin protection |
| Eye protection | Splash/dust protection |
| Rubber mallet | Gentle vibration |
| Plastic sheet | Moisture control during curing |
| Brush | Finishing/cleaning |
| Level | Keeps mold flat |
Protect Yourself While Mixing
Wet cementitious materials can irritate or chemically burn skin. OSHA recommends alkali-resistant gloves, protective clothing, waterproof footwear where appropriate, and eye protection for wet-concrete exposure.
Dry dust also deserves attention.
Avoid:
- Throwing dry powder into the air
- Sweeping fine concrete dust aggressively
- Dry grinding without dust control
CDC/NIOSH notes that cutting, grinding, polishing, and drilling concrete can generate respirable crystalline silica.
For a home project, reduce dust at the source whenever possible and follow the product’s safety instructions.
How Long Do Concrete Garden Ornaments Take to Cure?
Concrete may become hard enough to remove from a mold relatively quickly, but that does not mean curing is complete.
Many small castings can be demolded after roughly 24–48 hours, while larger or more delicate pieces may need several days before safe removal. Continue moisture-conscious curing after demolding. Concrete continues gaining strength over time, so avoid treating a newly cast ornament as fully mature simply because its surface feels hard.
Setting Is Not the Same as Curing
Concrete does not simply “dry” into stone.
The cement reacts with water through hydration.
If a fresh casting loses moisture too quickly, its final performance can suffer.
That is why curing matters.
Cover the Mold
After pouring:
- Leave the mold level.
- Protect it from disturbance.
- Keep it out of harsh drying conditions.
- Use plastic sheeting when appropriate.
QUIKRETE’s planter project recommends covering the concrete with plastic during curing to control moisture and allowing at least four days before removing that particular form.
Its smaller vase project allows at least 24 hours for plastic-bottle castings, demonstrating why demolding time varies with project geometry and mold type.
Do Not Demold by the Clock Alone
Check:
- Size
- Thickness
- Temperature
- Mix used
- Mold flexibility
- Fragility of details
A simple thick stepping stone can tolerate earlier handling better than a statue with:
- Thin ears
- Small fingers
- Narrow wings
If the ornament feels fragile, give it more time.
Demold Gently
For flexible molds:
- Support the concrete.
- Peel the mold away gradually.
- Avoid pulling on thin decorative details.
For rigid molds:
- Remove screws or sides if possible.
- Break the seal carefully.
- Avoid aggressive prying against young concrete.
If the piece does not want to release, forcing it can destroy hours of work.
Continue Curing After Demolding
QUIKRETE recommends moisture-curing some cast-concrete projects for approximately three to five days under plastic for improved strength.
For the ornament:
- Keep it shaded.
- Prevent rapid moisture loss.
- Follow the concrete-product instructions.
Do not place a newly demolded ornament immediately into intense summer sun just because it feels hard.
When Can You Sand It?
First ask whether sanding is actually necessary.
Minor rough edges can sometimes be corrected early with:
- Hand tools
- Light rubbing
- Careful scraping
Grinding hardened concrete can create hazardous silica-containing dust.
CDC/NIOSH recommends dust-control approaches for concrete grinding and similar work.
Where possible:
- Minimize dry sanding
- Use appropriate wet methods
- Use dust extraction
- Follow tool and PPE instructions
Common Curing Mistakes
| Mistake | Likely Result |
|---|---|
| Demolding too early | Broken details |
| Strong sun immediately | Rapid moisture loss |
| Moving mold while soft | Distorted piece |
| Very watery mix | Weaker casting |
| No vibration | Surface voids |
| Aggressive grinding | Dust exposure |
| Painting too early | Poor coating performance |
Give Paint and Sealers a Mature Surface
A concrete ornament can feel hard long before it is ready for every coating system.
Check the paint or sealer manufacturer’s required:
- Cure age
- Moisture condition
- Surface preparation
- Temperature
Do not assume “24 hours old” means “ready for any paint.”
Can I Add Color to Concrete Garden Ornaments?
Yes. Concrete ornaments can be colored in the mix, stained, painted after curing, or left natural and protected with a compatible finish.
You can color garden ornaments with integral concrete pigment before casting or use compatible exterior masonry paint, stain, or other decorative finish after adequate curing. Integral color creates color throughout the mix, while surface finishes offer more artistic detail. Always follow the pigment, paint, and concrete manufacturer’s compatibility and curing instructions.
Option 1: Integral Concrete Color
Integral pigments are mixed into the concrete before pouring.
Advantages:
- Color is not only on the surface.
- Chips may be less visually obvious.
- Multiple castings can be coordinated.
QUIKRETE’s cast-concrete guidance specifically allows liquid cement color to be added before the concrete is poured.
Measure carefully if making several matching ornaments.
Small changes in:
- Pigment
- Water
- Batch size
can create color variation.
Option 2: Paint the Finished Ornament
Paint gives the greatest decorative control.
You can create:
- White stone effect
- Bronze effect
- Terracotta
- Painted animals
- Colored mushrooms
- Antique finish
- Mossy aged effect
Use coatings intended for:
- Concrete
- Masonry
- Exterior exposure
when the ornament will live outdoors.
Option 3: Use Stain or Washes
If you want the concrete texture to remain visible, try a compatible:
- Concrete stain
- Thin masonry wash
- Layered patina system
This can produce a more natural finish than opaque paint.
Option 4: Leave It Natural
Gray concrete can be attractive by itself.
Natural concrete works particularly well for:
- Spheres
- Minimalist planters
- Architectural objects
- Modern garden sculpture
It will also visually change outdoors with weathering.
Should You Seal Concrete Garden Ornaments?
Sealing may help reduce water absorption or protect certain decorative finishes, but the correct product depends on:
- Concrete condition
- Climate
- Paint system
- Desired appearance
Some sealers darken concrete or add sheen.
Always test first on:
- The underside
- A sample casting
before coating the visible surface.
Matte Usually Looks More Natural
For stone-style ornaments, I usually prefer:
- Matte
- Low-sheen
rather than a thick glossy surface.
High gloss can make a handmade stone-effect ornament resemble plastic.
There are exceptions.
Gloss can work intentionally for:
- Bright modern sculptures
- Colorful mushrooms
- Decorative glazed effects
Six Finishing Styles
| Style | Finish |
|---|---|
| Natural stone | Unpainted gray |
| Antique limestone | Warm off-white wash |
| Aged garden | Dark wash + lighter dry brush |
| Bronze statue | Dark base + metallic highlights |
| Modern | Solid black/white |
| Colorful garden | Exterior masonry colors |
My Insights: How to Make Concrete Ornaments for Gardens
The most successful concrete ornaments are not produced by using the most complicated recipe. They come from controlling a few basic variables consistently.
To make durable concrete garden ornaments, start with a simple mold, use an appropriate bagged mix with controlled water, work concrete into fine details, vibrate out trapped air, cure slowly, demold patiently, and use an outdoor-compatible finish when needed. For beginners, mold design, water control, curing, and safe dust handling matter more than elaborate decoration.
My First Insight: Begin With the Mold, Not the Concrete
Concrete reproduces the mold.
If the mold has:
- Scratches
- Leaks
- Warping
- Bad seams
the casting will reproduce them.
Spend extra time preparing the form.
It is usually easier to fix a mold before pouring than repair every ornament afterward.
My Second Insight: A Simple Bagged Mix Is Often Better for Beginners
You can create your own cement-and-aggregate recipe.
But that introduces more variables.
For a first project, a suitable commercial mix gives you a repeatable starting point.
Then you can focus on:
- Water
- Vibration
- Mold quality
- Curing
My Third Insight: Water Is Not a Shortcut
When the mixture feels difficult to place, the temptation is to keep adding water.
Do not improvise beyond the product instructions.
Instead, improve placement through:
- Smaller batches
- Better tools
- Tapping
- Vibration
- A mix designed for the detail you need
My Fourth Insight: Air Bubbles Are Mostly a Process Problem
A pinhole is not always a disaster.
But large voids around:
- Faces
- Lettering
- Edges
usually mean concrete did not fully contact the mold.
Work the first layer carefully into detailed surfaces.
Then vibrate.
My Fifth Insight: Make Your First Ornament Thick and Forgiving
Avoid beginning with:
- Thin wings
- Delicate antlers
- Narrow fingers
- Long unsupported projections
Start with a shape that has mass.
Good beginner projects:
- Stepping stone
- Garden sphere
- Leaf plaque
- Small mushroom
- Thick decorative bowl
Once you understand the material, move into more delicate casting.
My Sixth Insight: Cure Longer Than Your Impatience Wants
QUIKRETE examples show that demolding schedules vary substantially—from around 24 hours on small vase forms to several days on larger cast pieces—and recommend moisture management during curing.
If you are unsure whether a fragile ornament is ready, more curing time is usually safer than aggressive early demolding.
My Seventh Insight: Separate Casting From Decorating
Do not try to finish every step immediately.
Think in stages:
Day/Stage 1
- Mold
- Mix
- Pour
Next stage
- Demold
- Continue curing
Later
- Clean edges
- Finish surface
Final
- Paint/seal if desired
- Install outdoors
This reduces rushed mistakes.
My Eighth Insight: Make a Test Piece Before a Large Statue
Before using an entire bag of material in an expensive mold, cast a smaller sample.
Test:
- Concrete consistency
- Pigment
- Release system
- Surface finish
- Curing process
If you want colored ornaments, make several small test tiles first.
My Ninth Insight: Think About Weight Before You Pour
Concrete becomes heavy quickly.
A large ornament should ideally be cast near its final location or designed so it can be moved safely.
Before making a huge planter or statue, ask:
- How will I lift it?
- Can the mold support the wet weight?
- Can the finished base support it?
- Will frost or soft ground cause it to tilt?
Do not discover the answer after the ornament is finished.
My Tenth Insight: Outdoor Durability Begins Before the Sealer
Sealer cannot rescue poor concrete.
A durable garden ornament begins with:
- Correct mix
- Controlled water
- Good compaction
- Adequate curing
- Suitable thickness
The finish comes afterward.
My Recommended Beginner Workflow
| Step | What to Do |
|---|---|
| 1 | Choose a simple ornament |
| 2 | Prepare a stable mold |
| 3 | Set up PPE and work area |
| 4 | Mix according to product directions |
| 5 | Fill fine details first |
| 6 | Pour remaining concrete |
| 7 | Tap/vibrate mold |
| 8 | Level and cover |
| 9 | Cure before demolding |
| 10 | Continue curing |
| 11 | Finish only when appropriate |
| 12 | Install on a stable garden surface |
My Preferred First Project: A Concrete Leaf Ornament
A leaf plaque is a good beginner project because it teaches:
- Texture transfer
- Shallow casting
- Air removal
- Demolding
without requiring a complex multi-part mold.
Use a large textured leaf as the visual pattern and create a supported shallow mold beneath it.
Once the concrete is adequately cured, remove the leaf and use the casting as:
- Garden art
- Decorative plaque
- Small landscape accent
My Preferred Second Project: A Garden Sphere
A sphere teaches a different skill:
- Three-dimensional casting
- Mold stability
- Weight management
Several spheres at different sizes can create a strong modern garden feature without requiring intricate sculpture.
Safety Should Stay Part of the Process
Do not treat safety as an optional paragraph after the creative steps.
Wear appropriate eye and skin protection when handling cement-based mixes. Wet concrete can cause chemical burns.
When drilling, cutting, or grinding hardened concrete, control silica-containing dust rather than creating a dry cloud around the work area. CDC/NIOSH identifies concrete as a potential source of respirable crystalline silica and recommends control measures to reduce exposure.
My Final Formula
For reliable garden ornaments, remember:
good mold + suitable mix + controlled water + vibration + patient curing + appropriate finish
If one of those stages is poor, expensive pigments or complicated molds will not compensate for it.
Start simple.
Make one successful casting.
Record:
- Mix used
- Water amount
- Demolding time
- Pigment amount
- Finish
Then repeat the process.
Consistency is what turns an experimental garden craft into a reliable method for producing attractive concrete ornaments.
Conclusion
Use a simple mold, suitable concrete mix, minimal excess water, vibration, and patient curing. Once the process is consistent, experiment with pigments, finishes, larger molds, and detailed garden sculptures.